DIY hanging cabinet. Wall mounted French cabinet. We make it ourselves. Making a folding kitchen table
This lovely wall herb storage cabinet has a unique look with its gracefully rounded top and bottom, exquisite colors and carved roll handle. This french wardrobe made of good things pine boards, connected by tongues.
The outside is painted with thinned acrylic paint and treated with teak oil. To obtain a greenish tint, green and green paints are mixed here. blue colors, however, you can choose a color of your choice, such as bright red or even white.
§ To make such a cabinet, you need the following materials and tools (⇓)
Tools - a workbench with a vice and clamps, a compass, a pencil, a ruler, a square, a jointer, a screwdriver, jigsaw machine, sanding block, frame bow saw, 7mm diameter countersink drill and plug cutter, electric drill, twist drills with a diameter of 10 and 3 millimeters, an awl and two brushes. Others may also be useful useful tools: cordless screwdriver, grinder, marking knife.
Materials – pine (see specification); 50 steel screws with countersunk heads 35 millimeters; sandpaper with grit 80 and 150; 2 overhead brass hinges of suitable size with screws; teak oil; acrylic paint [see SPS "Wall Paint" and "Architex" paints].
Specification – 4 tongue and groove boards 700 × 89 × 15 mm (2 doors and 2 planks); 4 tongue and groove boards 650 × 89 × 15 mm (rear wall); 4 tongue and groove boards 650 × 89 × 15 mm (sidewalls); 3 boards 312 × 170 × 18 mm (shelves); 8 boards 160 × 30 × 18 mm (2 crossbars for doors and 6 supports for shelves) - all pine blanks. If you want to cut a more complex wrap, take linden, which is easy to process.
§ Making a French wall cabinet with your own hands: a step-by-step guide (⇓)
1 . Study the design carefully and pay attention to the narrowing at the ends of adjacent boards. Using a jointer, bring the workpieces to the desired size (Fig. 1).

2 . Fasten the two door boards together with two 160mm long crossbars. Secure each door board with two screws (Fig. 2).
3 . Connect all 4 boards 700 mm long (2 door boards in the center and 2 planks at the edges), bend the ruler and draw curved contours along the ends (Fig. 3). If necessary, you can call someone for help if you can’t cope on your own.

4 . Using a mechanical jigsaw, cut the ends of the door along the curved contours (Fig. 4). Do the same with the planks. Sand the cuts sandpaper and slightly round their edges.
5 . Frame bow saw Carefully bevel one end of each 160mm long support piece at a 45 degree angle (Figure 5).

6 . Attach 160mm long supports to the ends of three 312mm long shelf pieces with screws. The side edges of the supports should be flush with the ends of the shelves (Fig. 6). Use a sanding block to clean all edges and ends.

7 . Attach three shelves with screws to the sidewalls connected in pairs (Fig. 7). The middle shelf is positioned with the supports on the underside of the shelf and their 45° angled ends facing the front of the cabinet.
8 . Attach the back boards (Fig. 8) into place by driving screws through them into the edges of the shelves and sides. The screw heads must be flush with the surface. Attach the front slats of the cabinet with screws, first countersinking the holes so that the screw heads are recessed.

9 . Using a knife, cut out the three components of the door wrap - the part that is attached with a screw to the side wall of the cabinet, the latch and the central swivel. There is no need to exactly copy the given sample, give free rein to your imagination. Drill a 10 mm diameter hole in the latch and install the swivel in place. Drill a hole with a diameter of 3 mm in the side wall of the cabinet and attach it with a dowel 100 long and 3 mm in diameter, cut from scrap. Continue whittling the wrap until it takes on a pleasing shape (Fig. 9). Wrap the stick in sandpaper and sand the planed parts.
10 . Replace the door, use an awl to make holes for the screws and screw on the hinges (Fig. 10). Depending on the size of the hinges, place one about 140 mm from the top, and the second about 100 mm from the bottom. Using fine sandpaper, go over the surface of the brass hinges to dull their shine.

11 . Attach a wrap to the side of the cabinet and use it to locate the latch. Mark the axis of rotation with a pencil and drill a hole with a diameter of 10 mm. Insert the central peg into it (Fig. 11). Drill a 3 mm diameter hole in the peg with inside doors. Use a knife to cut out the pin and insert it into the hole to secure the wrap.
Sand all surfaces with sandpaper. Dilute the paint with water and paint the cabinet. When the paint is dry, sand all surfaces with sandpaper, scratching the paint until the wood grain is revealed, and rub with teak oil. Use a chisel to cut out plugs from scrap wood and glue them into the countersunk holes to hide the screw heads.
Rice. 12. Homemade wall cabinet: other design options (⇓)

Helpful advice !
Experiment before painting. Dilute some acrylic paint with water and paint a piece of scrap wood, then sand and oil as described above. If you want a lighter or darker shade, add more water or paint to the mixture accordingly. Remember that end-grain wood grains absorb more paint and therefore become darker.
3.3333333333333 Rating 3.33 (3 Votes)
For a complete set of any kitchen interior A wall cabinet is considered a necessary furniture accessory. They are manufactured at furniture factories, small companies, as well as at home. To produce wall cabinets with your own hands, you need to know some of the nuances of manufacturing technology, as well as analyze the work process in detail.
Types of wall cabinet designs
In order to start working on making a kitchen set with your own hands, you need to understand in more detail what the main types of wall cabinets are and their purpose. Wall cabinets are usually classified in two ways - by purpose, and also by type of construction.
According to their purpose, the types of wall-mounted structures are usually divided into: end cabinets, cabinets with drying, open cabinets and cupboards.
Based on the type of construction, cabinets with horizontal and vertical opening are distinguished. The first option is considered more common, since for the manufacture of a horizontal door only a standard fastening (canopies) is required, and for a vertical door a hydraulic cylinder is required.
Another criterion by which wall cabinets can be distributed is the installation location. This furniture set can be straight or angular (end). Corner wall cabinets, of course, have more complex design, and their production requires not only more material but time, but they are much more convenient to use and take up less space.
Cabinets with drying are very practical look kitchen cabinets, which in most cases are usually located next to the sink. A dish dryer is placed inside such structures. A very convenient option for any kitchen.

What material to choose for a wall cabinet with your own hands
The materials for making wall cabinets with your own hands can be very different. This includes plywood and plastic, as well as chipboard, chipboard, natural wood and so on.
| Materials for wall cabinets | |
| Plywood | It has durable characteristics, which is complemented by a fairly high price. |
| Plastic | It is widely used and has a reasonable price. Recommended for making bathroom furniture. |
| Chipboard | It has a reasonable price, the material is very popular in use. It is not very reliable for hanging structures, since looseness causes the hinges of the structure to become loose. |
| laminated chipboard | Has a wonderful appearance affordable price. Does not require additional finishing work. |
| Natural wood | It is reliable and has a rich appearance. The disadvantage is the high market prices for the material. |
More expensive options are plywood, plastic and natural wood. Chipboard and laminated chipboard have become affordable and very popular among users. These materials have an affordable market price compared to others and are very convenient to use. Chipboard itself requires extensive finishing work in the process, and laminated chipboard is a ready-made laminated material, which is distinguished by its reliable strength and attractive appearance. Best for making kitchen sets(cabinets) use the last option, which we will focus on in our article.
For installation process we will need the following necessary tools to make a wall cabinet with your own hands:
- roulette;
- Screwdriver Set;
- drill;
- level;
- pencil;
- hacksaw for metal;
- hammer, etc.
But before you begin installation work, first of all you need to draw up a drawing of the future design for the kitchen.

DIY cabinet design
Before directly starting the installation work, and then the actual installation of the wall cabinet, the first thing the master needs to do is decide on the dimensions of the furniture. Making a sketch of a wall cabinet with your own hands involves taking accurate measurements of the future design and depicting them in detail on paper, which will greatly facilitate the work and insure against possible shortcomings with the dimensions of the parts.
Particular attention should be paid to the installation location of the cabinet, to the design of the kitchen itself and its dimensions. If there is not so much space in the room, it would be wise to create corner cupboard, which will significantly save the used space. For a craftsman who is making furniture with his own hands for the first time, experts recommend starting with a straight, small cabinet size.
Additional elements for making a cabinet with your own hands
When making furniture with your own hands, it is important not only to save your family budget, but also to do the work as accurately as possible so that the products last for more than one year. Therefore, another point that requires attention in the process of creating designs for the kitchen is the choice of fittings for the wall cabinet. Furniture hinges, locks, handles, supports, shelf holders, cup holders, couplers - all this is the very necessary additional material that no one can do without. professional workers, nor home craftsmen.
Accessories for wall cabinets also include a variety of designs. lifting mechanisms for doors, complete dish dryers, shelves. All these purposes make the furniture easy to use and significantly save space in the kitchen. When purchasing all these auxiliary parts, it is necessary to take into account the design model, components of the wall cabinet and, of course, the material of the product, which is so important not to be damaged during operation. Some craftsmen separately buy not only handles for their furniture, which should fit harmoniously into the existing interior, but also such details as doors and drawers. For example, glass door always brings elite, expensive decorative notes to the decor.

DIY straight wall cabinet
The simplest wall cabinet model includes:
- top and bottom parts;
- two sidewalls;
- back wall;
- shelves;
- door in two halves.
This is one of the options possible design, each craftsman has the opportunity to optionally equip a wall cabinet of his own production. This process must have a special procedure for making a wall cabinet with your own hands.
According to the given dimensions, it is necessary to measure and cut from the sheet Laminated chipboard details future furniture. When all the parts are ready, you can proceed to assembly. It is better to carry out this moment in the following sequence:
1. To begin with, drill the places in the side walls that are intended for shelf holders. Next, a place is prepared for attaching hinges under the doors.
2. The sides, top and bottom of the cabinet are connected in sequence. Then the shelf supports are attached.
4. Doors are attached to hinged hinges, and shelves are also equipped.
5. The next step is to attach the corner, which will facilitate the installation of the wall cabinet.
DIY corner wall cabinet
The production of various types of hanging structures is based on the very simple version. This also applies to a do-it-yourself corner wall cabinet for the kitchen, made from the common cheap chipboard material. For the future product, you can take standard dimensions as a basis: 600 * 600 mm from the corner, and a furniture height of 720 mm.
The body of this design consists of two side walls of chipboard, and the facade itself is 400 mm wide. A special feature of the product is the internal shelf, which is recommended to be slightly recessed inward for ease of use of any door (so that it closes tightly). When all the parts have been sawn and prepared in the right quantity, assembly is carried out similarly to the previous version. You can equip the corner wall cabinet with the necessary fittings if desired.
Because chipboard material has no attractive appearance, it is necessary to carry out a series of finishing works, which will allow you to adjust the wall cabinet to any decor of the room.
Before starting any finishing work assembled furniture need to be cleaned of small particles, dirt, etc. Since chipboard does not absorb regular paint well, it is better to use alkyd enamel, it must be applied with a special sponge. You can choose any color, the main thing is that it fits harmoniously into your interior.
Chipboard is also opened with special varnishes, which give the furniture a certain shine. The cut sides are usually covered with construction tape, which allows you to hide all surface roughness and create an expensive look for the product.
DIY plywood wall cabinet
Before you start working with the material, you need to familiarize yourself with its properties and the rules for its use. Plywood is a worthy material for the manufacture of kitchen furniture, which can serve the household for many years. Installation work for making a wall cabinet with your own hands has the same principle as the process of working on the simplest model. The works differ significantly regarding the material itself.
The rules for working with such material as plywood can be depicted in the following diagram.
1. It is advisable to make any holes on a plywood sheet using a special step drill.
3. When preparing structural parts, it is important to take into account the thickness of the plywood sheet, since you need to use a special tool to cut it. Thinner material must be cut with a sharpened knife; medium sheets are cut using hand jigsaw, and thick material is cut using an electric jigsaw.
4. It is worth considering the fact that plywood sheets cannot be cut across the grain.
Professional craftsmen claim that if you follow all operating rules when working with plywood material, the furniture will be of high quality and reliable to use. Another advantage of making wall cabinets from plywood with your own hands is the ease of finishing work.
By using various paints and other finishing materials A wall cabinet of our own production will not only fit harmoniously into the interior of the kitchen, but also become its real decoration. Plywood products can be supplemented with LED lighting on doors or drawers. A variety of self-adhesives are easily applied to the surface of a plywood sheet, with the help of which you can create any pattern on the design of a wall cabinet. Experts also recommend using varnishes that allow you to preserve the natural appearance of the material.
DIY wall cabinet installation
Installing a wall cabinet with your own hands is a difficult task, but any owner can do it.
In order for the wall cabinet to occupy the most correct place in the kitchen, the following criteria must be taken into account:
- the height of the furniture should be such that all family members can get the necessary things without any problems;
- the wall cabinet should not interfere with the normal functioning of ventilation in the room;
- the used mount must be guaranteed to be insured hanging structure from possible falls, which can lead to a lot of problems.
When installing wall cabinets, you should use building level. Most often, hinges and fasteners are used for fastening. So, in order for the structure to be placed evenly and without differences, it is necessary to draw a horizontal line on the wall, which is checked with a level.
Next, a fastening is placed on this line using a hammer drill and screws. The furniture set itself is equipped required quantity loops or special staples. Then all elements are securely connected. This method of fastening has proven itself to be quite reliable. After the wall cabinet is finally attached to the wall, removable shelves are installed. And as a result, a DIY wall kitchen cabinet is ready for use.
For more detailed information You can watch a video on assembling and installing wall cabinets with your own hands:
The closet plays an important role in any interior. It is not surprising that strict requirements are imposed on it: not to take up too much space, to be spacious, to have a sufficient number of shelves and drawers. The models on the market do not always fully satisfy individual wishes.
But the online store has both ready-made options cabinets and under individual order. So experienced craftsmen They will assemble the future owner’s closet to suit any of his whims and desires.
Owners of apartments with non-standard layouts find it even more difficult to choose an option that fits into the room. In this case, you can order a cabinet from specialists who will take into account all your wishes regarding the design and internal contents.

Unfortunately, this option is not affordable for everyone. Then the best solution to the problem would be to use own hands and ingenuity, because assembling a cabinet yourself is not at all difficult!

Preparatory stage
For each the premises will be suitable your type of construction, so it’s worth familiarizing yourself with the main ones.
A cabinet with a closed front is a straight model with hinged doors. To open them, you need to provide additional space; do not forget about this if you are making a closet for the hallway.

A cabinet with an open front has no doors, and its contents are in plain sight. It makes certain demands on order.

The wardrobe doors are mounted on a rail mechanism and open, moving to the sides. There are designs with top and bottom rails; which one to choose is a matter of taste.

Ideal design for built-in wardrobes
A corner cabinet fills a corner. Suitable for any size room, as long as it is square or similar in shape.

Having chosen a suitable design, you can begin to create a project for the future cabinet. Since this piece of furniture lasts for many years, it is worth considering what functionality may be required from it. It is better to build a drawing on whatman paper, recording all measurements there.

Decide on the location and dimensions of the cabinet. If there is a niche in the room - ideal, but if it is not possible to build it in, choose a place where nothing will interfere with it.
Consider the internal content: the location and number of shelves and drawers, their sizes, additional elements such as mezzanines or interior lighting.

Don't forget about choice exterior finishing, jewelry. The colors “oak”, “alder”, “beech” are the most popular today. Or you can choose wood with an interesting pattern and leave the original pattern. Get creative and decorate the doors with a carved pattern.

Materials
The material can be natural wood, plywood, MDF or chipboard - all of them are used by furniture manufacturers.

Wood is environmentally friendly, does not require additional decorations, and is convenient to work with. Wooden cabinet will last for many years and will look solid and impressive. Ideal choice for interior in classic style.

Plywood consists of glued veneer sheets (birch or trees are used coniferous species). This cheap, practical material is suitable for making almost any furniture. It is best to choose laminated plywood (FOF brand).

Chipboard (chipboard) is the cheapest and most common option. When assembling your own closet, this is usually what you use. Short-lived.

Self-adhesive melamine film is also useful for processing the side edges.

The diameter of the rod must be at least 22 mm. The easiest way is to buy it in a specialized store. You can also buy pens there.

Tools
- Ruler, tape measure, pencil and others for taking measurements and drawing.
- Level.
- Jigsaw or hacksaw for cutting.
- Screwdriver or drill and screwdriver.
- Glue.
- Ratchet key.
- Iron for gluing the edging film.
- Accessories. Each door opening mechanism has its own kit.
- Confirmations for the cabinet from Chipboard is better buy 7 cm long with a diameter of 0.5 cm.

Progress
First of all, measurements are taken and a drawing of the future cabinet is constructed. The final result depends on a correctly drawn up drawing, so approach it with all seriousness.
It’s not difficult to make cabinet doors with your own hands, the main thing is to correctly calculate the dimensions. If its vertical height is less than the height of the opening, the door will not completely close it, and if it is more, it will not fit. When finding the horizontal dimension, we must not forget about the fastening elements: they will add a few millimeters to it. The width of the doors should be ~3 mm less than the opening.

Now you need to mark the placement of the fastening bolts on the sawn parts and drill all the holes.


Assembly begins with installing the bottom and attaching the walls to it. Make sure that assembled wardrobe fits into the allotted space and other furniture will not interfere with the opening of the doors. If you are making a wardrobe, the guides are installed at this stage.

The location of drawers and shelves is outlined, shelf supports and guides are installed. They must be strictly parallel to avoid distortion.

It's time to do the installation top shelves and roofs. A gap of ~7 cm is left between the ceiling and roof for the installation of confirmations. Fastening is done manually and finally tightened with a ratchet wrench.

The side shelves are attached to 4 confirmata (two on each side); in some cases, dowels (small wooden cylinders) are used. One end of the dowel is inserted into the cabinet wall, and a shelf is put on the other.

The last step is to install the doors. Before installation, attach the handles with the curve outward. For sliding doors, proper installation of the mechanism is especially important. Take your time, act carefully.
It's time to start the finishing touches. Treat the sections with decorative film and decorate the facade. Put up the mirrors interior lighting and other elements.


Tricks and nuances
Rely on existing cabinet designs when designing yours.

A corner cabinet requires more care in design and assembly than a straight one, so it may be too complicated for an inexperienced person.

If you lack experience, it is better to entrust cutting out the parts to a master. His hand will not tremble, and the cuts will be smooth and neat.

To avoid getting a part smaller than needed, consider the thickness of the saw. The wall thickness must be at least 18 mm. Otherwise, the strength of the structure will be insufficient.

While working on the drawing, pay attention to the curvature of the floor. If the floor is not level, gaps may appear between the doors. To avoid this, adjust the installation awnings for a swing mechanism, and change the height of the wheels for a sliding mechanism.
Guides for sliding doors should be parallel. Be extremely careful when marking and installing guides for drawers and shelves.

Drill holes for confirmations symmetrically. Use the correct size drill bit. The exact number of confirmations depends on the number of parts. The confirmations are covered with plugs matching the color of the structure.

Installing a mirror begins with installing a seal around the perimeter. The film is glued to the chipboard sections using an iron. Iron it with a cloth, pressing it as tightly as possible. The edges can be trimmed with a regular knife.

Study photos of handmade cabinets: you will get a charge of inspiration and note interesting ideas for yourself.

We hope our tips helped answer the question of how to make a cabinet with your own hands.

Photos of do-it-yourself cabinets

Essential accessories for any modern kitchen are wall cabinets. They are used to store dishes, cutlery, food and other utensils. Today wall cabinets are quite expensive. Not every person can afford to purchase them. DIY wall cabinets are perfect solution this problem. They're actually quite easy to make.
Do-it-yourself wall cabinets for the kitchen and shelves for them are made using a certain technology, depending on the chosen material. There are several here possible options. So, next we’ll talk in detail about how to make wall cabinets for the kitchen with your own hands.

The modern market is full of various materials, which are used by people to make this or that furniture with their own hands. As for wall cabinets, preference can be given to one of the following types of materials:
- Plywood. Used to make wall cabinets for the kitchen with your own hands. It is inexpensive and quite durable. A significant disadvantage of plywood is the fact that it is poorly processed, and the smooth and even sheets on the market are not that cheap.
- Chipboard. Enough cheap material. It looks ugly, but it can be used for finishing country buildings, as well as for making cabinets in the country. This option is of little use for an apartment.
- Chipboard. It is this material that today is considered the most popular among those used in furniture production. Making wall cabinets with its help means getting a reliable piece of furniture, and also quite attractive in appearance.
- Plastic. Also popular among the common population. This material is great for the kitchen. It is easy to clean and quite lightweight. Of course, it also has its drawbacks. This material is expensive.
Most experts recommend using self-made laminated chipboard wall cabinets. It is this material that we will focus on.

Tools required for work: level, hammer, screwdriver, tape measure, screwdriver, hacksaw.
So, the material has been chosen, now you need to think about what tools will be needed for subsequent installation. The main ones will be the following:
- level;
- screwdriver;
- hammer;
- screwdriver;
- hacksaw for metal;
- roulette.
This set is quite enough to carry out the entire range of activities for assembling the cabinet with your own hands.
The fittings will be an integral part of the wall cabinets. The main thing is to choose it correctly. After all, each cabinet in the kitchen has its own specific function. For example, for a dish dryer you will have to purchase additional metal inserts and a plastic tray.
The cabinet may have glass doors. It will be used to store especially significant and expensive things that you are not ashamed to show to everyone around you. There are other options that you can do with your own hands.
Direct assembly of the product

Now all the tools, materials and accessories are ready, which means you can proceed directly to assembly. By the way, Chipboard is better Do not cut it yourself. All work should be entrusted to the employees of the store where the material was purchased. They will do it much better. All a person has to do is assemble the closet.
Before you start work, you must clear the room of everything that could interfere with the work. All tools and materials should be laid out in such a way that they do not interfere with further work.
First, the side walls of the cabinet are marked. Next, in accordance with the drawing, holes of the corresponding diameters are drilled into them. On the shelves, holes are drilled according to the already prepared ones, which were previously made on the walls. When working, it is important to use a high-quality measuring instrument that will give a minimum error. Laminated chipboard is made from sawdust, so when drilling it is imperative to keep the part as level as possible. Here, one awkward movement is enough, and the drill will come out.
Holes will be needed for removable shelves. They are drilled with a diameter that will correspond to the diameter of the shelf support used in this particular situation.
The assembly of the wall cabinets itself is quite simple. It takes relatively little time and effort. First, all shelves are screwed to one side. Next, holes are made on the rear shelf for adjustable canopies. DVPO installation is in progress. Now you can easily screw it to general design second side wall. Now a canopy is attached to each sidewall. In this case, it is too early to tighten the fastenings completely. Next, hinges with facades are installed. They only need to be applied in advance. So that they do not interfere with further work, they should be removed again. This will make it much easier to hang the cabinet on the wall.
Now all that remains is to mark a place on the wall for mounting plate, and then hang the cabinets in their rightful place. The most important thing is that there is no need to rush anywhere in this matter. Only with proper execution of the planks will the cabinets hang really evenly. To level it you need to use a level. In this case, the liquid option will come in handy.
Nuances of performing work
Adjustable awnings can withstand a fairly large load.

It is about 40 kg. In accordance with this parameter, it is imperative to evenly distribute all utensils and kitchen utensils on the cabinets so that they do not fall off or fall.
No need to spare screws. For a more rigid fastening of all elements, it is better to screw them in as much as possible. However, we should not forget about the aesthetic part of the work.
It is worth noting the fact that the width of wall cabinets for the kitchen should not exceed one meter. Otherwise, the bar may simply sag. It won't look very nice. In addition, externally such cabinets also do not look very aesthetically pleasing. A large and bulky specimen can be installed somewhere in the hallway, but it is not suitable for the kitchen. It is important here that everything looks harmonious.
The cabinet that will be used for dishes must be equipped with a tray. It can be some kind of plastic container. Today such pallets can be purchased at hardware stores. It is very important that it completely covers bottom part closet Moisture can get in here, which in the near future can render the entire material unusable.
The work involved in making wall cabinets for the kitchen with your own hands can take a long time. This is not something to be afraid of. There is no need for haste in such a matter. As the old Russian proverb says, measure seven times and cut once. This also applies to wall kitchen cabinets.
Thus, we can summarize some of the work done. As is clear, the entire process of preparing material for work and assembling kitchen wall units does not take much time. At the very beginning, you definitely need to prepare thoroughly so that then everything goes like clockwork. Otherwise, there is a high probability that the quality of assembly and performance will leave much to be desired.
You will definitely need a preliminary drawing and sketch of the product. Otherwise, the work may not go according to the planned scenario, and this is unacceptable. Even small nuances must be taken into account. All fittings and fastening tools must clearly correspond to their intended purpose. It is better to buy all materials in specialized stores. Here most of the products are different high quality. You should not purchase accessories from market stalls. There is a high probability of purchasing not very high-quality products.
Floor-standing kitchen cabinets are, one might say, the pillars on which an updated kitchen rests. On the other hand, the first impression is made by good wall cabinets for the kitchen. Wall cabinets are located at eye level. They are the first thing in the kitchen that people pay attention to. Presented hanging project kitchen cabinet for making with your own hands, it is designed to harmonize with the floor cabinet (DIY floor cabinet for the kitchen). Both cabinets feature raised-panel overlay doors, but you can choose a different design style. The width of the wall-mounted kitchen cabinet is 45.7 cm, which is the standard and coincides with the width of the floor cabinet. The list of materials for the manufacture of a wall kitchen cabinet provides for exactly this size. The dimensions of the cabinet can be changed at your discretion. For example, you can reduce the size of two cabinets to fit them above a stove hood.
The wall cabinet has no fixed shelves, so its height is especially easy to change. To do this, you just need to reduce its walls, front frame and door by the same amount. If you need to cover a wider space, you can make the cabinet wider and hang a double door on it. In this case, you will have to add a center pillar to the front frame. Make it twice as wide as the side posts.
To make those side walls of a wall kitchen cabinet that will be visible, take hardwood plywood, and for walls that will adjoin other cabinets or the wall, use spruce fan era brand A-C. You can also use chipboard to make such a kitchen cabinet. Face frames, doors, and trims should be made from solid hardwood to match the hardwood plywood you use. The level of complexity of making a wall-mounted kitchen cabinet with your own hands is relatively high.
List of materials for making a wall kitchen cabinet with your own hands:
Cabinet body and front frame:
Roof (plywood, chipboard) - 1.9 x 28.6 x 43.8 cm - 1 pc.
Side walls (plywood, chipboard) - 1.9 x 28.6 x 76.2 cm - 2 pcs.
Bottom (plywood, chipboard) - 1.9 x 27.9 x 43.8 cm - 1 pc.
Shelves (plywood, chipboard) - 1.9x26.0x41.3 cm - 2 pcs.
Back wall (plywood, chipboard) - 0.6 x 28.6 x 75.2 cm - 1 pc.
Mounting strips - 1.9 x 3.8 x 41.9 cm - 2 pcs.
Stands - 1.9 x 3.8 x 27.9 cm - 2 pcs.
Crossbars - 1.9 x 5.7 x 38.1 cm - 2 pcs.
Shelf edge trims (solid wood) - 1.9 x 1.9 x 41.3 cm - 2 pcs.
Door- 1.9 × 38.7 × 41.3 cm (applied to the opening 1 cm on each side) - 1 pc.
Kitchen cabinet fittings and fittings
Pins for adjustable shelves - 12 pcs.
50 mm finishing nails.
22 mm finishing nails.
Overhead loops - 1 pair.
Door handle - 1 pc.
76 mm drywall screws.
Making a cabinet body
1. Manufacturing of parts. Cut the roof, walls, bottom, shelves and fastening strips of the cabinet in accordance with the dimensions indicated in the list of materials for making the cabinet with your own hands. Drill out pin sockets on the inside of the side walls, as shown in the figure “Detailed view of the side wall of a wall-mounted kitchen cabinet.” .
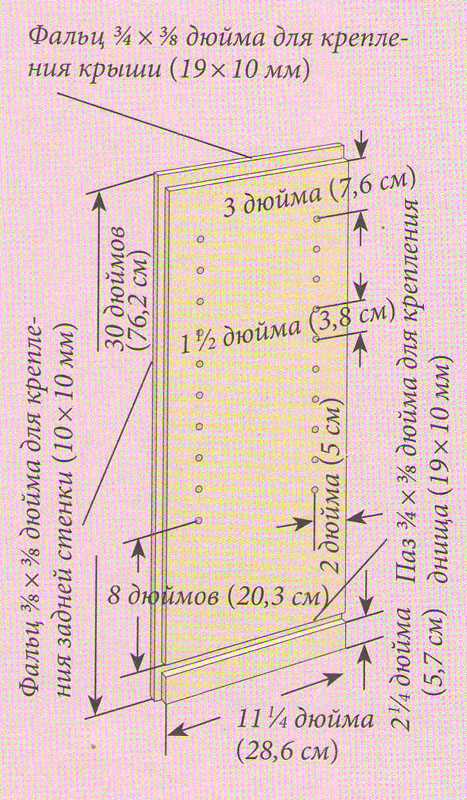
2. Selecting grooves and folds in the side walls and roof. Select grooves and folds in the side walls of the cabinet, as shown in the figure “Detailed view of the side wall of a wall-mounted kitchen cabinet.” . To ensure freedom of adjustment, and if the walls in your kitchen are not completely ideal, remember, writes Infobud, that the fold intended for attaching the back wall is 3 mm wider than the bottom plywood or chipboard. Please note that the picture shows one side wall. Don't forget that the second wall of the wall kitchen cabinet should be a mirror image of it.
|
|
3. Assembling the cabinet body. Connect the bottom to the side walls using glue and 50 mm finishing nails. Using glue and nails, connect the mounting strip to the side walls, as shown in the figure “General view of a wall kitchen cabinet.” .
4. Installing the rear wall. Use a carpenter's square to ensure the body is square. Apply glue to the folds of the side walls and roof and secure the rear wall with 22 mm finishing nails.
5. Manufacturing and fastening of cabinet racks and crossbars. The dimensions of the crossbars given in the list of materials for making a cabinet with your own hands are chosen in such a way that the crossbars are flush with the side walls of the cabinet. This ensures the best appearance for a free-standing cabinet. However, if you are making a row of cabinets, you should increase the length of the crossbars by 6 mm. As a result, the crossbars will protrude 3 mm on each side of the cabinet, which is very convenient if the walls of the bedside tables are slightly warped or the walls in the kitchen are not too smooth. Cut out the posts and attach them with 50 mm glue and finishing nails. Then cut the cross members to match the distance between the posts and attach them in the same way.
Shelves, doors and cabinet installation
1. Making shelves. Cut the faceplates according to the dimensions indicated in the list of materials for the cabinet. Glue them to the front edges of the shelves and press them with clamps.
2. Making and hanging the door. The dimensions indicated in the list of materials correspond to a door that overlaps the racks and crossbars by 10 mm on each side. To hang the door, attach a pair of overhead hinges to the post, placing them at a distance of 50 mm from the ends of the posts. Strengthen the hinges on the racks and hang the door, making sure that it is not skewed.
3. Final finishing and hanging of a cabinet (or several cabinets). Apply the final finish to the cabinets (polyurethane varnish works very well for kitchen furniture). Install the door handles using the screws included with them. Using 76 mm plasterboard screws screwed into the top and bottom mounting strips, secure the cabinets to the wall. Hanging cabinets can be a challenge because they need to be supported until they are secured to the wall.

")


