Furniture conductor, manufacturing example. Furniture jigs and templates for precise and quick furniture assembly
A furniture jig is a device that can significantly simplify and speed up the process of production and assembly of furniture structures. This device, which can be manufactured in various designs, makes it possible for even novice craftsmen to make holes in elements of furniture structures with high quality and precision.
What is it used for?
When manufacturing and assembling elements of furniture structures, specialists have to carry out many similar actions related to both marking locations and drilling future holes. The furniture jig allows you to optimize both of these processes.
According to their functional purpose, furniture jigs can be marking and drilling. The first, as their name implies, are intended to simplify the marking of the locations of future holes. Drilling jigs used in the production of furniture structures exclude the use of marking devices.

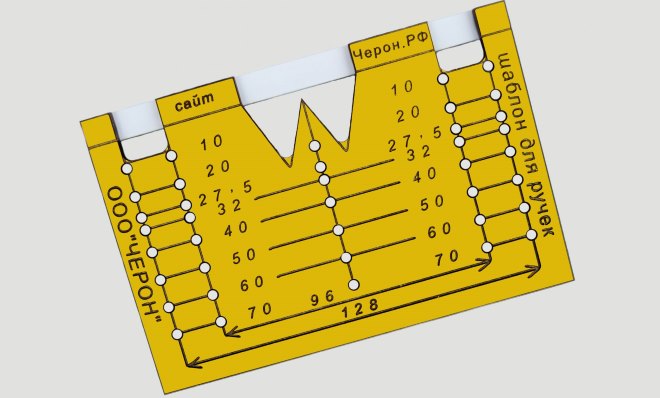
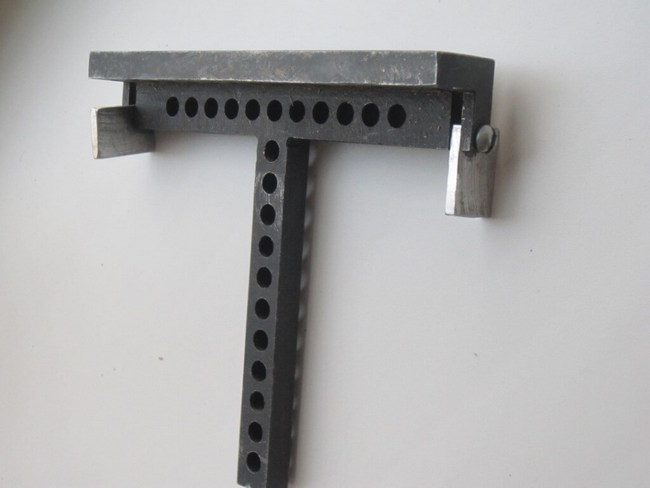
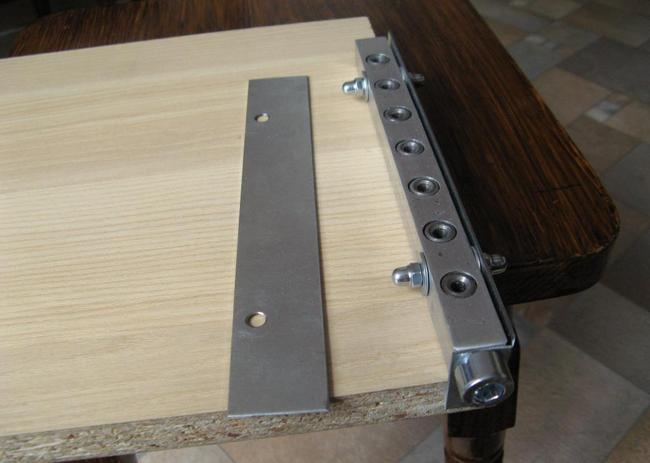
Many people purchase a furniture template, designed for preliminary marking of the locations of future holes, in a factory-made version. However, you can make a jig for assembling furniture with your own hands. The easiest way is to make a furniture jig from a metal ruler, to which the crossbar is screwed strictly perpendicularly. This furniture template is a multi-purpose marking device that is easy to make and use. The holes through which the drilling sites will be marked are made in a metal ruler at a certain distance. So, if holes are drilled for a minifix, then the distance between them will correspond to 32 mm, and for shelf holders - 100, 200 or 300 mm.
You can make a simple furniture marking template using a regular carpenter's square as a base, in which holes are also drilled at the required distance. Such a marking device, although more functional, is less stable on the surface of the workpiece. This is its most significant drawback.
Using a similar principle, using available materials, it is possible to make highly specialized marking devices (for example, a jig for furniture hinges or for marking holes intended for fixing furniture handles or any other furniture fittings).
Of course, if you have your own serious furniture production and the volume of assembly operations performed is quite large, you should pay attention to professional equipment for furniture assembly. However, the cost of such furniture jigs and templates, especially if they are produced under famous brands, quite high.
Main types
Based on the type of design and functionality, devices used for adding (drilling) holes in elements of furniture structures may fall into one of the following categories.
InvoicesThese are jigs that are applied to the surface of the workpiece and either fixed on it or held in a given position by hand. Using such a device for making furniture, holes are made in flat parts (for example, in slabs made of chipboard or MDF).
RotaryThe working bar of such conductors can rotate both horizontally and vertical plane. Using this device, you can make holes in parts of complex geometric shapes. Such a jig is used for drilling holes whose axis is located at an angle.
UniversalThese are reconfigurable jigs for making furniture. It is advisable to use devices of this type in production workshops, producing furniture in small series. The versatility of such jigs for furniture production lies in the fact that they can be quickly reconfigured to different combinations of the location of the holes being made.
TiltableConductors of this type are used in cases where it is necessary to drill holes in several planes.
Besides, in furniture production More highly specialized jig devices are also actively used (in particular, a dowel jig for assembling furniture and a device that allows you to accurately and efficiently make holes for confirmations).
According to the method of fixation on the surface of the workpiece, jigs are divided into sliding and fixed type devices. Devices that are fixed to the part before processing, although more convenient to use, somewhat limit the freedom of action of the master. This is especially critical in cases where drilling is performed on a machine equipped with a single spindle mechanism.
Using a jig, it is possible to avoid a rather serious problem: the drill entering the surface of the workpiece at the wrong angle. Coping with this problem, if it has already arisen, is quite difficult, and in many cases simply impossible. When using a jig, the drill not only enters the material being processed at the required angle, but also does not deviate from the specified direction throughout the entire drilling process. You cannot do without a jig in cases where it is necessary to drill a hole at a certain angle in thin furniture boards made from chipboard or MDF.

Setting up the production of furniture with your own hands, if you use conductors in such production, is possible even for a person who is not highly qualified and does not have sufficient experience in this field. When using such devices, there is no need to perform complex preliminary calculations and mark out locations for future holes.
Almost all types of such devices have a simple design, so making your own conductor is not so difficult.
Conductors presented on the domestic market
Among home craftsmen who independently manufacture furniture, as well as among specialists working in small furniture workshops, conductor devices of the following brands have gained popularity.
AssistantThe Assistant marking jig belongs to the professional series. This is a multifunctional jig device, which, when using appropriate bushings, can be used not only for marking, but also for adding holes.

The Dubel-Profi conductor is produced by KVB. This is an inexpensive but functional device for home use. The kit of such a conductor includes various devices (clamps, rulers, etc.) that greatly simplify the work with it and make its use more convenient.
These are conductors Russian production– inexpensive, but quite functional. They are equipped with a positioning system and a set of replaceable bushings.
When manufacturing cabinet furniture, there is a need to be able to accurately and quickly drill into the end of parts. As a rule, this need is due to the use of euroscrews (confirmations), in which holes with diameters of 4.5-5.0 mm (depending on the density of the plate) are drilled into the end of the parts to a depth of 35-55 mm (depending on the length of the euroscrews).
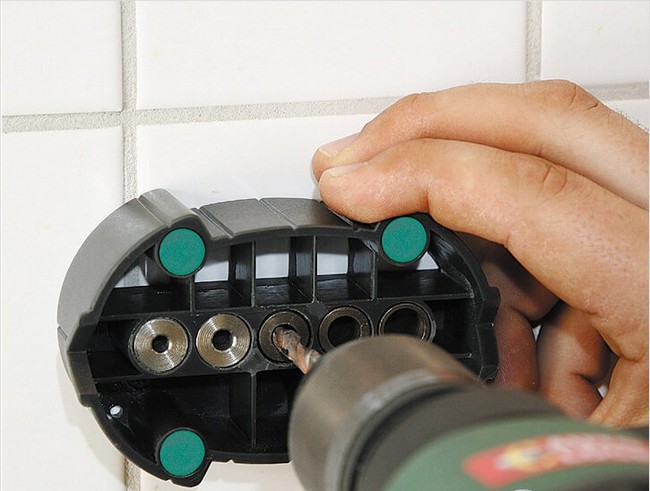
Of course, there are special drilling and attachment machines for such purposes, but they are not readily available to private furniture makers or small organizations due to their high price, plus, the machines are not convenient due to exclusively stationary use. To simplify the work of a furniture maker, jigs were invented - small devices for precise drilling with a conventional hand-held electric drill. Today there are several manufacturers on the market; by paying quite a price, you can buy a ready-made conductor. This article will discuss how you can make a good homemade conductor from available and easily accessible material in a couple of hours.We use ball bearings to guide the drill bushings. The bearings are made of durable steel and will last a long time. In order for the drill to be well oriented in the jig, two bearings are used for each working distance (the bearings are located coaxially one under the other).
To make a conductor (for three working fixed distances) we will need:
- A piece MDF boards 16mm thick.
- A piece of MDF board 10mm thick.
- Six pieces (a pair for each working distance) of any ball bearings with internal diameter 5.0 mm, outer diameter no more than 16 mm. The height of the bearing should be as small as possible and no more than 8mm.
- A dozen 4x25 mm self-tapping screws.
- PVA glue, “Superglue”.
- Furniture footer with internal thread M6 (see photo).
- Screw M6x50. Nut M6. Grover washer 6mm.
Manufacturing of the conductor body.
First, you need to make the case itself. There is no need to particularly explain anything about the body, everything is elementary. Cross section housing - the letter “P” with one end (closed) wall. This wall will be used as a stop and will set the zero point, the starting point for drilling. When drilling, the stop is pressed against the end of the part. Main dimensions:
- The external size of the conductor is arbitrary.
- The upper part, in which the bearings will be seated, is made of 16mm MDF, the remaining parts are made of 10mm MDF.
- The distance between the two sidewalls (where the workpiece will be placed) is equal to16.5 mm, whatcorresponds to the actual thickness of the slab plus a small gap for ease of installation and removal of the jig.
- The distances between the centers of the bearings and the stop: 50, 70, 100 mm are the most common in furniture practice.
To assemble the case, it is necessary to accurately cut all four parts (top, two sides and one end), it is recommended to take measurements with a caliper. Next, holes are marked and drilled for the screws that will fasten all the parts together. The housing is assembled using PVA glue.
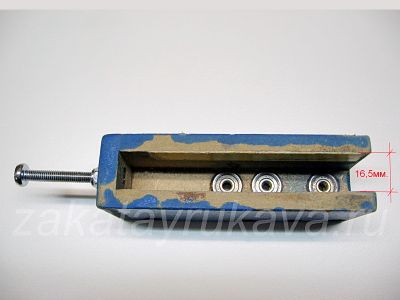
The distance between the side walls of the conductor is 16.5 mm (for laminated chipboard with a nominal thickness of 16 mm).
Bearing seating.
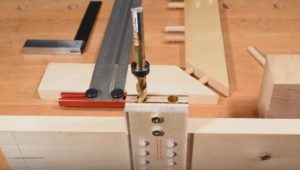
After the glue has dried, we proceed to marking and punching the holes for the bearings. We try to perform this operation very accurately! To drill holes for the bearings, we will need a drill mounted in a rack. It is very difficult to perform precise drilling by hand, but with some skill it is possible. We mark the centers of the bearings with a pencil and punch them. Using the core, we drill three through holes with a diameter of 2 mm. We clamp a feather drill (punch) into the drill chuck; the diameter of the punch should be equal to the outer diameter of the bearings. We drill two blind (non-through) holes for each bearing on each side of the previously drilled through hole. The depth of drilling with a hammer (the penetration depth of the central tenon is not taken into account) should be approximately 1 mm greater than the height of the bearing. As a result, we should get six mounting holes (three on each side) for the bearings. You can try to insert the bearings into the seats; the bearings should fit freely, but without noticeable play. After fitting, you need to lubricate the outside of each bearing with glue and seat it in its place until it stops. If “Superglue” is used (it quickly absorbs and dries), then this operation is performed using a rubber mallet.
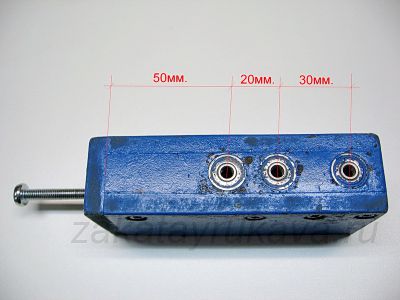
Conductor on top. Distances between bearing centers and stop.
Making an adjustable stop.
To be able to drill at any arbitrary distance from the stop (not only 50, 70, 100 mm), it is necessary to supplement the jig with a simple adjustable stop - a long screw. We drill a through hole in the center of the end stop with a diameter 0.5 mm smaller than the outer diameter of the furniture fitting (see photo). Screw in the foot. We screw a long screw into the foot, not forgetting to first screw the nut onto the screw and put on the Grover washer. Now, by changing the screw screw depth, you can set any drilling distance from 0 to 100 mm.
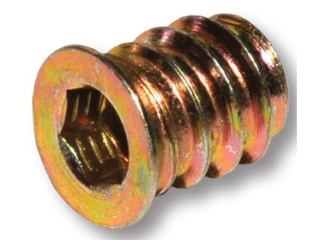
Furniture footwear. To screw the fitting into the conductor body you will need a hex wrench.
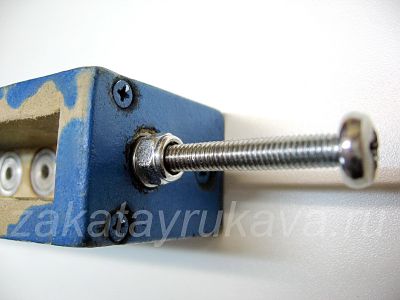
The adjusting screw of the jig is screwed into the furniture fitting.
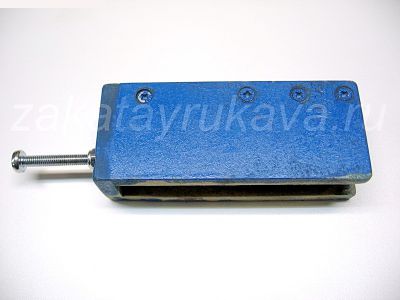
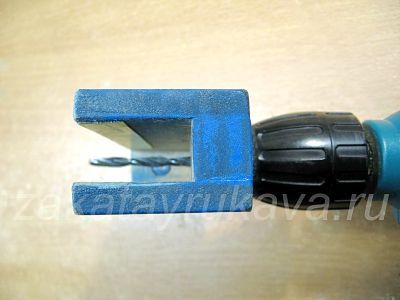
Conductor. Side view.

Conductor. Inside view.
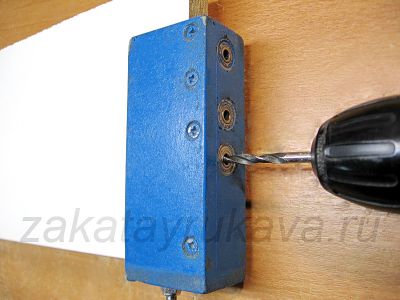
Drilling a hole in the end of the chipboard using a homemade jig.

Drill overhang. Drilling can be done to this maximum depth.The length of the drill used and the depth of its attachment in the drill chuck must be selected taking into account the thickness of the jig (that is, almost the total height of the two bearings).
If desired, the surface of the conductor can be sanded with fine sandpaper, prime and paint (for example, with spray enamel). Practice has shown that the accuracy of drilling with a jig is no worse than +/-0.5mm and largely depends on how much actual thickness was made (slabslaminated chipboard) differs from the calculated thickness. In any case, an error of a maximum of half a millimeter is not critical for end drilling in the manufacture of cabinet furniture.
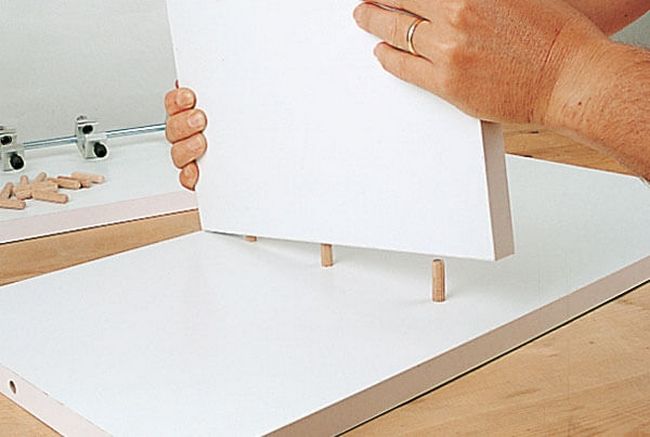
When furniture is created, almost all parts have to be joined end-to-end. This is done using dowels in which holes are made. This is where a special part is needed. You can buy it or make a furniture jig with your own hands.
What is a furniture conductor?
A jig is a strip that has several holes and sleeves. It is applied to the desired part, the drill is inserted into the sleeve and a hole is made. To secure two parts you will need the help of one conductor, and the parts are fixed as securely as possible.
Advantages of a conductor:
- precision drilling;
- simple and fast hole creation.
At the same time, conductors are used not only during construction, but also in mechanical engineering. Also this device allows you to drill cylindrical workpieces and pipes.
Different types of conductors
Depending on the industry, conductors are divided as follows:
- Invoices. They got their name because of their area of application. This device is applied to the workpiece and fixed, with the help of which holes are made.
- Rotary. They are used to drill cylindrical holes. In this case, the rotary axes can be located horizontally, vertically, or at an angle. The body here is equipped with rotary bushings.
- Tiltable. They are used when holes are created in several planes.
- Sliding. Used to make each individual hole. In this case, this model is not fixed to the surface, which means it is not the most convenient.
DIY furniture conductor
As we already wrote above, this product is needed when assembling furniture. Some people prefer to buy it, while others prefer to make furniture holes with their own hands. Such products are sold in any construction stores; here it is important to choose finished products under specific goal. The cost of a furniture jig will depend on its size, purpose and manufacturer.
The simplest option is inexpensive, but professional equipment with various additional functions costs quite a lot. Therefore, today they are increasingly making furniture jigs and templates with their own hands.
They are produced using metal sheet or wooden board. Holes are made in them that will serve as guides. This work is not difficult, anyone can cope with it.
How to create a conductor
So, it’s not difficult to create a furniture jig with your own hands. To get started you will need:
- welding machine;
- Bulgarian;
- drill and some plumbing tools;
- You also need to prepare 10 x 10 mm reinforcement in advance.
First, the workpiece is cleaned with sandpaper and markings are made. The distance from center to center is approximately 32mm. Next, each template hole is drilled. After this, a stop is created - for this you can take a metal plate 1 mm thick. It needs to be bent and prepared for carving. The last step is connecting these parts.

The product must be made as accurately and carefully as possible, otherwise it will be of no use, and in an unfavorable situation it can even damage the furniture. You can learn more about how to make a conductor by watching various video tutorials. The easiest way to make it is using a furniture template, which can also be obtained from specialists.
To ensure that drilling does not cause complications, a conductor is needed. This device will really be needed when assembling furniture. Of course, today you can buy everything, but it is better to make a furniture jig with your own hands, because then such equipment will definitely be suitable for each specific purpose.
When working with hand drill, sometimes it is difficult to maintain the specified direction of the hole. Conductors are also used if it is necessary to make a series of similar holes according to a template. For example, during carpentry work. In this case, the master does not waste time marking the tree, and is guaranteed to get the same result.
The jig is indispensable when drilling holes in pipes. But the main application is to pass holes at a given angle.
Let's consider various options this useful device:
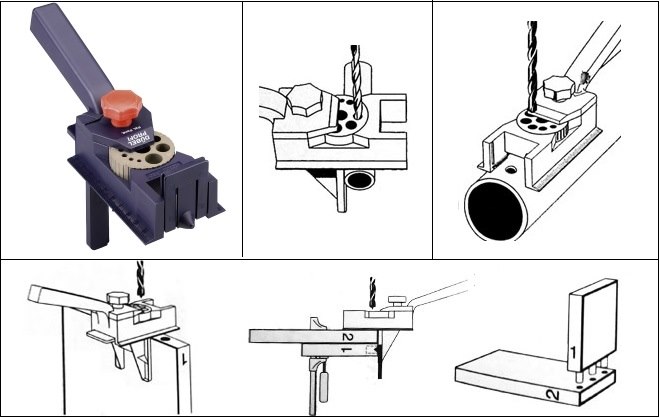
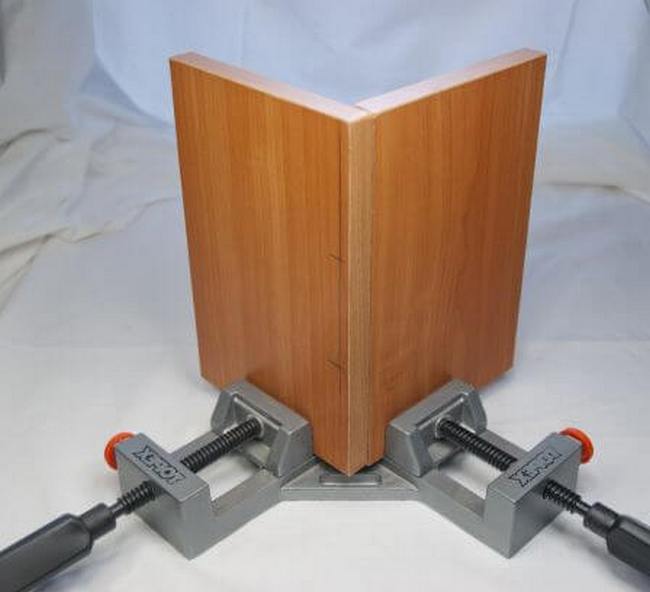
Jig for perpendicular drilling of holes
A simple furniture jig for drilling holes when assembling metal furniture. Details in the video material
Purpose - to obtain passes in thick workpieces, strictly at an angle of 90°. It is a set of bushings in a single body, or a bracket with replaceable working attachments.
By installing the device above the drilling point, you can start working without pre-punching. The drill accurately hits the center of the sleeve and does not deviate from the axis.
Important! The only problem is that the tool must be held on the workpiece, especially at the beginning of work. Otherwise, vibration may cause it to shift.
You can make such a drilling jig with your own hands. Thick textolite or solid wood is used. Perfect option— the use of extruder bushings for drawing wire. Worn bushings can be found at the factory. 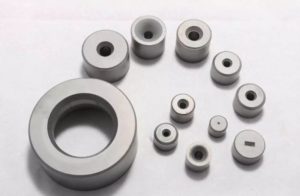
The extruder nozzles are made of alloy steel, with the addition of pobedit. The service life is practically inexhaustible.
Conductor for cylindrical blanks or pipes
Making a hole in a sloping surface is almost impossible. It is especially difficult to start the process - the tip of the drill jumps off the specified point. The device will fix the direction and allow you to perform the work with high accuracy. 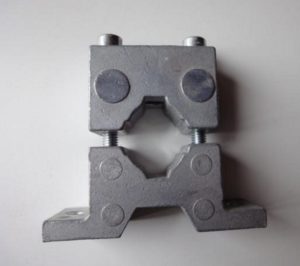
By adjusting the length of the fixing bolts, you can drill a hole tangentially to the center. If you don’t have such a tool at hand, you can make one from scrap materials. For example, from a block of hard wood and a strip of plywood. 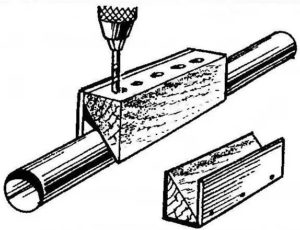
To prevent the guides from being broken so quickly by the sharp edges of the drill, they can be reinforced with sleeves made of tubes of different diameters.
Furniture jigs for drilling holes deserve a separate description.
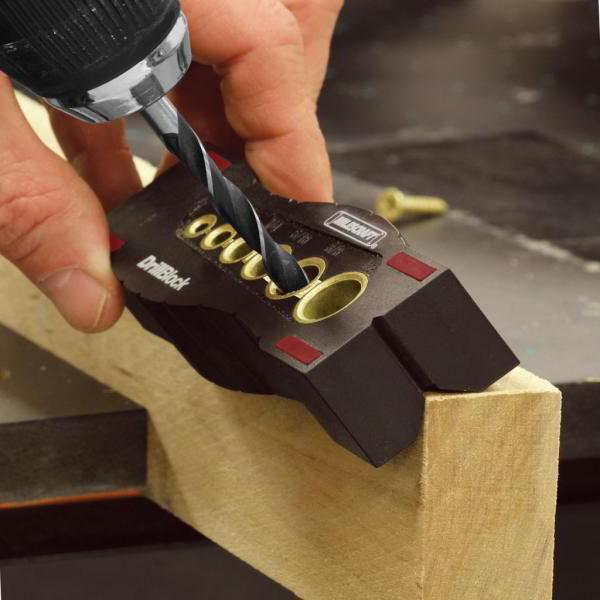
Jig for angled holes
This type of drilling is not very common, however, there are ways to fasten products to each other when this technology cannot be done without. 
In fact, the hole is made tangentially, which is almost impossible to do while holding the drill with your hands.
Important! IN metal parts Such recesses can only be made using a milling cutter.
And for wooden blanks exists ready set.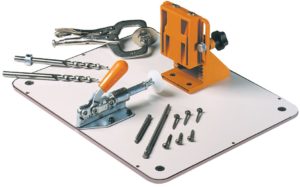
Any carpenter is familiar with this method of drilling; professionals use this device all the time. Working with the jig is easy: you set the drilling height, the workpiece is pressed tightly against the stop, and you get precise oblique holes. 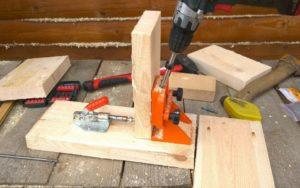
A stop-limiter must be put on the drill, otherwise the hole will end up through. Then the screw head will fall through. In addition, it is better to do such fasteners using a special drill with a double diameter. 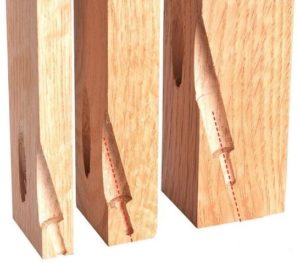
It is difficult to make such a device yourself. Although there is simple options, not particularly accurate. 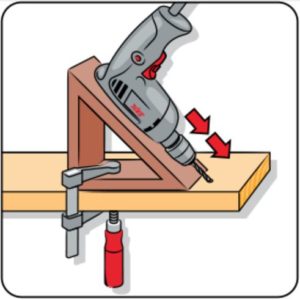
There is a separate type of device: for drilling at an angle with an adjustable tilt. This is a specific jig that is not suitable for all workpieces. 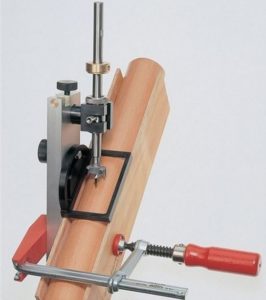
The type of fastener indicated above is only suitable for an array. Pressed slabs cannot be joined this way.
Therefore, such a jig is not suitable for drilling holes in chipboard. To assemble trunnions and other furniture components made of hardboard, dowel fasteners are used.
The device is designed to maintain the alignment of the holes. Otherwise you will not be able to install the spikes. By applying the jig to both parts to be joined, you will ensure a perfect connection. 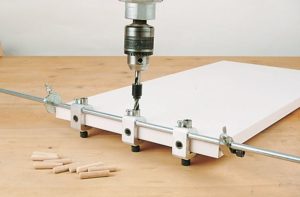
If you decide to make such a conductor with your own hands, there is no need to look for drawings. We present two options for perfectly working homemade products:
It's very easy to make. A small piece of plywood and a sheet of hardboard are enough. With this device you can always drill a couple of coaxial holes for dowels. 
Hardboard (or other transparent plastic) must be marked and calibration holes drilled. With their help, it will be easier for you to install the template in the right place. Thin-walled brass tubes must be driven into the holes. Otherwise, the wood drill will quickly destroy the guides. 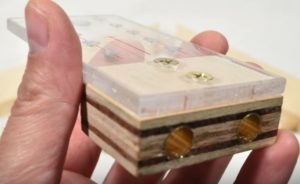
Important! This device is only suitable for workpieces of a fixed width.
Then the spikes will be located in the center of the end. For wood of other sizes, it is necessary to make separate guides, or a universal jig template.
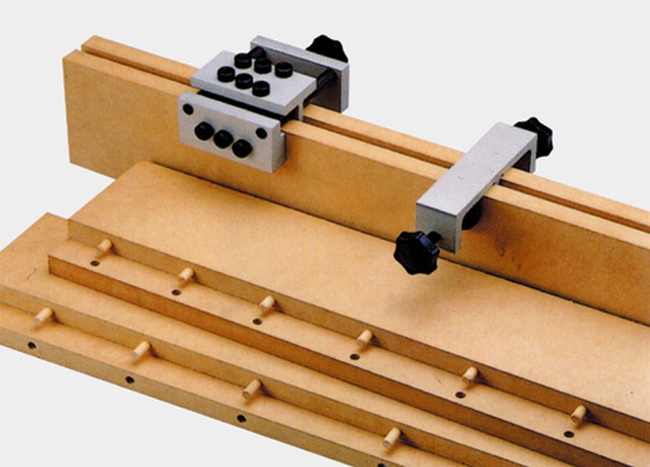
Self-centering jig
If you do not make furniture using standard panels, you need universal tool. You can also make it yourself, and the materials are literally lying under your feet. 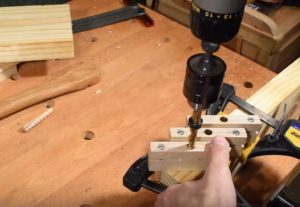
To make such a jig for drilling holes you will need a drawing and basic knowledge of geometry. 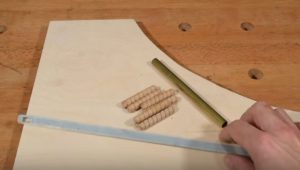
Materials used: a piece of plywood 15-18 mm, a thin-walled tube suitable for a drill, several dowels, and a metal strip for the arms of the parallelepiped. 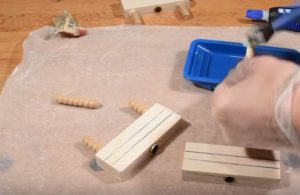
We make three identical parts: in the middle there is a hole reinforced with a tube, on the bottom side there are symmetrically located dowel legs. It is important that all three components are absolutely identical. 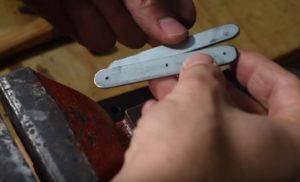
From metal we cut three identical arms with symmetrically located holes. They determine the linearity of the holes of the conductor. 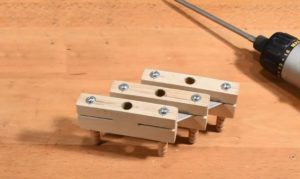
We cut out grooves in three blanks and connect them using metal shoulders. The device works no worse than the factory one, at virtually zero cost.
Another way to connect furniture is to use the so-called confirmat. A separate tool is needed for this.
Making a self-centering conductor - video
Conductor for confirmation - types and possibility of production 
Of course, such a device is on sale, and it is quite convenient and versatile. It is used to perforate the first part of the workpiece. 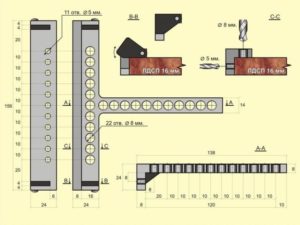
The second part of the workpiece must have two rows of perpendicular holes. A different design has been developed for this purpose. 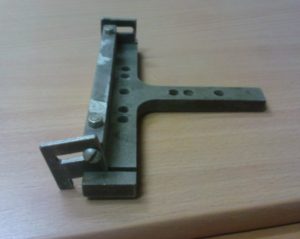
Of course, home craftsmen do not look for easy ways, and make a furniture jig jig for drilling holes with their own hands. Moreover, it does not have to be universal; you can adapt it to a specific type of joint of furniture panels. Important! Any universal device
designed to save money. Make a mistake in drilling when large quantities extra holes - as easy as shelling pears. Therefore, when self-production
templates, make them narrowly profiled.
Don't be confused by the holes being the same size. Confirmat, as a rule, is issued according to certain standards. Therefore, the drilling diameter is the same. We have discussed how to make a jig for drilling holes for fasteners. During assembly wooden structures 
and installation of doors/windows, hinged joints are used. Their fastenings must also be standardized and synchronous with each other. To avoid mistakes with the markings, a jig is used for the holes for the hinges.
Any devices that can be used to standardize markings or drill holes improve the quality of work by an order of magnitude. In addition, purchasing (manufacturing) conductors allows you to save a lot of time during carpentry work.
If you make furniture with your own hands, then you know that all products must be butt-joined. In this regard, there is a need to drill many holes. For this, all masters use special tool. We will talk about a jig for drilling holes.
What it is?
The jig is a plate on which holes and sleeves are located. Even a beginner can use such equipment. It only takes a few steps:
- equipment is fixed in in the right place;
- a drill is inserted into the sleeve;
- a hole is carefully made.
To fasten two parts you only need one jig.
Advantages
This device is used not only in the manufacture of furniture and construction, but also in mechanical engineering. It can be used to drill holes on any surface. There are several other advantages:
- highest accuracy;
- ease of use.
Variety
All models, regardless of their application, are to one degree or another divided into several main groups. Let's look at them in more detail:
- Invoices. They received this name due to their special use. Equipment is applied to the selected workpiece. Fixed or left without clamping. Ideal for use in materials such as chipboard.
- Rotary. If you need to make a passage on a cylindrical surface, then you should definitely use this type of equipment. This type has several rotation axes: vertical, horizontal, inclined. For the latter, the housing has a guide sleeve.
- Tiltable. If you need to drill simultaneously on several planes, then you should use this type of jigs.
- Sliding. The last group is not in demand, as it is considered the most inconvenient. Before drilling, it is necessary to bring the device into working position. This type cannot be fixed to the surface.
Application
Drilling jigs are used in many fields of activity. Most often in construction. But besides this, there are several other important industries.
Furniture
During assembly, many craftsmen are faced with a problem such as a lack of holes. In this case, you have to make new ones yourself. To do this easily, it is recommended to use a jig. With its help, all work will be done quickly, efficiently and accurately. Craftsmen who do not have a special machine should also resort to the help of such a device.
Modern assembly is different wide choice furniture fittings and various fasteners. All this requires precise installation without displacement. This is where the conductor will help.

Pipes
Make holes correct form on cylindrical surfaces is quite difficult. Using a drill in this case is useless. It will constantly slide off, which means they will all work out irregular shape. For this, it is recommended to use a conductor.
Additionally, you can use devices that help make perpendicular holes. It will also help to process rounded elements and edges.

Purchased or homemade: which is better?
When assembling furniture, the use of such a device is mandatory. Some people prefer to buy ready-made option in the store, and many make them themselves.
As for sale, they can be found in almost every hardware store. However, it may turn out that the purchased equipment may not suit your needs.
The cost of products is influenced by the following factors:
- method of use;
- size range;
- manufacturer.
Simple equipment is inexpensive, but products with additional functions will cost more.
Having a little idea about the conductor and some tools, you can make it yourself.
Self-production
To work you need to prepare following materials and tools:
- metal sheet or wooden plank;
- welding machine;
- angle grinder;
- drill;
- screwdrivers;
- wire cutters;
- sandpaper;
- pliers;
- reinforcement measuring 10*10 mm.
- Make a blank. It must be cleaned with sandpaper. Mark future holes. There is a standard for this that says the distance between centers should be 32mm.
- We carry out drilling.
- The next step is to make a support from metal plate. Its thickness should be 1 mm. It needs to be bent and the place for the thread marked.
- Connect the two parts together.
Technical side
It is worth familiarizing yourself with several drilling techniques in detail.
Under confirmation
When making furniture yourself, confirmats are often used. For such drilling, special drills with a size of 4.5 mm are used. It is easily recognized by its additional head.
![]()
Face drill
This is the most difficult technique. The drill should be perpendicular to the end. In this case, the drill must be held firmly and level. It is very convenient to use special equipment.
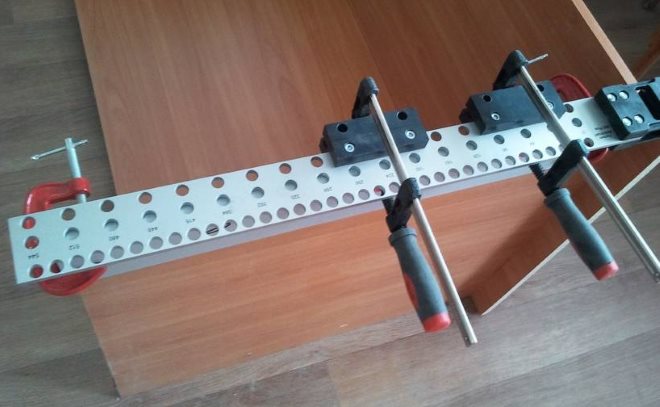
Drilling in two parts at the same time
This is the most accurate and quick way. For this method, it is necessary to prepare special clamps (clamps). The fixation must be of high quality so that the parts do not wobble.
Drilling for dowels
To do this, use a drill approximately 8 mm in size. So that the details don't work out through holes it is necessary to install a special depth limiter. It is recommended to use the same drill for the end, and the depth should not exceed 20 mm.
Video
From the video you will learn how to properly use a jig for drilling holes in chipboard.

")


