Do-it-yourself wooden staircase - step by step instructions, calculations, photo and video editing. Do-it-yourself wooden staircase - a step-by-step description of the work from "a" to "z" How to make a wooden flight of stairs
wooden stairs made by hand is quite simple. However, there are a number of nuances on which the convenience and even safety of movement depends. I will tell you about all the intricacies of construction wooden structure so you don't make mistakes in the process.
All work on the manufacture of stairs can be divided into two main stages:
- Design;
- Construction assembly.
Design
Staircase is enough complex structure, therefore it is simply impossible to make it qualitatively without a detailed project, especially for a beginner. The design process can be broken down into three main steps:

Step 1: Determining the type of structure
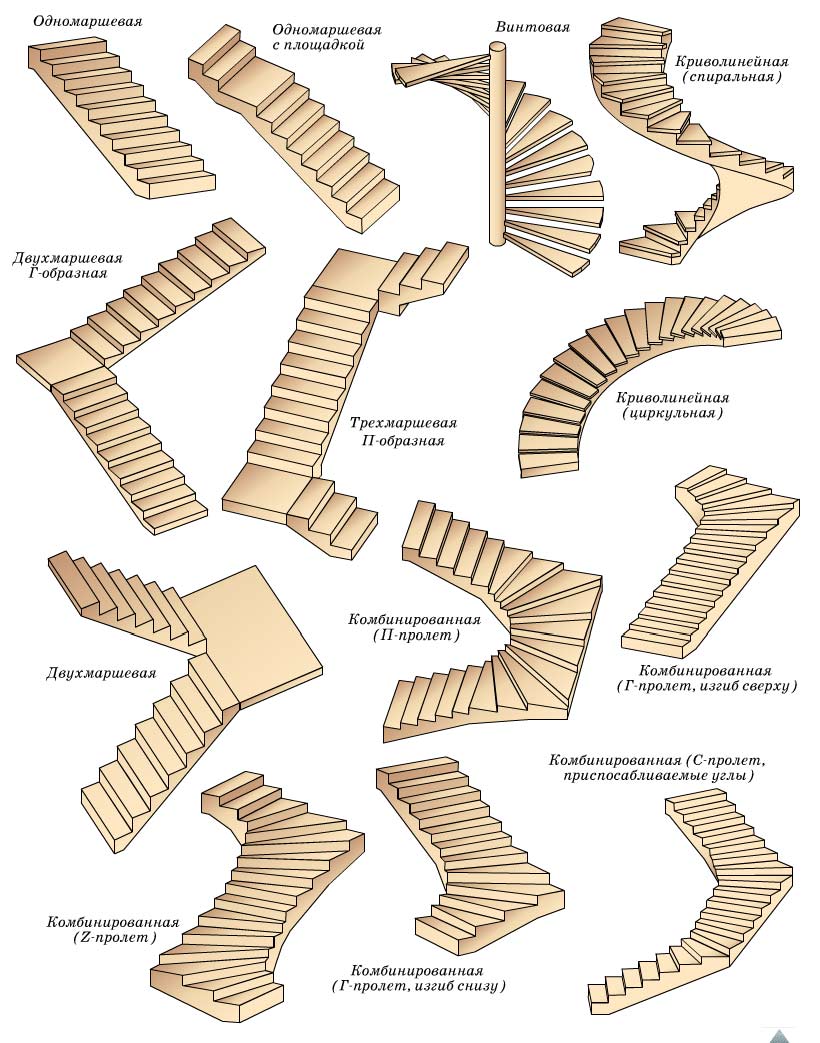
All existing species stairs can be divided into two types:
- Screw. The peculiarity of such structures is that they contain only winders located around the central pillar. It is advisable to use them if there is a minimum of space in the room.
Keep in mind that such stairs are inconvenient to use, and also quite difficult to manufacture. Therefore, I would not recommend beginners to take on the construction of a spiral staircase;

- Marching. These stairs have smooth marches ( flights of stairs). They are more comfortable and safer to use. However, keep in mind that mid-flight stairs take up more space in the room.

Marching stairs, in turn, are divided into several subspecies:
- Single-march. Consist of one straight flight of stairs;
- Swivel with winder steps . They can have several flights of stairs, between which there are turning (winder steps);

- Rotary with landings. Flat platforms are installed between the flights of these stairs. Such stairs are more convenient to use, but take up more space in the room;

- "Duck step". The peculiarity of these stairs is the paddle-shaped steps, which are installed in pairs in the opposite direction. As a result, only one foot can stand on a step, hence their name.

Such stairs are less convenient, but they can be very steep, i.e. the angle of inclination can exceed 40-45 degrees.
The type of construction should be chosen depending on the conditions in the room and your requirements. If there is not enough space, you can make a "duck step" staircase, which requires a minimum of floor space on the ground floor. If pensioners or small children live in the house, it is better to sacrifice space, but make a turning staircase with marching platforms.
Stage 2: calculate the stairs
At this stage, you need to decide on important parameters stairs like:
- Number of treads;
- riser height;
- The angle of the stairs;
- March length;
- The area that the stairs will occupy on the first floor.

Any staircase should be comfortable and safe. To do this, when performing calculations, the following rules must be observed:
- Step sizes. The height cannot be made more than 190 mm and less than 160 mm. The width of the tread should not be less than 220 mm and more than 330 mm.
Keep in mind that all steps must be the same height and width, otherwise the stairs will turn out to be traumatic; - The number of steps in a flight of stairs. The most comfortable value is 11-15 steps. If there are more of them, it is advisable to divide the flight of stairs with a platform.
In addition, it is desirable that the march has an odd number of steps, so that a person finishes the descent or ascent with the same foot with which he began moving up the stairs; - March width. Must be at least 90-100 mm;
- Railing height. At least 90 cm.
Calculation of the number of steps. Before proceeding with the calculation of the stairs, you need to measure the height between floors, as well as the area allocated for the stairs. For example, the height between floors, i.e. the height of the stairs in our case is 3 m.

Now you can start calculating the number of steps and the height of the risers. These two parameters are interrelated.
To calculate the number of steps, you need to divide the distance between the floor of the first floor and the floor of the second floor by the height of the steps. The latter can be any within 160-190 mm. For example, let's take a height of 180 mm, in which case we will have the number of steps 300/18 = 16.6 pieces.
Since we need an even amount, we will correct the height by dividing the total height by the number of steps - 300/17 = 17.6 cm. In fact, the staircase will have 16 steps, since the last step is the floor of the second floor.

Tread width calculation. There is a calculation formula comfortable stairs- a + b = 470 mm, where:
- a - riser height;
- b - tread width.
From this formula we get the width of the tread 47-17.6 = 29.4. This size is well within the acceptable range.
March length calculation. Now it remains to calculate only the length of the march, i.e. the length of its projection on the floor. To do this, you need to multiply the width of the tread by the number of steps - 29.4x17 \u003d 499.8 ~ 5 m.
Since the stairs will turn out to be quite long, it is advisable to make it rotary, consisting of two marches. In this case, the first flight will have eight steps, including the platform, and the second flight will have nine steps, taking into account the floor of the first floor.
The width of the platform should be equal to the width of the march, i.e. at least 90-100 cm.
If necessary, you can adjust the parameters of the stairs to the conditions in the room - change the height of the risers and the width of the tread. The main thing is that these parameters remain within the acceptable range.

Calculation of the length of the kosour or bowstring. The calculation of the kosour is carried out according to the Pythagorean theorem - the length of the stairs in the square + the height of the stairs in the square = the length of the kosour in the square.
Stage 3: draw up a drawing
Now you need to prepare a drawing according to which you will make the details of the stairs. To do this, first consider the details that the design of a wooden staircase includes:
- Kosour. Bearing beam on which the steps are laid. As a result, the kosour takes on the entire load when moving up the stairs;

- Bowstring. It also represents load-bearing beam. It differs from the kosour by the absence of cutouts for the steps, as a result of which the treads are connected to the beam by the butt.
To attach the treads to the bowstring, recesses are milled in it or bars are attached on which the tread is placed;

- Steps. They consist of two elements - tread (horizontal board), riser (vertical board, which is located under the step). I must say that the design of a wooden staircase may not have risers, especially if it is based on bowstrings.
What is the best way to make a ladder - on stringers or bowstrings? The construction on bowstrings is faster and easier, since there is no need to make cutouts for the steps, however, the stairs on the stringers are able to withstand a large load.
Making stairs
Consider how a ladder is made of wood with your own hands. This process can be conditionally divided into several stages:

Stage 1: preparation of stringers
The work is done like this:
| Illustrations | Description of actions |
 |
Materials. At this stage, prepare boards with a section of 40 x 300 mm. |
 |
Beam preparation. Cut boards 40x300 mm along the length of the stringer according to the design calculations. |
 |
Kosour markup. For marking, use a construction square. Use it to mark the location of the steps and risers, as shown in the photo. Keep in mind that the angle of the tread and stringer must match the angle of inclination. In order not to make mistakes in the calculations, you can perform the following steps:
|
 |
Cutting out the kosour. Carefully cut out the cuts with a hacksaw, jigsaw or other tool. In the same way, make all the other stringers. |
To make paired kosours exactly the same, use the first kosour as a template - attach it to the board and circle it with a pencil.
Stage 2: frame assembly
Now we need to make the remaining elements of the ladder frame, and install them. The work is done like this:
| Illustrations | Description of actions |
 |
Materials. In addition to the kosour for assembly, you will need:
|
 |
Mounting the kosour to the wall:
|
 |
Mounting support post:
|
 |
Column marking. Mark on the pole the junction of the second stringer. To do this, you can use a laser or water level. |
 |
Installation of the second stringer:
|
 |
Installation of the stringer of the second span. The beam is attached to the post according to the same principle as the stringer of the first span. |
 |
Site frame assembly:
|
This completes the installation of the frame. If your stairs are straight and without a platform, then all the work on assembling the frame comes down to installing two stringers.
Stage 3: cladding stairs
Sheathing stairs is carried out as follows:
| Illustrations | Description of actions |
 |
Materials. At this stage we will need:
|
 |
Marking steps and treads:
|
 |
Cutting details. Use a jigsaw or other tool for this purpose. In addition to treads and risers, you will also need boards for sheathing the landing.
|
 |
Hole drilling:
|
 |
Processing the joints of parts with glue. Use wood glue for this. |
 |
Installation of steps and risers. Fasten the parts with self-tapping screws. |
 |
Sheathing the space under the stairs:
|
 |
Upper flight lining:
|
Stage 4. railing installation
Now you can start installing the railing. It is more expedient to buy ready-made balusters and handrails, since it is difficult to make them beautiful without the appropriate equipment. At the same time, their price is small - the cost of figured pine balusters starts at an average of 100 rubles apiece.
The installation process of balusters and railings looks like this:
| Illustrations | Description of actions |
 |
Materials. To equip the railing you will need:
|
 |
Installation of dowels for balusters:
|
 |
Installation of balusters. The instruction looks like this:
|
 |
Preparing balusters for handrail installation. trim upper part columns at an angle equal to the angle inclination of the flight of stairs. |
 |
Fastening handrails to the outer posts:
|
 |
Fastening handrails to intermediate balusters.
|
The process of manufacturing a wooden staircase is almost complete. Now all that's left is to do the finishing touches.
Stage 5: finishing
Usually in the process finishing do-it-yourself wooden stairs are varnished, stained or impregnated. This operation is carried out in the following sequence:
| Illustrations | Description of works |
 |
Materials. For finishing you will need:
|
 |
Puttying:
|
 |
Sanding:
|
 |
Dust removal. Vacuum the surface of the stairs or wipe with a damp cloth. |
 |
Varnishing:
It is desirable to cover a wooden staircase with a matte varnish or impregnation. Covered with a glossy varnish can be slippery and unsafe to move around. |
As you can see, stairs to the second floor are made quite simply, so for their manufacture it is enough to have basic woodworking skills.
Conclusion
We examined the process of making stairs with all its main nuances and subtleties, and now you can take on the job yourself. I recommend watching the video in this article. If you encounter any difficulties in the process of work - write comments, and I will be happy to help you.
Making the stairs to the second floor yourself is a difficult task only at first glance. If you correctly perform the calculations and carefully and consistently perform all the assembly steps, you can confidently guarantee the success of such an event as making a staircase in a house with your own hands.
The first step is to choose the material that will be the least problematic to work with. All houses with more than 2 floors are made exclusively with metal or concrete interfloor stairs. These are the requirements of fire safety.
But making a metal staircase for a home requires significant skills in welding work, the presence of welding machine. Yes, and its calculation is a rather complicated procedure.
The construction of a concrete staircase for a house is a laborious process that requires the constant participation of several people.
But everyone has the skills to work with wood, this material is light and can be processed with a simple tool. Therefore, if your house has 2 or more floors, then a wooden staircase is the most best option both in complexity and cost.
The designs of wooden stairs for the house are different. Screw ones take up little space, but are inconvenient to use, and the technology for their manufacture is rather complicated, which is why a novice master will definitely make catastrophic mistakes when assembling it. Therefore, it will be extremely difficult for a non-professional to make a screw model in a private house with his own hands. Straight lines, although they take up more space, are very convenient for walking and have a decisive advantage in our case - simple technology manufacturing.
Calculation of a straight staircase to the second floor of the house
If there were inconsistencies during assembly, then they were allowed at the design stage. clear, detailed drawing with correctly calculated dimensions of the parts will guarantee that the assembly will take place quickly and without hesitation.
Note! FROM The easiest way to make a scheme is according to the principle of the following ratio: the height of the stairs to the length of the span is equal to the height of the step to its depth.
This relation follows from the similarity of triangles, one of which is formed by flight of stairs, span length and span height, and the other is the height and depth of the step.

The dependence of the shape of the steps on the angle of inclination
Angle = 30°; sin = 0.5; cos = 0.8660254; tg = 0.5773503; ctg = 1.7320508.
Deciphering the ratios:
- Sin - span length / flight of stairs.
- Cos - height / length of the flight of stairs.
- Tg - span height/length (or step height/depth).
From this it follows that in order to make a complete calculation, it is enough to know two dimensions - the height of the stairs and the length of the span, which you yourself choose based on the conditions of the room. In the example under consideration, with a height of, say, 2m, the length of the flight of stairs will be 4m, and with a standard tread depth of 30cm, the height of the tread will be 30x0.5773503=17.32cm. The span will be equal to 2x1.7320508=3.46m.
Manufacturing procedure
For the manufacture of stringers, a planed pine board 4 cm thick is used. Its width depends on the length of the flight of stairs. The longer it is, the wider the kosour should be. For this example a board 15 cm wide is used. If the shelves for the steps are made by sawing, then the width of the board should be made even wider so that after cutting the shelves for the steps, a section of at least 15 cm wide, solid along the entire length, is preserved. Such shelves are cut with a jigsaw after marking.

It is done using a template, given the slope of the stairs. The template can be the first cut triangle. Marking is done with a protractor and a ruler.

Important! When calculating the length of the stringer, the thickness of the floor should be taken into account. In this case, the upper and lower rungs of the stairs are not made. The role of the lower step will be performed by the support beam, and the upper one will be the floor of the second floor.
There is another way to make shelves for steps. At the same time, they are not sawn out, but are formed by applying triangular fillies to the end of the supporting brace. In this case, a beam of 15 cm wide is used, since it will not be weakened.

Mounting scheme
Next, you need to make treads and risers. For the soles, you can use the same pine. Sometimes the stairs for the house are made open, without risers. For treads, it is recommended to use hardwoods, as they are more resistant to abrasion. If this is not possible, you can use glued pine. Such treads will not at least crack, and they will not “twist” over time.
To install the stringers at the bottom, a support beam is attached in the right place, and from above they are attached to the floor beam on which they rest.

Fastening elements
After installing the stringers, steps are attached to them. The steps are screwed with self-tapping screws, smearing the shelves with glue.
Railings are often made from prefabricated balusters. Balusters are attached to the steps, two per step, using self-tapping screws passing through the holes in the steps from the bottom up. The railings are attached to the balusters with self-tapping screws, twisted obliquely into the balusters, with the hats sunk and the holes sealed with putty or decorative plugs.
Finally, everything is sanded, primed, painted or varnished.
Knowing the rules for calculating the parameters and using a minimum of material, you can easily make a staircase to the second floor yourself.
During construction frame house sometimes the question arises how to build a wooden staircase? Most of the projects involve the presence of a second or attic floor. Stairs come in a wide variety of materials.
But wood is the most popular and simple material as well as eco-friendly and convenient. Anyone can handle this material. Building and installing stairs with your own hands is a tangible cost savings.
There are two main types of wooden stairs - spiral and mid-flight.
Mid-flight stairs are the most common and simple, and if you are new to construction, choose this kind of stairs.
As a rule, such schemes are compiled in electronic form. There are special computer programs and applications that allow you to create such models. Professional programs for construction organizations have 3D function. Although, this is not at all necessary for the construction of a marching staircase, the usual one on paper will suffice.
Standard interfloor wooden stairs are installed on stringers or bowstrings. The difference lies in the following: the bowstrings are located on the side of the steps, and the stringers are under the steps.
A marching ladder usually has two side bowstrings. Its steps are attached on both sides. Consider the installation and installation of stairs with just such a technology.
Installation of a marching staircase
Initially we make detailed diagram for stairs and its parts. We pre-cut the steps from the boards, make 2 bowstrings and special supporting bars. Next, we connect the steps with bowstrings. Under each step we make a supporting bar. We mount all bowstrings to the floor and to the walls.
 Kosuar and bowstrings
 Spiral interfloor wooden staircase
 Oak spiral staircase
 If you can’t build a staircase with your own hands, then you can opt for a ready-made helical wooden structure. The advantage of this staircase is that it will significantly save space in the house.
It is important to take into account when building a spiral staircase its angle of inclination. If it is too steep, it can be hazardous to health, especially if there are children and elderly people in the house.
An easy way to install and install a spiral staircase is to buy a ready-made, measured design. on the installation will also bring you significant benefits.
A spiral wooden staircase consists of three main parts: a rack, a railing and steps. When choosing wood for stairs, choose oak. He is not only one of the most durable materials, but also different beautiful view and excellent features.
Before buying a spiral staircase, measure the dimensions in detail in order to choose desired design just right for your home. There is another option - to hire a specialist who will take all the measurements himself, and after that already place an order for the stairs. If you have building skills, you can make the steps yourself, ordering only the rack and railing. Usually racks and railings are made to order, chiseled, although there are also rectangular ones.
The device of the spiral staircase
- On the one hand, the steps are attached to the rack, and on the other, they have holes for the railing.
- Racks are mostly metal. They have a flange to which steps are attached.
- The most common staircase design is "duck step". It involves a special form of steps.
- The rack is mounted between floors. It is attached to the floor with anchor bolts.

- After installing the rack, the steps are installed. The distance between the steps should not exceed 20 cm. This is necessary for your safety. When assembling and installing steps, make sure that the last rung of the stairs fits exactly to the floor of the second floor.
At the spiral staircase, like the marching one, there are many decorative elements and details. And each set has its own decorations and different details, and elements of fasteners. When installing and assembling a simple mid-flight staircase, the calculation is different, the geometry of the opening here is rectangular. The opening at the spiral staircase is a circle.
If you decide to order a finished wooden staircase, then contact a trusted and reliable company, with good reviews. Buy a ready-made wooden staircase or make it yourself with your own hands.
Staircase painting
 Stair painting
 Painting stairs is divided into three main parts:
- preliminary preparation of all the details of the stairs;
- painting stairs and its details;
- painting the stairs with a protective varnish layer.
Before starting work, you need to prepare each element of our stairs for painting. And this means: and. Puttying must be done with special mixtures for wood. The use of compounds that are not suitable for wood is strictly prohibited.
When the putty layer has dried, we proceed to polishing the surface. Grinding takes place in two stages. The first stage is rough, it is also called superficial. After that, you have to wait a few days. You will notice that lint forms on the surface of the wood. Blow them with air before the second sanding.
After the completion of the grinding work, the board will become perfectly flat and smooth. Now feel free to start applying the first coating.
Before you start painting, apply a coat of primer to the wooden stairs. And it is better to choose a primer to match the paint.
When choosing a paint, stop your attention on alkyd or urethane types of coating. Such paints are ideal for a flight of stairs. From colors choose lighter colors.
If desired, instead of paint, you can use, or use stain or varnish. The advantages of wood stain are that it perfectly emphasizes and highlights the unique pattern of wood. Your staircase will look perfect. Choose stain along with varnish. And don't skimp on the purchase. The better the coloring composition, the longer the staircase will last you. Stain is not only decorative trim but also protection from various factors.
After the paint has dried, apply finishing layer varnish. Choose from a matte or semi-matt finish. Lacquering is carried out in three stages. Moreover, before each subsequent application, the previous layer of varnish must dry. If air bubbles form on the varnish, then after painting, simply sand them.
Video on making a straight staircase
Video on the manufacture of a spiral staircase
Stairs- this is one of the main elements of the interior design of the room, therefore, when designing it, attention should be paid not only to reliability and functionality, but also appearance. Before taking on making a wooden staircase with your own hands, must be taken into account a large number of factors on which not only its design, but also its dimensions will depend.

These factors include:
- affordable room area,
- height,
- maximum load for which the ladder is designed,
- ease of use for people living in the house.
Today, there are a huge number of options interfloor stairs, so the choice suitable design- It's pretty hard work.

Choosing which staircase to build
Stairs marching and spiral. The design of a flight staircase is quite simple and is the best choice if you plan to make it yourself, however, a considerable area is required in order to provide an acceptable slope and height of the steps. This ladder is very easy to use and can withstand heavy loads. It can easily lift furniture and other large items to the second floor, in addition, it is safer, so it will be the best choice if children or the elderly live in the house.

Spiral staircase has a more complex structure. It is used under conditions limited space when, due to lack of space, it is not possible to ensure a safe slope of an ordinary staircase. The main disadvantages include a not very convenient design, which makes it difficult to lift and does not allow you to carry large items. At the same time, a skillfully executed spiral staircase has sufficient strength and can be the main element of the interior.

Safety above all!
Before proceeding to making stairs with your own hands need to take care of its safety. Firstly, it must be strong and easily withstand a load several times greater than the weight of a person of average build. Secondly, the ladder should be comfortable and ergonomic. In this case, it is necessary to give great attention factors such as the height of the steps, the slope of the stairs, and the location and shape of the railing. The steps should have a non-slip coating, and the gaps between the balusters should be chosen so that the child cannot squeeze through them and fall.
Design features of stairs
Depending on the method of fastening the steps, marching stairs can be on bowstrings, stringers or bolts.
- Ladders on bowstrings have two side beams to which steps are attached. Such squirrels (strings) can be made of metal or wood. They can be attached to the wall or special supports, providing high strength of the entire structure.

- The steps of the stairs on the stringers are attached to the beams, which are located below and repeat the geometry of the entire structure. Such beams (kosoura) can be straight or curved. Straight stringers, as a rule, have a jagged shape, while the steps are superimposed on the teeth.

- Stairs with a bolt connection of steps are highly durable, so this design does not require additional supports and can be held at two points. The steps are attached to each other with metal rods - bolts, which completely eliminates the creaking caused by the friction of two wooden surfaces.

How to make a staircase with your own hands. Choosing materials
The most commonly used wood for stairs conifers because it is affordable and easy to process. An oak staircase will be more durable, but the cost of such a design will increase several times, moreover, the processing of this type of wood is a rather laborious task and requires certain skills.
The main steps in the manufacture of stairs
Consider the basic principles of making stairs using the example of a wooden structure on stringers. Before starting the design, it is necessary to understand that any, even minor errors and inaccuracies in the calculations can lead to serious problems that will arise during installation, so each stage should be treated very carefully. Our future staircase will consist of three main elements: steps, handrails and stringers. On the initial stage design needs to be done necessary calculations designs.
Calculation of the width and height of steps
To calculate the size of steps, the formula 2A + B = 64cm is usually used, where A is the width and B is the height. Typical step heights range from 140 to 170mm. We measure the height of the future stairs and divide by the estimated value of the height of the steps.
Suppose it is 240cm, and the desired height of the steps is 17cm. We divide the resulting value by the height of the steps 240/16=15 and round the result to the nearest integer, therefore, our future staircase will consist of 15 steps. Now we define exact height steps, for this we divide the height of the entire staircase by the number of steps: 240/15 \u003d 16 cm. We find the width by the formula, using the height value, we get 24cm. You can also use a table.

The protrusion (part of the step hanging over the riser) should be no more than 3-4 cm. The greater the height of the riser, the narrower the step itself, but its width should not be less than the height. Most optimal width steps should correspond to the forty-second shoe size (29-30cm.)

When calculating the stairs, it is also necessary to take into account the distance between the steps and the objects located above them (ceiling, beams, balconies, etc.). It should be at least 1.9-2 meters.

The horizontal size of the stairs is determined as follows: the width of the steps is multiplied by their number, while it should be taken into account that the floor surface serves as the first step, so in our case the calculation will look like this: 13x24=312cm.
If the height of the stairs is large enough, you can make a platform. Such platforms are recommended to be done in 7-8 steps. In the case when it is necessary to design a staircase with a certain number of steps, you can reduce their height in order to make a platform.
Manufacturing of stringers
As a material for the manufacture of stringers, you can use pine board 40mm wide. Make a pattern that exactly repeats the dimensions of the profile of the steps and mark the prepared boards. Then cut out the teeth with a hacksaw or electric jigsaw. In those places where the riser joins the step, it is necessary to cut off the corner. Having made one kosour, you can use it as a template for the rest. Since the strength, safety and durability of the stairs depend on the stringers, you should not save on their quantity, as well as on the quality of the material from which they are made. Boards should be free of knots and any signs of insect activity. Consider a way to attach stringers. To achieve the required strength, as a rule, 3-4 stringers are enough.

Installation of steps and railings making wooden stairs with your own hands
Steps can be attached both directly to the stringers, and with the help of additional wooden elements- filly. Measure and cut out of wood required amount steps and risers, do not forget to take into account the ledge. Steps are fastened with nails or self-tapping screws.

The design using triangular fillies is more reliable. The fillies are fastened using dowels, for which grooves are previously made. Most solid construction is obtained using fillies of complex shape, while a special cutout is made on the stringers. The connection of the elements of the stairs is carried out with the help of glue and self-tapping screws.

After the steps are ready, you can screw the railing balusters to them. In order to protect the tree from the influence of destructive factors (dampness, mold harmful insects), it needs to be painted.
Making a wooden staircase with your own hands, in principle, is not so difficult. All you need for this is quality wood, the necessary tools and a little patience. Before starting work, carefully consider all the nuances future design and double-check your calculations.
If you have already built two-storey house or you are the owner of a two-level apartment, then the topic of building a staircase on the second floor will be of interest to you.
In order to acquire a comfortable and high-quality ladder system, you have only three ways: buy a ready-made structure in a specialized store, order the necessary model from a carpenter, or make a ladder with your own hands.
For those who chose the third option, this article is devoted. In it you will learn a lot useful information about ladder construction and see step by step detailed instruction for the manufacture of stairs in photo and video.
For owners of a two-level dwelling, the stairs of the second floor - required attribute interior
What are the stairs - a little theory
Before you start building stairs with your own hands, you need to decide on the type of construction that will be most suitable for your home.
Types of stairs by design type
We will choose a system from three types:
- Marching.
- Screw.
- Combined.
Let's take a look at each of them a little.
Marching
This type is the easiest to manufacture and therefore, if you decide to make a staircase with your own hands, then this option will be the most suitable for you.
 Single-march designs, despite their apparent simplicity, can be beautiful and spectacular.
 Marching stairs, in turn, are divided into types:
- single-march;
- two-march;
- multi-march.

Both the first and second types are considered not difficult to manufacture and are in the greatest demand.
screw
Such stairs are a spiral going up to the second floor. This type saves a lot of room space, but it is labor-intensive in production.
 The spiral staircase is original and beautiful, but it is better to entrust its production to professionals.
 Combined
These systems combine the two previous types. Their manufacture is the most difficult and therefore for self erection does not fit.
 Combined systems are more complex in production and it will be quite difficult for a beginner to mount them.
 We make a ladder with our own hands - instructions for making
First, we will determine the material of manufacture and prepare the tool necessary for the job.
Material selection
For the production of a ladder structure, you can choose:
- wood;
- stone;
- concrete;
- metal;
- plastic.
 For the manufacture of stairs, you can use the most various materials
 by the most suitable material for self-manufacturing stairs is definitely natural wood. Its advantages are obvious:
- environmental friendliness and safety;
- non-toxicity;
- ease of processing;
- relatively economical price;
- long service life.
Therefore, for the construction of our stairs, we will choose natural wood. It is best if it is pine wood - spruce, pine. You can also use ash, beech, maple, oak, birch and other species.
 Natural wood is the most the best choice for the production of stairs with their own hands
 So, we have decided on the type of structure being built - this is marching ladder. We also chose the easiest to process and eco-friendly material- natural wood. The next step is to prepare the necessary tool.
Cooking tool
To make a wooden staircase with your own hands, we need:
- Measuring devices - tape measure, ruler, level.
- Electric drill of manual type.
- Hacksaw for woodworking.
- Screwdriver.
- A hammer.
- Electroplaner.
- Sandpaper.
 Optimal set necessary tools
 Preparing the basic elements
Before installing the ladder system, it is necessary to prepare the following details:
- Processed boards of the required dimensions (according to the drawing).
- Bars for the production of steps.
- Step boards.
- Bowstrings or stringers (depending on the type of construction).
- Railings, balusters, handrails - these parts can be bought ready-made.
- Fasteners - screws, screws, bolts.
 This figure shows in detail all the components of the structure.
 The main stages of installation
To make quality ladder with your own hands, use the following manufacturing instructions in photos and videos.
Stage 1. Schematic drawing
Let's draw a drawing on which we denote the main elements of the future design.

Stage 2. We perform the necessary calculations
Performing design calculations is probably the most exhausting process, but it still needs to be done. You can do this in a few steps:
- determine the height of the structure - to calculate it, measure the distance from the floor plane of the first level to the floor of the 2nd floor. This will be the length of the march;
- determine the height of the steps - usually the most optimal height for a person of average height 17 centimeters;
- we calculate how many steps and risers are needed - for this, we divide the height of the stairs, which we have already measured, by the height of the steps (17 cm);
 Before making a ladder, it must be calculated
 - step width - for convenience when walking, the smallest value of this parameter should be 22 cm, and the largest - 40 cm.

Stage 3. Making a kosour
We cut the beam prepared for this part to the desired size and cut out the notches right size to install steps.

Stage 4. Checking the kosour
To do this, we attach it to the place where the stairs will be located, if necessary, we make adjustments to the part.
 This diagram shows detailed calculations stringer
 Stage 5. We fasten the stringers
We attach the stringers and fasten them together to the upper beam using anchor bolts.
 We fasten the stringers securely anchor bolts
 Stage 6. Installation of risers
Attaching the risers to the stringer is carried out using self-tapping screws.


 for a girl: character and fate, the origin of the name")