How to draw an energy-saving light bulb. DIY light bulb toys for the New Year: we make New Year decorations from old light bulbs. Several crafts for interior decoration
Old light bulbs can be easily turned into amazing Christmas tree decorations. However, you don’t have to collect burnt out light bulbs to get new New Year’s toys - you can buy new, cheap ones. Their price compared to ready-made Christmas tree decorations is simply microscopic.
Which light bulbs to choose for toys
The shapes and sizes of light bulbs for New Year's toys can be any - depending on what kind of toys you want to make. If you are planning to install a large one in your home for the holidays, feel free to choose large light bulbs. By the way, they provide great opportunities in terms of creating New Year's decorations. Large light bulbs can not only be painted, but also decoupaged and decorated different materials. You can even remove the base and place some interesting things inside the lamp - you will get the most interesting New Year's composition.

But it’s also possible to make a Christmas tree out of small light bulbs original decor. In addition, keep in mind that small toys add great beauty to the tree. Even if the tree is very large, just place them on the branches between large Christmas tree decorations.

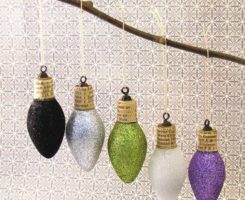
Especially interesting crafts-toys are made from elongated light bulbs, so-called candle light bulbs.

What paints to use for painting light bulbs
In the process of turning light bulbs into, you will need paints for painting. Choose win-win options:
- glass paints;
- paints for glass and ceramics;
- stained glass paints;
- contours for painting.
These paints are easy to paint, they cover the glass surface well, stick tightly to it, do not fade over time and last a long time.

You may want to buy paints with different effects for your Christmas decorations. In addition to the countless shades of glass paints, there are pearlescent paints, metallic, glossy and matte, transparent and opaque.

Using a certain type of such paints, you can obtain a structural surface (rough, “velvet”, etc.). If you want to enhance the effect, use a special sprinkle - buy glitters (sparkles).


Contours are also paints, only thick and non-blurring - they are good for drawing lines separating parts of the drawing and drawing details. They are convenient to use - they are sold in small tubes with thin tips.

How to paint a light bulb
With the decor of light bulbs, everything is exactly the same as with painting of ordinary glass.

Before starting painting, the surface is washed and degreased. To do this, take glass cleaner, alcohol or solvent. They dry quickly, so preparatory stage won't take much time.

The background coloring is subtle, special care should be taken if the paint is clear/translucent.
We are waiting for the background to dry. We draw the drawing with a simple thin pencil.

We paint the sketch with paints of the appropriate color.
While the paint is fresh, sprinkle the selected areas with glitter. You can do it differently: wait for the painting to dry, grease the areas with PVA glue and then sprinkle them with glitter. Remove excess glitter with a brush.
Leave for a day, after which we cover them with acrylic varnish.
Leave your review |
|
Don't throw away burnt out light bulbs! Today we will learn how to turn them into very cute Christmas tree decorations with our own hands. Snowmen, Santa Clauses, shiny lanterns and much more - we have collected for you best ideas for inspiration and useful master classes. With a little effort, you will have a great set of unique toys that will make your Christmas tree even more beautiful!
All materials for work are very simple. The process itself is also not difficult: turn on Christmas songs and get down to business, recharging yourself in the New Year's mood!
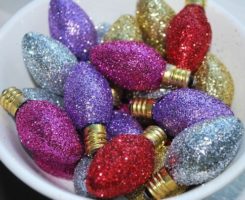
Option one: shiny lanterns
The finished toys will sparkle and shine. Choose any colors, mix them, combine them with each other.
What do we need?
- light bulbs (preferably small ones)
- PVA glue
- dry glitter
How to do it?
- The light bulb needs to be coated with glue using a brush. If you have dry dyes the color of the selected sparkles, you can mix them with glue: if there are gaps, the flaws will not be visible.
- Then just sprinkle them with glitter. Hold it by the base and pour it in with a spoon.
- All that remains is to make the rope.

Such homemade New Year's toys can replace any set!
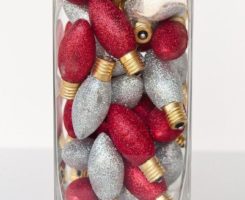
Option two: gold and silver light bulbs
Such Christmas tree decorations look very expensive and always turn out especially beautiful.
What do we need?
- large sparkles
- PVA glue
- spray paints or acrylic paints in gold and silver colors
- standard size light bulbs
How to do it?
- Pour glue into a bowl and pour glitter into it. Dip the light bulb into the bowl and twist it on all sides.
- We take another light bulb, hold it by the base and carefully cover it with paint on all sides. Don't forget to wear gloves!

Ready! The lights of the garland are reflected very nicely in these Christmas tree decorations.
Option three: light bulbs coated in sugar
These New Year's toys make you want to eat them! They are very similar to sweet candies.
What do we need?
- small light bulbs
- acrylic paints
- artificial snow(ready or homemade)
How to do it?
- Cover the light bulb with acrylic paints and let it dry.
- Then we repeat the procedure to ensure the color is saturated.
- We cover our craft with artificial snow on top. Ready!

It is better to take small light bulbs - it is easy to glue a gold thread to them, from which you can hang a toy.
By the way, if you make artificial snow with your own hands (you will find a corresponding master class), cover the spruce branches with it - this way your tree will turn out snow-covered and “candied”.
Option four: New Year's toys in sequins
This method suitable for those who loves hard work.
What do we need?
- small light bulbs
- bag of sequins
- additional decorations in the form of flowers or stars
- PVA glue
- tweezers
How to do it?
- Light bulbs can be pre-painted. Carefully pick up each sequin with tweezers and dip it in glue, and then “sit” them on the light bulb one at a time next to each other.
- Wrap the top part of the craft with cotton wool.

Option five: shiny decor and satin ribbons
You will get very neat New Year's toys made from light bulbs that will look beautiful both in a set and individually.
What do we need?
- light bulbs of different sizes
- acrylic paints
- PVA glue
- sparkles, mirror pieces, stars and other decor
- thin satin ribbons
How to do it?
Lifehack: If you don't have acrylic paints, but only gouache, watercolor or other paints - mix them with glue and cover the light bulbs with the mixture using a brush. This paint will adhere tightly.
- We paint the light bulbs with acrylic.
- Next, using tweezers and superglue, lay out decorative elements.
- Wrap the base with ribbons.

Option six: Christmas tree decorations with stones
We won’t paint the light bulb, but we’ll do the decor – it will still be beautiful. This option will do for those who don’t have paints at home.
What do we need?
- bulb
- large rhinestones
- Super glue
How to do it?
Please note that the glue in this case must be transparent.
Stones can be glued using tweezers or directly with your hands. If desired, you can lay out a fancy pattern.

In this case, the main thing is not to overdo it with the decor so that the Christmas tree decoration turns out beautiful, but not tasteless.
Option seven: snowmen in hats
You will get a very cute Christmas tree decoration that is hard to miss.
What do we need?
- a small piece of fabric for a cap
- white acrylic paint
- plasticine
- marker
How to do it?
- We paint the light bulb in White color.
- We roll the fabric into a cone and glue it to the base.
- We draw eyes and a smile on our snowman with a marker, mark the place for the “carrot”
- If there is a ready-made “nose” made of plastic, we glue it with superglue; if not, we sculpt a “carrot” from plasticine.
- If you want to make a girl snowman, add yarn braids.

Try making different New Year's characters in the same way. It's actually not difficult.
Option eight: New Year's toy made of fabric
A light bulb can turn into a ball! You just need to decorate it correctly.
What do we need?
- a piece of beautiful elegant fabric
- bulb
- satin ribbon, lace cord
- small decorative elements: leaves, spruce branches, etc.
How to do it?
- We wrap the light bulb with a cloth, and grab it with tape on top (at the place where the base begins).
- It is better to fix the structure with glue.
- All that's left is to add decorative elements!

Choose fabrics in red, green, white, gold and silver flowers. Velvet, felt or thick printed fabric look best.
Option nine: ready-made stickers and napkins
If you've ever decorated eggs for Easter with ready-made stickers, you already know what we're talking about.
What do we need?
- bulb
- ready-made stickers or napkins
- acrylic paints
How to do it?
- First you need to paint the light bulb in one or more colors.
- If you have ready-made New Year stickers, just decorate them beautifully on a glass surface.
- If you have New Year's napkins, try decorating a light bulb using decoupage technique.

In this way you can make toys even with very complex designs.
Option ten: toys with beautiful designs
If you know how to draw or are ready to work with stencils, this idea will definitely suit your taste.
What do we need?
- light bulbs of different sizes
- acrylic paints
- thin brushes
- pieces of fabric for decoration
How to do it?
- Paint the light bulb one tone. Let this layer dry thoroughly and apply a second one.
- Then arm yourself with a thin brush and apply a design to the surface. It’s better to “rehearse” the image on paper in advance, and then draw it. If you don't know how to draw, take a stencil and tracing paper. Apply an image with a simple pencil, and then paint it.
- Instead of thin brushes and acrylic paints, you can take nail polish (try options with glitter - they are often used for nail art, which means they have a thin brush) or special markers.

Don’t forget to put a hat on the New Year’s character, glue a scarf and other related accessories on him. By the way, such a toy light bulb would be a great holiday gift!
Choose any of the ten proposed options. Don't be afraid to experiment! If you are working on decor with your children, do it on the table. If the light bulb suddenly slips out of your hands and breaks, the fragments will not fly off to the floor.

Enjoy the process, get inspired and feel like an artist!
Views: 7,894
Create original craft possible using available materials. If your light bulb burns out, don’t rush to throw it away. After all, with a little effort and using your imagination, you can make an original product with your own hands that will decorate your apartment or country house.
How to prepare material for work
Before you start making beautiful crafts from light bulbs, you need to remove internal elements from a glass flask.

To do this, the base is sawed around the circumference using a thin sheet of metal. A notch should also be made on the inner glass component. Then the end of the base is clamped with pliers and the structure is rotated. As a result, the middle of the lamp is freely pulled out. If there are any fragments left inside, they should be carefully removed.

Light bulbs often have a matte finish. This means that the inside contains a coating of kaolin powder. It must be removed using a twisted napkin, which is inserted inside the flask.

You can also pour salt into the flask and shake the lamp. Together with kaolin, it is easy to pour out of the flask. It is also advisable to rinse the structure with water and then wipe it dry.


Several crafts for interior decoration
The most simple option crafts made from light bulbs for home decor is an improvised vase. After you have removed the insides from the flask, you can pour water into it and place several flowers with a light stem. Such a vase can be hung by tying a string to the plinth or mounted on an improvised stand made of rigid wire.


You can also pour an aqueous solution into the flask eau de toilette or perfume. Make a simple air freshener. There is another option - pour oil into the container, after inserting a cotton wick inside.

As a result, you can get an original candle. It is allowed to use cork or round blank with a hole inside. The flask is attached to it using glue or silicone.

A paraffin candle in the shape of a lamp will also decorate your home. To do this, paraffin is poured into a flask with a wick. After it hardens, the glass is carefully broken and removed from the surface of the paraffin product. A master class on crafts made from light bulbs will help you decide on the choice of product and manufacturing technology.

A transparent container can be filled with small pebbles, sand, moss, and shells. This mini-garden can be hung or installed on a wire base. The structure must be fixed to the base. Using a cocktail straw, pour sand or fine gravel inside, and soil with fertilizer on top.


You can plant moss or succulent plants in the soil. Planting is done using tweezers. You will get a wonderful mini-terrarium with toy animal figures, as can be seen in the photo of crafts made from light bulbs.

A useful item can also be made for the kitchen. Washing up inner surface flask, it can be used as a container for storing spices.

But for this it is advisable to remove metal base completely or make a larger hole in diameter. A regular cork is used as a lid. You can decorate the base using twine wrapped around it.

Original ideas for decor
If you want to learn how to make a light bulb craft with your own hands and surprise your child, then the option with funny bees will help you. To do this, you do not need to disassemble the lamp; the bulb is used together with the base, which is painted black.


The glass is painted with yellow and black stripes and will represent the abdomen of an insect. To keep the lines straight, use thin rubber bands. You can make antennae out of paper by first twisting the tip at the top. You can also use paper or a loop of thick rope as wings. Small eyes are also glued to the base.

Paint the flask or cover it with colored paper, and attach a homemade basket to the bottom to create an original balloon. The entire structure is hung from the base or on the tree as a decoration.


By covering the flask with glue and attaching glitter on top, you will create snowman figures. Of course, you will need to glue on hands made from light twigs, as well as beads in the form of buttons.

The figurine is used as a Christmas tree decoration. And if you paint the flask black and white, then the original penguin will come out... christmas tree.


Ideas and instructions for making crafts vary widely. With their help, you can decorate both the New Year tree and the entire room. A solution of water and glycerin in a ratio of 7:3 with glitter diluted in it is poured into the flask. You will get a funny snow globe. After shaking, its sparkles will fly around the flask in an original way.

Creative and interesting crafts from light bulbs can be made without any effort. special labor. Children are also involved in making the product. Original jewelry for the Christmas tree will be provided. Crafts can decorate a room and can even be used in the kitchen.


Photos of crafts made from light bulbs


Little things in the interior mean a lot and are not those little things that you shouldn’t pay attention to. Original decorative touches, unusual solutions aimed at emphasizing comfort and warmth home environment, do not necessarily require large expenses and money. For example, to make accents and add bright colors You can simply paint the light bulbs to add to the decor. After reading our article, you will be able to understand how to paint a light bulb and how best to do it. Here you will find the simplest and available methods.
Coloring a light bulb - what do you need to know about the process?
The idea of coloring can come to the mind not only of a child, but also of an adult. You may ask why paint them? You can buy multi-colored ones. But no, it is very rare to find a blue or red light bulb in a store, and they are not cheap.
Why you might need light bulbs of different colors:
- painted light bulbs in the entrance will not be stolen;
- a multi-colored garland made by yourself will delight your household;
- Multi-colored lighting will look very stylish.
The main problem you may encounter is temperature. When the light bulb is turned on, it heats up and when high temperature the color may change greatly. Incandescent lamps come in different wattages; therefore, incandescent lamps of no more than 25 watts and ordinary energy-saving lamps are suitable for painting.
Important! Halogen lamps cannot be painted. Reduced light transmission will lead to uneven heating and the lamp will fail.
Let's take a closer look at 7 ways to make paint at home.
Method 1 - Ball Paste
For this method you need to prepare the following components:
- ball paste;
- acetone, paint thinner (can be bought at any paint store), ethyl alcohol (sold at a pharmacy);
- brush for applying paint;
- container for preparing paint.
Cooking process:
- Remove the rod from the paste. Blow the paste into a container. We take at least 5 rods.
- Add 50 ml of acetone or some other solvent that is available.
- Stir until smooth.
- Apply paint to the light bulb with a brush.
Important! Applying several layers of paint will give you color.

How to make the right color?
- From blue paste you can get Blue colour— the number of rods will affect the color saturation.
- Of the reds, red is the color.
- From green - green
- From yellow - yellow.
You can also show your imagination and mix red and blue to get purple, add red to green and the result will be Brown color and so on. It all depends on your imagination.
Important! Prepare a drying stand in advance. It can be made from scrap materials:
- cardboard;
- polystyrene foam;
- plastic bottle.
At a certain distance, so that the light bulbs do not touch each other, make holes whose diameter is equal to the diameter of the light bulb base. A light bulb must be inserted into these holes to allow the paint to dry completely. This way you can easily and accurately paint the light bulb.
Method 2 - Nail polish
For this method we will use quick-drying nail polish. It can be used to color a low-power incandescent light bulb or an energy-saving one (fluorescent or LED).
Step-by-step instruction.
- We take a light bulb and, using the brush that is in the varnish, apply the varnish.
- Place on the stand for 10-15 minutes, base down.
- Reapply varnish.
Important! For application, you can use a swab or cotton pad. There will be no streaks and the varnish goes on smoother.
If you only have in stock clear varnish, don’t worry - you can paint it using ballpoint paste, using the method described above.
Method 3 - PVA glue
For cooking you need to prepare the following items:
- PVA glue;
- ink for inkjet printers, or other water-soluble inks;
- shallow container;
- brush.
Important! Can only be used on moderately hot elements.
Preparing the paint:
- Pour glue into a container.
- Add coloring pigment in a 1:1 ratio (50 ml of glue requires 50 ml of paint).
- Mix well with a brush.
- Apply to the light bulb and dry.
Important! Prepare separately all the necessary shades so that you can paint the light bulbs blue, red, green or any other color.
Method 4 - Auto enamel
Automotive enamels are sold in aerosol cans. Everything here is quite simple; you don’t need a lot of time and effort to paint a light bulb. Need to:
- Buy balloons with the desired colors.
- Spray paint on the light bulbs at a distance of 30-40 cm.
- Dry.
Advantages of this method:
- suitable for light bulbs with bulb temperatures up to 200°C;
- easy to use;
- dries quickly.
Important! Do not apply too thick a layer of paint, it can make the bulb opaque and the light bulb simply will not shine.
Method 5 - Stained glass paints
These are special paints for creating designs on glass. They are different types. In our case, we need water-soluble ones for firing. When heated, they do not burn, but on the contrary, they become more transparent. Accordingly, a light bulb painted using this method will last longer and the coloring will be brighter.
Important! The only drawback of this product is the price.
The application technology is also not complicated:
- Mix the paint in the bottle.
- Apply with a brush or padding pad.
- Dry.
Method 6 - Organosilicon
The painted surface with silicone enamel can withstand high temperatures. Light bulbs painted this way can be used to create color music. Can be purchased at any hardware store.
Important! When purchasing, pay attention to the toxicity of the varnish.
Instructions for use:
- Mix the enamel with the solvent (the brand of the required solvent is written on the package).
- Apply to the light bulb using a brush.
- Place on a rack to dry.
Important! Wear a mask and gloves while working, as the paint is toxic during drying and painting.
Method 7 - Tsaponlak
Tsanoplak is a varnish, which in its composition belongs to nitro-varnishes, is a liquid mixture of nitrocellulose mixed with dyes and plasticizers.
As we approach New Year's holidays An irresistible desire to create awakens, and it’s just in time, because we can save some money on Christmas tree decorations by preparing them ourselves for the holiday. You can create New Year's decorations from anything, for example, from old used light bulbs, if you didn't throw them away. Of course, new ones can also be used if you are creative.
So what can we offer? What new toys can be made from used light bulbs. How to breathe new magical life into them and a fabulous, festive atmosphere of the New Year?
Cute snowmen
The first thought that comes to mind is good-natured, smiling snowmen made from small light bulbs. It will be easy to make them, for example, by painting a light bulb white; you can easily draw a funny smiling face on a whitewashed light bulb. Carrot-nose can be made from salted dough; real craftswomen may have fimo or some cold porcelain. The base of a light bulb can be easily and very cutely decorated with a small cap made of fabric. Handles made from sticks can be glued to universal adhesive gel. It will make a very funny face and an attractive decoration for the New Year tree.
The snowman can be simplified by, for example, covering the entire light bulb with glue and sprinkling it with white or silver sparkles. Using rhinestones or paint on top, draw noses, coal eyes, a sweet smile and buttons. Handles made from sticks are a must-have attribute for a snowman!

Grandfather Frost will be in time for them. It will be even easier to make if you have brushes and paint. A beard can be made from cotton wool, as the well-known poem says. However, you can draw not only Santa Claus, but also the same snowman, and penguin, and New Year's bottle champagne.

Animals from famous fairy tales: making Christmas tree decorations from old light bulbs
If you can draw the faces of famous heroes, then you can diversify the Christmas tree branches with cute animal faces from different fairy-tale characters. Light bulbs instantly turn into bright, familiar characters.

Speaking of a couple of reindeer for Santa Claus. They, like snowmen, can be drawn on a primed light bulb, adding horns made of dough or cardboard, and decorating them with the same bright New Year's hats.
You may be interested in:
The sophistication of decoupage: master class on decoupage of an old light bulb
Of course, the painted faces are too simple and lack some kind of sophisticated work. The decoupage technique will be just right. An exquisite, beautiful Christmas tree toy will be made from simple New Year's napkins and will not require such artistic skills as drawing characters. Simple, quick and very beautiful, especially if you add a little sparkle. Here is a short master class on decoupage:

- Prepare the light bulb for changing it, wipe it with alcohol, this will degrease it and remove dirt. Get some primer and prime thin layer light bulb using a piece of foam rubber.
- After the primer has dried, paint the future toy white with acrylic, although the choice of color is yours, it all depends on your idea. While the acrylic is drying, choose the right one New Year's motive, the napkin is just right.
- After cutting out the desired piece, use decoupage glue to glue a piece of napkin onto the dried light bulb. If extra wrinkles appear, you can go over the dried bulb with sandpaper.
- The toy already looks festive, but this is not enough, there is not enough background decor. Using a sponge, add a little blue tint to the toy at the bottom and top. Glitter will add a festive touch to the toy; you can use it to outline a picture, an inscription, or draw a snowflake. A pair of large snowflakes and small dots near the base will not harm the toy.
- Secure your piece with glossy acrylic and add a thread. If desired, the base can be masked with an acrylic outline, depicting icicles.
Balloons
A light, cute toy will hint to Santa Claus about your desire to travel. By the way, it’s not a sin to decorate not only the New Year tree with such a toy.

Yes, old light bulbs make for a long journey Balloons. The base of the light bulbs can serve as a basket for travelers, and the glass part can serve as a ball that can be painted on the glass with the most different ways. Exquisite, light, sophisticated, no, it is impossible to find the right word to describe these beautiful products.

Openwork joy
If you are good with a ball of thread and a crochet hook, then the idea of decorating light bulbs with lace will not be difficult for you. After all, you can simply crochet them, getting a wonderful toy for a quick fix. Toys can be diversified with different thread colors, add beads, borders, whatever your imagination suggests.

By the way, with woolen threads you can tie a light bulb tightly, with a pattern or giving it the shape of a strawberry, for example, or a small mushroom.
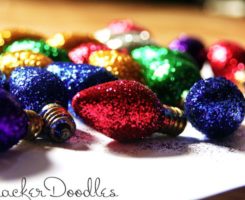
Simply brilliant: Christmas tree decorations made from old light bulbs
Maximum effect and minimum cost strength? Of course you can! Coloring the light bulbs different colors or after covering it with glue, sprinkle dry sparkles on a light bulb - no big deal, you can decorate them afterwards with ribbons, rhinestones, and more sparkles. This toy cannot be distinguished from a simple Christmas tree toy from the supermarket.


More Photo Ideas:


For artists
For those who confidently hold a palette and a brush in their hands, you can paint a light bulb in a variety of ways, placing on it not just drawings, but whole art, real paintings and incredible scenes. Pictures or bright ornaments are a wonderful design for a light bulb of any size.

A little for the base
It is worth focusing on the base. If painting the glass part of a light bulb costs nothing, then decorating the base is not a simple thing, it’s ugly, it’s made of steel, it stands out from the overall picture and spoils all the charm of the craft, revealing that an old light bulb is hiding under the Christmas tree decoration. Remember the base, decorate them with hats, braids, cotton wool and bows, depending on the design of the toy itself.

Options for decorating a light bulb can be very diverse, simple and crazy, bright, shiny, voluminous, decorated with bows and felt hats, with the addition of salt dough, sparkles, beads, and paints. Don't be afraid to get creative by inventing new characters to decorate your forest guest.
If everything is clear with the previous versions of Christmas tree decorations from light bulbs, then how to make a snow globe from old light bulb? If you want to make something truly original New Year's craft, then this master class was created especially for you.
Well, let's begin. In order to place anything inside an old light bulb, you need to open it and remove the filament. This is actually done quite simply:

Now that the lamp is free, you can put whatever you want inside, for example, a miniature Christmas tree and sparkles. Then you will get a real snow globe.

Instead of snow globe You can make a very personal gift for your loved one. You won't need glitter, but you will have to find a small piece of wire.

")


