In what soil is it better to plant petunia seeds? When to plant petunia seedlings. Stages of planting petunias for seedlings
Petunia seedlings can always be found at flower markets, because... This flower is simply extremely popular. However, you came to this article not because you want to buy a ready-made planting material, but on the contrary, be eager to plant petunia seeds for seedlings yourself and go all the way from the appearance of the first small sprouts to the gorgeous flowering of large bright buds.
In this material you will find all the necessary information on how to properly sow petunia seeds for seedlings at home.
If you want your petunia to start blooming in May, then you need to sow the petunia seeds 3-3.5 months before planting in the ground, i.e. in February-March.
Advice! In order not to bother too much with lighting, it is still better to sow seeds in March, selecting early varieties.
First, ampelous varieties are sown and then the rest - large-flowered, multi-flowered, double (usually bush).
More exact dates select landings depending on the climatic conditions of your region, namely when the threat of return frosts has passed and the soil warms up to 10 degrees Celsius.
For example, in the south of Russia you can sow as early as February, but in Middle zone (Moscow region) - from late February to early March, in the Urals and Siberia - from the second half of March.
How to sow petunia for seedlings: preparatory stage
Before you start directly sowing seeds, you need to buy high-quality seeds, prepare a soil mixture (soil) and select suitable containers for seedlings.
Selecting quality seeds
One of the main factors for successful and rapid seed germination is their freshness. In other words, it is desirable sow the seeds collected last year.
So in the spring of 2020 you must sow the seeds 2019 collection.
The fact is that small petunia seeds are not stored for a long time and quickly lose their viability. As a rule, it makes sense to sow seeds no older than 2 years, because Already 3-year-old seeds germinate very, very poorly.
Biological viability period petunia seeds - 2 years!
Suitable soil
The soil for sowing petunia seeds for seedlings should be as light and loose as possible (soft and as if “melting” in your hands) and always neutral acidity (6-6.5 pH).
Note! On initial stage(germination of seeds, especially small ones) growing petunia soil in which there is too much nutrients, on the contrary, can negatively affect the condition of young seedlings.
Where can I find such soil?
- Purchase ready-made soil mixture for growing flower seedlings in garden store. Now you can even find soil for petunias on sale.

- Prepare it yourself (including using purchased soil (peat) and sand).
Several recipes for preparing “airy” (moisture- and breathable) soil for sowing seeds:
- Recipe No. 1: 3 parts of deoxidized peat, 1 part of turf and leaf soil, and 1 part of river sand.
- Recipe No. 2: 2 parts peat, 1 part each humus and sand.
- Recipe No. 3: 3 parts peat and 1 part sand.
Important! If you have acidic peat, then for each kilogram of prepared soil mixture you will need to add 1 tbsp. spoon (to reduce acidity).
Next stage - soil disinfection. Moreover, this applies to both self-prepared soil mixture and purchased soil.
Soil can be disinfected in the following ways:
- Heat the soil - steam it in the oven, steam or microwave.
- Spill it the old fashioned way with a solution of potassium permanganate or a modern biological product (the second will be much more effective).
Better yet, do it both(first heat, then cool and pour).

Immediately before landing it is highly advisable sift the soil through a sieve, so that there are no lumps or sticks in it. Moreover, it is not necessary to sift all the soil, it will be enough sift only the top layer(1-2 cm).

Containers for planting
For the initial cultivation of petunia seedlings, you will need a general container - shallow (4-5 cm high), but wide enough.
Thus, the following can be used as a planting container for sowing petunia seeds:
- plastic food container with lid;

- wooden or plastic box for seedlings;
Advice! Transparent containers are more practical because... you can easily assess how wet the soil is and whether it is worth watering, which is very important at the initial stage of growing petunia seedlings.
- peat tablets.

Also, do not forget that the landing container must have drainage holes so that excess moisture flows out freely and does not stagnate. Alternatively, you can pour drainage layer from expanded clay. Or you can do both (if you want), but this is not at all necessary, just choose one.
Advice! If you choose containers with transparent walls, then, in principle, you don’t have to make drainage holes, because... you can control the degree of soil moisture. However, if you are afraid to overfill the soil, then do it better!
Methods for planting petunia seeds for seedlings and step-by-step guides for direct sowing
So, depending on what kind of seeds you purchased - regular or pelleted, and whether you have snow (you can take it from the refrigerator), you can choose one of your favorite methods of sowing petunia.
Standard sowing of small seeds (universal instructions)
Step-by-step instructions for the classic sowing of petunia seeds for seedlings:
- Fill the planting container 3/4 full with suitable soil, level the surface and compact it lightly.
The surface must be as smooth as possible, because seeds will be sown superficially and compacted, that they do not fall into the lower layers.
- Moisten the soil thoroughly. After moistening, be sure to level the soil surface again.
- In order for the seeds to be distributed over the surface as evenly as possible, they can be mixed with sand.

- Sowing is carried out by scattering the seeds on the surface of the soil or spreading the seeds with a toothpick (after wetting its tip). The more evenly you distribute the seeds, the more convenient it will be for you to do.
Important! In no case no need to bury or sprinkle the seeds on top with soil. We only sow superficially! The seeds are small; they simply do not have enough strength to break through the thickness of the soil.
- If desired, you can lightly squeeze the seeds with your hand so that they seem to “stick” to the ground (in other words, it is advisable to ensure good contact of the seeds with the soil).
Because Petunia has very small seeds, and the sowing is superficial; they should not be sprayed with a spray bottle.
- Cover with a lid, glass, cling film or put on a bag to create a greenhouse effect, i.e. mini-greenhouse (high humidity will help the seeds germinate faster).
- Label the container or stick a label on a packet of seeds to know exactly what is planted.
- Place the container with the seeds in a warm place place where it is kept optimal temperature for seed germination - +22..25 degrees, according to other sources, even +25..30 degrees is better (the lower the temperature, the longer you will have to wait for germination, the higher - the faster).
Think! There is an opinion that petunia seeds germinate only in the light, so in February they are placed under lamps (12-14 hour daylight hours). However, as practice shows, this is not entirely true. The bowl with crops can be removed to Kitchen Cabinet. Another thing is that it is very important to get and move the container with the seedlings into the light in time, otherwise they will quickly stretch out.
Sowing pelleted seeds
If you purchased pelleted petunia seeds, then sowing is even easier:
- Everything is the same the previous method, only in this case you will be able to distribute the seeds more evenly over the surface (optimally at a distance of 1-2 cm from each other).

- Again, if you wish, you can lightly press the seeds into the soil by hand.
- After sowing you can lightly moisten the pelleted seeds from a spray bottle, that they got wet faster and began to sprout.
However! Some experts believe that when sowing granulated seeds, they do not need to be sprayed additionally. The fact is that the substance of the granule can be different in composition: some granules dissolve immediately, others retain their shape until seedlings appear.
- Cover with film (make a greenhouse), put in a warm place (+25 degrees) until the seeds germinate.
By the way! You can sow pelleted seeds immediately in individual containers (the same cassettes) or .
Sowing in furrows (in rows)
To make it easier to care for the growing petunia seedlings (including), you can sow the seeds not randomly, distributing them over the surface, but immediately along the grooves.
Important! If you are going to sow ordinary small seeds, then the soil must be moistened beforehand; if it is pelleted, then you can water it after sowing.
- So, you need to make very shallow grooves (literally a couple of millimeters deep), so to speak, mark rows at a distance of 2-3 cm from each other.
- Next, place the seeds in grooves, trying to keep a distance of 1-2 cm between them.

It is very convenient to spread the seeds (dragées) using a toothpick, moistening its tip, to which they will stick well.
Or mix regular seeds with sand and sprinkle evenly from a leaf.
Interesting! Some people manage to pick up regular small seeds with the moistened tip of a toothpick.
- If you sowed granulated seeds, then moisten them with a spray bottle (spray the seeds so that the seed shell becomes limp). If the usual small ones, then they had to be sown immediately on moist soil.
- Make a greenhouse (close with a lid or cover with film) and put it in a warm place (+25) until shoots appear.
Video: sowing petunia in rows
Sowing in the snow
Because Petunia can be sown in winter, but it is very convenient to sow seeds in the snow (their will be better visible on a white background):
- You need to lay a layer of snow (1-2 centimeters) on top of the soil mixture.
- Next, distribute the petunia seeds evenly over the snow.
The advantage of planting in the snow is that after the snow melts, the seeds will be in the ground at the optimal depth (they will be only slightly “pressed”, so to speak, “drawn” into the soil).
Snow will also contribute to the gradual dissolution of the shell of the coated seeds.

- Wait until the snow melts, cover with film or a lid, and put in a warm place (+25 degrees).
However! There is an unfounded opinion that petunia seeds do not require any cold stratification; on the contrary, for good germination the optimal temperature is +25-30 degrees. Accordingly, after sowing petunia seeds on snow, germination may be delayed.
Video: how to plant petunia seeds in the snow
Further care of petunia seedlings after germination
Before the seeds germinate and seedlings emerge, you will need to monitor the soil moisture in your greenhouse. Open the lid slightly or remove the film for ventilation every day - once a day for 5-10 minutes, so that strong condensation does not form inside.
Petunia shoots, as a rule, appear after 5-10 days (maximum after 14). After unfolding the cotyledon leaves, the cover (shelter) can be removed.

Now you know that the first step to obtaining high-quality petunia seedlings is its timely and correct sowing, which also consists in choosing quality seeds, light soil and suitable planting containers.
Video: how to properly sow petunia seeds for seedlings
In contact with
Petunia is pleasing to the eye and looks equally good on personal plots, city flower beds and for decorating balconies. The bright and unpretentious annual has become a favorite for experienced landscape decorators and amateur flower growers. Petunia is grown from seeds, and if the rules are followed, even novice gardeners can do this.
Ampelous petunia on the balcony
Description: Petunia is an annual plant belonging to the Solanaceae family. The plant's birthplace was South America. There, the ornamental shrub that is familiar to us is a perennial and looks unusual, reaching a height of 1 m.
Each bush of the plant consists of highly branched round stems that grow upright or spread along the surface of the soil. Leaves are attached to them using short cuttings. Color of leaves and stems different varieties Petunia has different shades of green.
Flowers are located in the axils of the leaves. They have a funnel-like shape characteristic of all varieties, which is formed from 5 petals fused at the base.
Flower varieties
- The diameter of the flower funnel varies. The smallest flowers have a diameter of 5 cm, maximum size large flowers - 16 cm.
- The surface of the petals may be smooth or have small folds.
- Petunia petals of different varieties have different edges: straight or wavy. There are varieties with corrugated edges.
- Thanks to the work of breeders, the color of petunia flowers is characterized by extraordinary diversity. For a flower garden, you can choose petunias in various shades of white, pink, red, yellow, blue and other colors. Particularly popular are varieties whose petals are painted in different colors.
Retail chains offer ready-made seedlings decorative flower. But you can grow petunia from seeds yourself by choosing the seeds of the variety that will decorate the site.
Selecting seeds for planting
To ensure that the results do not disappoint, you need to take care of high-quality seed material.
When choosing bags of seeds, you need to pay attention not only to the color and fullness of the petals and the height of the stems.
It is advisable to purchase packages with granulated seeds. Each tiny grain of such packaging has an individual protective shell. It is formed from nutrients, creating an optimal nutrient environment around the seed.
Seed germination depends on what material is used for packaging:
- up to 1 year - paper bag;
- up to 2 years - foil and polyethylene bags.
For mass planting in several areas, it is better to purchase seeds in professional packaging, which are of higher quality.
Sowing time
Calculating when to plant petunia is easy. From the moment of sowing the seeds to the first flowers, it takes about 3 months. The plant is transplanted into the ground when the soil has completely warmed up and the return frosts have stopped. Gardeners middle zone can begin transplanting from mid-June. Counting 3 months, we get the sowing time - mid-March.
In accordance with Lunar calendar and waiting early spring, in 2018, experts advise sowing petunia from February. The sowing period lasts until April.
Soil for planting
Petunia is quite selective towards the soil. She prefers light and nutritious soil. Such soil is well saturated with oxygen, ensuring its access to the roots of the plant.
Specialized stores offer ready-made soil mixtures. It is best to use a mixture prepared directly for petunias. You can choose another soil, the main thing is that the soil is not acidic. To use existing acidic soil, you need to add lime to it, which will reduce the acidity. But Application rate: limestone, dolomite flour - 1 tsp, soil - 1 l.
To prepare the soil yourself use:
river sand - 1 part;
peat - 2 parts;
turf - 2 parts.
They mix everything, choosing roots, stones, and debris. Then the mixture is disinfected. To do this, the soil mixture can be poured with plenty of boiling water. You can also use oven roasting.
Containers for sowing
Planting petunia seeds at home is carried out in a variety of containers:
- small a plastic cup for seedlings;
- mini-greenhouse for seedlings (can be shared or divided into cells);
- peat tablets.
For the emergence of seedlings, common containers are used. Picking is done in separate cups or greenhouses with cells.
You can use available materials as containers: packages of yogurt, muffins, etc., at least 7 cm high. On the bottom of each homemade container It is necessary to make a hole to remove excess water. The absence of holes can cause root rot of seedlings.

Petunia seeds are very small
Filling containers
Selected greenhouses or cups are filled in the following order:
- Drainage (fine expanded clay, river pebbles) - 1 - 1.5 cm;
- soil mixture - 6 cm or more.
Sowing granular seeds
The granulated form of seeds is most convenient for sowing. We'll tell you how to plant petunia seeds in granules.
Sequence of work:
- Soil moisture. The earth is being spilled with water room temperature. For peat tablets use boiling water. After moistening, the tablets must be allowed to cool before sowing.
- Sowing. The granules are placed on the soil surface. Per glass or cell of the greenhouse - 2 pieces, tablet - 1 granule. When using a common container, the seeds are laid out, leaving 1.5 - 2 cm from each other.
- Lightly press the granules into the mixture. No need to sprinkle with soil or sand! For seeds to germinate, they need light.
- Cover the containers with polyethylene or glass, creating greenhouse conditions, and place them in a warm place.
Sowing small petunia seeds
Working with seeds that have retained the natural appearance of small grains is complicated due to their size. The tiny grain is difficult to hold in your fingers. To sow them, you need to prepare auxiliary tools: tweezers or toothpicks.
In practice, there are 3 main methods of sowing small seeds.
- Regular sowing
The seeds are poured out of the bag onto a white surface (saucer, sheet of paper).
A petunia seed is attached to a toothpick (or tweezers) moistened with water and transferred to the soil. The norms for planting seeds are maintained: tablet - 1, cup or cell - 2, general container - at a distance of 2-3 cm.
The seeds spread on the soil are moistened with a spray bottle.
Containers are covered transparent material(glass, film), place in a warm place.
- Sand connection
Moisten the soil.
The seeds and a little river sand are mixed.
Sand with seeds is poured onto the ground, trying to distribute it evenly in a thin layer.
Lightly spray the top layer of the containers, cover them and transfer to a warm place.
- Snow seeding
Gives good results unusual way sowing petunia in the snow.
Snow is placed in containers on top of the soil.
The seeds are sprinkled evenly on the snow.
Cover the container with film (glass) and leave it warm.
Growing petunia from seeds - sowing
"Snail" for petunia
IN Lately A special method of sowing petunia seeds, called “snail,” is becoming increasingly popular.
For this you will need a tape made from a laminate backing. The width of the tape is equal to the height of the roll toilet paper. You can spin a “snail” from an ordinary newspaper. The newspaper sheet is folded into 4 layers and inserted into a plastic bag. If there are few seeds, a small “snail” is made from two- or three-layer toilet paper. It also needs to be folded in 4 layers.
The soil mixture is poured onto the substrate. Stepping back 2 cm from one edge of the tape, lay out the seeds. The distance between them is 2 - 3 cm. The tape is carefully twisted like a snail, secured with an elastic band or tape and placed in a plastic container.
The soil in the snail can be moistened before planting the seeds. It is allowed to spray the soil after twisting. Put a plastic bag on the “snail” and place it in a warm place.
Caring for sown petunia seeds

In order for the seeds to germinate and develop normally, it is important to provide the crops with the necessary conditions.
- Temperature: not less than +20°.
- Maximum illumination for 12 hours a day after green shoots appear on the soil surface. In case of insufficient natural light backlight required.
- Maintaining soil moisture without stagnant water. Water that has stood for 24 hours is suitable for watering, with 1-2 drops of citric acid added immediately before watering.
- Daily removal of condensate from inner surface coverings.
- Hardening the sprouts (the greenhouse is opened daily, the first time for 10 minutes, then the hardening time is gradually increased).
Beginning gardeners often ask the question: “The planted seeds do not germinate, what should I do?” The answer to this is simple: the seeds need to be replanted, strictly observing the temperature and light conditions.
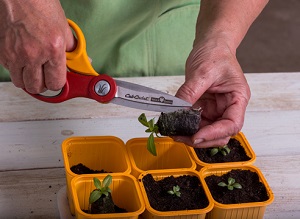
Picking
An important stage of cultivation is picking petunia seedlings. The readiness of seedlings is determined by their height (4 - 5 cm). Petunia seedlings are carefully removed from a common container using sharp knife. When working, you need to be especially careful not to damage the thread roots. The roots are pinched. Seedlings are planted in separate containers so that the first of the true leaves remain on the soil surface.
Seedlings that grow in peat tablets can be grown without picking, transplanting directly into the ground.
2 weeks after picking, the seedlings become stronger. At this time, it requires regular watering. In the third week they begin to feed. It is carried out once every 3 days by spraying diluted complex mineral fertilizers or growth stimulants, which are used alternately. When the plants grow up, fertilizing is carried out less frequently (once every 2 weeks). Now they stop spraying the foliage, feeding becomes root feeding.
Growing petunia from seeds - picking
Topping
When growing petunia seedlings, it is important to avoid excessive elongation of the sprouts. This happens due to insufficient lighting. To give the bush a rounded shape, the seedlings are pinched. The procedure is performed when 5 true leaves grow on the stem. If necessary, the side shoots are also pinched later.
When there are 2 weeks left before flowering, it is recommended to stop pinching, otherwise the petunia will bloom later.
Transfer
As the seedlings develop, petunia is transplanted 1 or 2 times into larger pots. Planting in open ground can be carried out in May. Having set a planting date, they begin to prepare the petunia for transplanting into the ground and new temperature conditions.
A suitable planting location will ensure long and abundant flowering. She feels best in a well-lit place. But the transplant is carried out in moderate sun: early in the morning or at sunset. Daytime planting is allowed only on a cloudy day. Petunia is planted in prepared holes, leaving 30 to 50 cm between the stems. Plants are watered warm water and mulch.
Petunia grown from seedlings can quickly take root in the garden and will delight you with its elegant flowers for a long time.
11.01.2019
Growing petunia from seeds is quite difficult: therefore, many people prefer to buy seedlings and not bother with sowing, picking and transplanting. But I think that buying ready-made seedlings is unsporting (especially if you have a specialized diploma). In addition, you may simply not find seedlings of the desired varieties, and this is a shame. In general, growing petunia seedlings at home is correct and interesting. It remains to figure out how to do this.

I must say that this is not easy. Even a novice gardener can cope with growing tomato seedlings, but petunia will have to tinker. Therefore, carefully study this material and the materials in the links - they contain comprehensive recommendations.
When to plant?
Some websites write that you need to plant petunia seedlings in January. This is very, very bad advice.
Petunia seedlings are usually planted in open ground at the age of 70 to 80 days, and in flower pots, pots and boxes at the age of 80 to 90 days. The age of plants is counted from the emergence of seedlings, and seedlings appear approximately 10 days after sowing. At the same time, it is usually transferred to a permanent place at the end of May, or even in June when it is already blooming. If we take June 1 as the mark, then seedlings should appear no earlier than March 1. It follows that the optimal time for sowing petunia seedlings is:
- tall large-flowered varieties - in early February;
- hanging varieties - from mid to late February;
- ordinary varieties - the second ten days of March.

There are some varieties whose seeds are planted both earlier and later. If you bought seeds from a very reputable supplier (I don’t know any of these among Russian companies), it is better to follow the recommendations on the packaging.
Two words about planting according to the lunar calendar
Nonsense.
What's wrong with early sowing?
When growing seedlings at home, you probably will not be able to provide petunias with the correct combination of temperature and light. In January and February, radiators in apartments are usually hot, and the air temperature in the room (especially near the windowsill on which the boxes are placed) is high. At the same time, the daylight hours are very short and the lighting intensity is low. In such conditions, the seedlings become very elongated and subsequently develop poorly.
If you provide your petunia with additional light and can control the temperature, it will not stretch, but it will outgrow. Overgrown seedlings take root worse permanent place and produces fewer flowers.
Control sowing of petunia

If you are not sure about the quality of the seeds, it is better to carry out a control sowing from each package in advance to approximately determine germination. It will be enough to sow 10 seeds - if you can separate exactly 10. However, lately manufacturers have been skimping and packing just ten in flasks, as in the photo
Substrate for sowing
There are three available options:
- loose soil with neutral acidity (if it is suitable for tomatoes, then you can also plant petunia seeds);
- coco peat (of course, it's not peat at all);
- peat tablets.
Sowing in the ground

To sow seeds, use containers with a depth of 5...6 cm. Soil is poured into them so that about 1 cm remains to the edge, after which they are compacted. Then, on top of the poured and compacted layer, a layer of soil sifted through sieves about 0.5 cm thick is poured. This creates an even “bed” for the seeds. Then the seeds are laid out individually in a square-cluster method according to a 1x1 cm pattern. If they are in granules, this is easy to do. Uncoated seeds can be mixed with fine sand and scattered in paths using a regular teaspoon.
After sowing, the soil surface is generously sprayed with a spray bottle, using a very fine spray - almost a “fog”. The water should be warm. Some gardeners do not use clean water, and a solution of the drug "Epin". Controversial decision: I cannot understand why seeds that are in close to ideal conditions need a stress adaptogen.

After watering, the containers are covered with film and placed in a warm place. Condensation constantly forms on the surface of the film. This is not good: you need to either wash it periodically or simply tilt the container so that large drops roll off to the side.

The film should be removed after the seedlings unfurl their cotyledon leaves. It should be removed gradually, opening the container by about a third every day. After three days, the film can be removed completely.
Usually seedlings appear on the third day after sowing, but sometimes the seeds do not germinate for 7...8 days. Granulated seeds may not show signs of life for even longer (up to two weeks) because the dense granule does not allow moisture to reach the seed itself.
Video about sowing petunia on a semi-industrial scale:
Sowing on coconut substrate
The method was suggested by user Elenka02 from Forumhouse. For sowing you will need a special coconut substrate.
Advantages of coconut briquettes:
- sterility;
- a large volume of air-filled pores - the roots of the seedlings cannot be “flooded”;
- low density - if necessary, you can easily transplant a separate seedling into a new container
Coconut briquettes do not contain any nutritional elements - so they must be “delivered” from the outside. The author treats granules with seeds with the growth stimulant "Energen", and the substrate itself with the fertilizer "Krepysh" from the company "Fasco".
Of course, “Krepysh” is not necessary - any NPK complex dissolved in water will do. The only convenience of “Krepysh” is that it is at least balanced, and its composition (according to the manufacturer) includes macro- and microelements. Of course, you have to pay for this pleasure, and pay a lot per ton, but you’re not planning on planting a million units of petunia seedlings, are you?
For sowing, special plastic containers are used.
Sowing on peat tablets
For planting petunia seeds, tablets with a diameter of three cm or more are suitable. The use of tablets simplifies the work and reduces the risk of fungal diseases developing in very young seedlings. If you are growing seedlings of expensive varieties and hybrids of petunias, purchasing tablets is quite advisable.
How to sow correctly:
- Soak the peat tablets until they swell;
- Drain excess water from the pan;
- Use a match to make a depression in the center of each tablet;
- Carefully transfer one seed to each tablet;
- If the seeds are coated, soak their shell. To do this, you just need to drop water from a pipette;
- Cover the seeds a little with peat and cover the tray with glass or film.

Caring for petunia seedlings
Backlight
Petunia seedlings must be additionally illuminated: in the first 7 days - at least 16 hours, from a week to a month old - 14 hours, over a month old - 12 hours. If you do not use lighting, the seedlings will stretch out and, even if they do not die, will grow very weak.
Watering
Water the petunia seedlings very carefully, using a teaspoon or through a strainer. Watering is moderate, the water should be warm. Young seedlings are very vulnerable, so try not to overwater them.
Feeding

Some authors recommend carrying out the first foliar feeding a week after germination, but I don’t do that. In my opinion, such small seedlings cannot experience a deficiency of nutrients in fresh soil. However, for unambiguous conclusions it is necessary to carry out experiments with control.
For feeding, you can use either a prepared solution of mineral fertilizers (concentration not higher than 0.5%), or ready-made complexes based on humates or chelates. Since their manufacturers do not always follow the recipe, it is better to dilute it in accordance with the instructions and by half more.

Treatment with growth stimulants
If the seedlings grow poorly, they can be treated with plant growth stimulants based on brassinosteroids (Epin, etc.). I can’t say anything about the drug “Zircon” and its varieties.
Protection from diseases
Root rot and other fungal diseases are a serious problem when growing petunias from seeds. Weak seedlings are easily attacked by fungi, which under normal conditions behave like saprotrophs. The defeat is promoted by high soil and air humidity, lack of light, low temperature and excess nitrogen.
If seedlings show characteristic signs of fungal diseases (withering, blackening of the base of the stem, etc., fungal plaque, etc.), the volume of watering should be reduced and watered so that water does not get on the plants. In addition, it is highly advisable to treat the seedlings with a fungicide solution. In Russia, the use of the following drugs is allowed:
- “Alirin B” in tablets (biological product, safe) - 1 tablet per 2 liters of water. Use for watering the soil;
- “Maxim Dachnik” (based on fluodixonil) – 1 ml per 1 liter of water. Use for watering the soil and spraying plants;
- “Healthy Earth” (carboxin + thiram) – 2 ml per 1 liter of water. Watering the soil.

Everything else is not permitted by the Registry (more precisely, not registered), however, there are recommendations for the use of the drugs “Fitosporin M”, “Baktofit” (this bacterial preparations, are used in the same way as “Alirin”) “Ridomil Gold” (2 ml per liter, watering and spraying), “Maxim Plus”, “Previkur Energy” (01.5 ml per liter, watering the soil at the root). The last three are chemicals that are not entirely safe: they should be used with the usual precautions.
After watering the soil with a solution of fungicides, its surface can be sprinkled with fine dry sand or ash. This will reduce air humidity and create some kind of barrier for pathogenic fungi.
Transplantation and picking
Picking is pinching the tip of the main root. The root is pinched so that the plant forms a large mass of lateral roots in the upper soil horizon, where most of the necessary plants nutritional elements. Since the tip of the main root inevitably breaks off when transplanting seedlings, over time, picking began to be called the transfer of seedlings of vegetable and flower crops into separate containers.
Picking petunia seedlings is carried out after the appearance of two true leaves. It is possible earlier, after the appearance of cotyledon leaves, but it is easy to damage a very young plant.
How to transplant and plant petunia seedlings
- We prepare in advance the container in which the seedling will grow;
- We press a hole for the hay in the ground;
- For transfer, it is better to use a pointed stick or pencil. Carefully pry it up with a lump of earth, holding it by the edge of the leaf. It’s the leaf – even if you tear it off, the plant will survive. If you break a stem or cut off a growing point, that’s it;
- Carefully lower the petunia into the prepared hole and press the soil against the stem. If the seedling has stretched out due to lack of light, we bury it up to the cotyledon leaves, otherwise we bury it as it was buried before transplanting.
It is better to cover the plants immediately after transplanting. non-woven material for 1…2 days.
Pinching the growth point
Plants with the apical bud removed branch better and are more spreading: therefore, it is better to pinch bush petunias above the fourth or fifth internode. If pinched earlier, the plants will lag behind in growth; if pinched later, they will grow unevenly.
In ampelous petunia seedlings, you can pinch off the growing points of the lateral stems. In this case, a large number of side shoots of the following order are formed on them.

Transplanting grown petunia seedlings into separate containers
Usually, after picking, plants are replanted 3 more times - in containers with a volume of 0.1 -> 0.2 -> 0.5 liters, and when growing ampelous petunia, even 4 times (the last pot has a volume of about 1 liter). This is quite labor intensive; In addition, petunia seedlings develop better if they are immediately transferred to large pots. Because I don't grow large quantities seedlings, it’s easy for me to immediately transfer the plants into containers with a volume of 0.5...0.75 liters, in which they grow until planted in a permanent place.
Petunia seedlings should not be replanted, but rather handled with a clod of earth. Transshipment is carried out when the root system completely “masters” the space of the pot.
Transplanting petunia seedlings to a permanent place
Seedlings should be transferred after the threat of late return frosts has passed - in the Moscow region this is June 10. If petunia is grown in pots or boxes, you can plant it earlier, and when it gets colder, simply move it indoors.
Petunia is a favorite ornamental crop of most gardeners. The bright flowers of this wonderful plant can decorate an area like a scattering of precious stones. In addition, petunia is actively used as a potted crop, with which balconies, verandas and terraces are decorated. There are several types of petunias, differing in flower shape and size. However, sowing petunia for seedlings is almost the same for each of these species.
To achieve high-quality flowering of the crop, great efforts should be made. And it’s not surprising, because growing petunia seedlings is considered a true art, and if you don’t master it, you’re unlikely to achieve good results. We will try to understand the peculiarities of sowing petunia so that you do not end up with bitter disappointment.

Before you start sowing the seeds of this crop, you must decide what specific variety and type of seed you will work with. And if when choosing a variety you need to be based solely on personal preferences and the characteristics of the place where the flowers will grow in the future, then the choice of the type of seed is limited to only two forms of sale.
More specifically, petunia seeds are sold:
- in granules;
- in bulk.
The advantage of granulated (pelled) seeds is that they are more convenient to sow. In addition, they have a higher germination rate, although the same can be said about the cost. But loose seeds will cost less, and you can determine by eye how high-quality the seed is.
Note! After selecting and purchasing seeds, it remains to decide when exactly is the best time to start sowing. This point is extremely important, but for some reason many beginners forget about it.

As a rule, about two months pass between sowing and the formation of the first flowers. Therefore, if you plan to enjoy the colorful neighborhood of petunias in the spring, you must take care of everything in advance. But the sprouts of this crop are susceptible to spring colds, and therefore too early transplantation into open ground may simply cause the death of seedlings.


Familiarize yourself with the generally accepted planting dates.
- If you can take care of daylighting of the plants, you can sow in the last days of February.
- If this is not possible, postpone it until mid-March. The reason is extremely simple: petunia seedlings “like” light with a certain wavelength, and in February such light is clearly not enough.
 Timing of ripening and planting of seedlings of popular crops (including petunias)
Also, to obtain strong and high-quality seedlings, be very responsible when choosing containers and soil. Due to the fact that seeds germinate best under the greenhouse effect, give preference to wide containers with an average depth (it is also important that they have a lid that allows sunlight). For this purpose, for example, transparent plastic containers for storing food. To get healthy shoots, be sure to monitor the quality of the soil mixture used. You can use packaged soil for indoor plants(this is sold in every specialized store) or, as an option, (we’ll tell you more about the latter a little later).
Prices for peat tablets
peat tablets
If you wish, you can prepare the soil mixture yourself. To do this, mix lowland peat, soil (both turf and leaf) and humus in equal proportions. You can also add sand (approximately 1⁄2 part). Before filling the container, be sure to sift the soil mixture through a sieve.

Note! It is recommended to place a drainage layer on the bottom of the container, which can be pebbles, expanded clay or small broken bricks. After this, air will freely flow to the root system, and such a nuisance as waterlogging of the soil will be prevented.
Prices for petunia seeds
petunia seeds
Preparatory activities
Immediately before sowing, prepare the selected containers (and these can be either the plastic containers mentioned above or small wooden boxes). Preparation consists of disinfection, for which you can use any antiseptic - for example, Formalin.

If using wooden boxes, place a layer of thick paper on the bottom. The instructions below use special seedling greenhouses, which are sold in every gardening store.
Fill the soil mixture with a layer of at least 6 cm, but at least 2-3 cm should remain to the edge of the container. Make drainage first (optional, but preferable if the substrate has a fine-lumpy structure).

How to sow seeds correctly
Petunia seeds are very small, their size often does not exceed 0.5 mm. For this reason, the seed is quite difficult to distribute in a certain step. From this point of view, granulated seeds are more convenient - you can take them with tweezers and place them on the soil in even rows. If so, the conditions will be the same for all sprouts, and further diving will be noticeably simplified.

Important information! The seeds do not go deep into the ground due to their small size, but are simply laid on top and sprinkled with a 1- or 2-mm layer of substrate.
If you plan to sow loose seeds, you can use one of the instructions below.

Method one. Seeds mixed with sand
Many gardeners mix seeds with sand or soil to facilitate even distribution over the soil surface. It looks something like this.

Take a container for seedlings, fill it with soil mixture in accordance with the above requirements, and then water it thoroughly.

Then take a shallow plate, pour the seeds and a little sand into it. Mix the contents thoroughly.

Spread the resulting mixture evenly over the surface of the moistened soil.

Moisten the crops (you can use a spray bottle), and then sprinkle with a 1- or 2-mm layer of soil.

Important information! Do not use a watering can for watering, otherwise the seeds will go too deep into the soil (and they should be located as close to the surface as possible). Sometimes the seeds, after being moistened, are not covered with anything at all.
Method two. Use of snow
The next option is to sow thin layer snow (no more than 1-1.5 mm), laid on top of the substrate in a container.

First, take a spoon and evenly distribute the snow over the soil mixture in which you plan to sow the seeds.

Sprinkle the seeds themselves onto the snow. The advantage of this method is that the seeds will be clearly visible in the snow. Therefore, even if they are unevenly distributed, you can easily move them with a toothpick.

The melting snow itself will draw the seed into the soil to the required depth. This means that in this case there is no need to water or sprinkle anything.
Method three. Using a toothpick
In this case, you can evenly distribute the seeds over the surface of the substrate in such a way that it will be convenient to plant the seedlings in the future.

In addition, the use of this method is advisable if it is necessary to sow a limited amount of seed in separate containers (for example, in).

Take the seeds and place them on a piece of paper so that they are clearly visible. You will also need a couple of toothpicks for this work. The seeds, as noted earlier, are very small, so it is easier to pick them up with the pre-moistened tip of a toothpick. In the future, to shake them into the ground, use a second toothpick (it should already be dry).

Note! After completing sowing, close the containers and transfer them to a room where the temperature is about +20-22°C. Pay attention to ensuring that the substrate is always moist, but the water should not stagnate. Wipe off any condensation that accumulates on the lid every day; do not forget to ventilate the seedlings daily for 10 minutes.
If you do everything correctly, you will see the first shoots within a week.
Aftercare
When the first shoots appear, you can congratulate yourself - the hardest part is behind you. Next, nature will take over, but you have to help her a little. Start with 10-minute hardening of seedlings (that is, airing) daily, later do this several times a day. When the first true leaves appear on most of the sprouts, you can remove the lid of the container altogether.


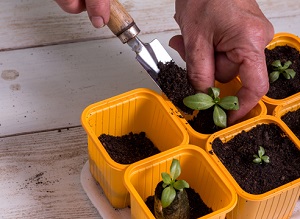
When the seedlings grow to 4-5 cm, start diving. To do this, take a narrow garden knife and dive each sprout to a depth of about 3 cm, pointing the blade strictly at an angle of 45 degrees relative to the surface of the soil. As a result, you will pinch off the tip of the main root, which will stimulate the development of a branched root system.


Transplant the picked seedlings into " kindergarten", which can be:
- larger common box;
- separate container ( this option more preferable).
Note! To ensure that the seedlings turn out to be of high quality and strong, each seedling should be buried slightly during planting so that a maximum of 3.5 cm of the trunk remains above the surface. This will prevent the seedlings from stretching.
Usage individual containers for picking will make subsequent planting in open soil easier, and the plants themselves will not experience stress, since their roots will remain intact. Typically, disposable plastic cups are used for this purpose, having previously made holes in the bottom and filled with a drainage layer for the outflow of moisture and free access of oxygen.

When new leaves appear after picking, continue hardening the seedlings. The best option- This is ventilation of the room. In this case, containers with seedlings should not be placed directly on the windowsill, otherwise there will be a risk of frostbite on the foliage. Start with the same 10 minutes every day, gradually increasing this time to half an hour.
When each seedling has 3-4 true leaves, you can start fertilizing. It is important that the first few fertilizers are not applied at the root - you can spray the seedlings with fertilizers intended specifically for these purposes. It is also advisable to use growth stimulants that strengthen the leaves and stems, ensuring strong plants by the time they are planted in open soil. The transplant itself should take place around the end of May.
 "Agricola" - fertilizer suitable for petunia
Prices for Agricola fertilizers
Agricola fertilizer
Large seeds of flowers such as dahlias and purslane are great for beginners. Also very popular among gardeners are geranium, zinnia, petunia, calendula, begonia, aster, lobelia, Snapdragon, primrose, salvia, verbena and other plants. Read more.
An alternative option is to use peat tablets
In the absence of the opportunity or desire to grow petunia seedlings using standard methods, we recommend using peat tablets for sowing granulated seeds. This way you will reduce the loss of seedlings, and also save yourself and the seedlings from the unpleasant procedure of diving.

The sowing process itself is not complicated. Medium-sized peat tablets (about 3-4 cm in diameter) will suit you. You will also need a special pill tray or plastic food container. The algorithm of necessary actions is given below.

Table. Step-by-step instructions for sowing petunia seedlings.
| Steps, illustrations | Description of actions |
|---|---|
| Fill the tablets with water until they are completely swollen, about a few hours before planting. You can add water if it is completely absorbed. But if the tablets swell and there is still water at the bottom, drain it. |
| Place the seeds in special recesses (one piece at a time). You can use a toothpick or match for this. Note: even granulated seeds stick well to a moistened toothpick. |
| People often complain that granulated seeds take a very long time to germinate, and the plants themselves turn out weak. The reason is simple - the seeds require more moisture to “break through” the protective shell. And so that the seedlings are good and friendly, moisten the spread seeds with a spray until the shell is soaked. As an option, you can drop a few drops of water on each seed, for which it is convenient to use a pipette. |
| After 5 minutes, spread the soggy coating on the tablet. This way the shoots will be friendly. |
| Cover the container. If you don't have a mini-greenhouse, use a food container. It is necessary that the tablets do not come into contact with the lid. Place the container in a heated place. |
| At a temperature of approximately +25°C, you will be able to see the first shoots within a week. If the temperature is below +20°C, then they most likely will not appear at all. After the seedlings form, reduce the temperature to approximately +18°C, otherwise they will stretch. The tablets should be kept moist at all times, but there should not be excess water at the bottom. Ventilate the seedlings periodically. No fertilizing is required, since the tablets already contain all the necessary fertilizers. |
| Picking, as noted earlier, is not necessary, because the seedlings must be transplanted along with the tablets. In this case, the soil in the new container should be loose and fertile. Here is one of effective recipes: mix washed river sand, peat and humus in a ratio of 0.5:2:1, you can also add wood ash (2 tablespoons per 1 liter). As an option, you can use a “store-bought” fertile mixture. |
| Remove the protective coating from the tablet. Do this with extreme caution so as not to damage the film. This way the roots will be able to master the new soil earlier. |
| If the roots have managed to grow through the shell, you can simply make several cuts on it. |
| Place the tablet with the plant in the pot, and fill the remaining voids with the prepared soil mixture. Tamp down lightly. It is important that the root collar is flush with the surface. |
| Water the soil around the plant. If she sits down after this, add more to align her with the tablet. |


Note! After 10 days you can begin hardening. Take the containers out to the veranda or greenhouse (a lot depends on the weather here). Remember about mandatory protection from drafts, wind and direct rays of the sun.
In conclusion, we note that floriculture requires considerable patience and love for plants, and this is especially true when it comes to petunias. But if you know all the rules for sowing petunia seedlings, you will certainly be able to tame it and achieve excellent results!

")


