How to teach a child to play checkers from scratch in a playful way. DIY board game ideas
Board games do not require special training or any specific skills. They are ideal for spending leisure time in a noisy company and will help you have an unforgettable time. Today you can find in stores a large number of different games for children and adults, however, sometimes their cost is much higher than expected. We are offering to you make board games for children with your own hands.
Remember that a board game will help bring the family together, will also teach you to think logically and will have a positive impact on your child’s development.
Board Game Ideas
A felt domino will look original. The advantage of this material is that its edges do not need to be processed. You can embroider the dots or apply them with a marker.

Don't think that children under 5 years old can't play dominoes. For them you can make chips with different colors sides These chips can be easily made from cardboard or ice cream sticks.

Chess and checkers are some of the best games, which train memory, logic and ingenuity. You can even make a field for these games using adhesive tape or tape.

If you find felt with squares, cut a field out of it. Or sew squares of fabric. Another way to make a chessboard is to cover some hard surface with self-adhesive tape, and then line it out and cut out the squares.

Iron bottle caps are ideal as checkers, or make chips from egg trays. To do this, you need to purchase cardboard egg trays and cut them into cells. Color and decorate them and the original checkers are ready. If you are too lazy to bother with such chips, take regular buttons.
Another one interesting game will help develop visual memory. For it you need to select or draw identical pictures on chips made of cardboard or paper. These chips are laid out on flat surface face up and then turned over. The goal is to remember as many pictures as possible and open the same ones.

Don't forget about labyrinths in which the ball rolls between the side faces. If you have a suitable box, then making such a labyrinth will not be difficult.

ideas for board games with your own hands so many. As a family, you can upgrade existing games by creating your own. Remember that time spent with your family playing a board game is the most useful leisure time.


To show your Creative skills, it is not at all necessary to spend years learning how to paint pictures or knitting clothes for the whole family around the clock. You can simply devote a little time to making a truly original, and in our case useful, thing. In this article we will focus on production of textile checkers. They can be great entertainment not only for children, but also for adults. Moreover, making them is not at all difficult and it does not take much time.
To play checkers, you need a field of 64 cells and 12 chips for two players. This is what they should look like in the end:
To work, you need to prepare the material. In our case, we took the most affordable one - rags for cleaning the room.
In addition, we will need glue, scissors, padding polyester or holofiber, wooden beads and pebbles big size.
For the playing field you need to choose 2 different colors. In our case, it is light green and pale orange fabric. We leave one piece of fabric unchanged, and cut out small 5 cm squares from the second. In the end, we get 32 pieces.
These squares need to be laid out on the field in a checkerboard pattern so that the green cells are even. Orange squares are attached with needles to the main field.
These squares can be stitched, but it will take a lot of time and effort, and the surface may not be even. It is best to use glue web. It is sold at any craft and sewing supply store. For each square you need to cut out your own piece of web, and then iron them with an iron. Under the influence of hot contact, the squares will easily stick to the general background.
The result should be just such a canvas, which measures 40 by 40 cm.
Next, we proceed to making the chips themselves. You can call your children to help, as they will probably become interested in this process. Moreover, it is not difficult at all.
You need to cut out 24 circles of one color and 24 circles of another color. We have pink and blue fabric. To ensure that the circles are even, you can take a glass and trace its diameter.
Next you will need glue. It should be universal in order to easily glue the beads to the surface of the circles. Beads are glued to 12 circles of both colors.
Beads are glued not only for aesthetics and beauty. Using beads makes it easier to move chips around the field.
The process of sewing chips is as follows: you need to take 2 mugs of the same color, wrap a small pebble in a piece of padding polyester and place it between the pieces of fabric. The pebble is needed to weigh down the chip.
Then a strong thick thread is taken and the chip is stitched in a circle with it. The result should be very original products, similar to dumplings.
Since this game is supposed to be taken with you into nature, you need to store it somewhere. To do this, you can sew a small case for the game in the form of a bag.
So, everything is ready. This game is sure to become a favorite entertainment for the whole family. Children will be happy to delve into the creative process of making it, and then they will enjoy playing checkers, developing their mental abilities.
Moreover, there is more than one technology for playing checkers. Parents and children can explore several options together.
Board games provide fun and colorful entertainment for every family. Don’t rush to buy games in stores, but try to make them yourself, this will help you create a special gaming style. In this article we will look at: how to make board games with your own hands.
Everyone knows this game from school. However, you thought that it needed a pen and a leaf, but it can be made from wood, fabric, magnets, stones, buttons and other figures. Just get creative and create a playing field, for example, on the refrigerator or pieces of fabric in the shape of a heart.
Travel around the world walking game

This game can be played by 2 to 6 people. You will need a "card", a die and chips. Each player rolls a digital die in turn, gets a number and makes a required quantity steps on the map. The winner is the one who gets to the finish line first, and the catch is that there are numbers on the map that return the player a few steps back, or move him forward.

The main process is to create a map. Lay out 8 A4 sheets in 2 rows, leaving half a centimeter gaps so that you can fold the card later. Place a weight on each sheet to prevent it from moving, then tape the sheets along each row. Draw a route of moves with a pencil and arrange stops, for example (1-60 or 1-90), between each stop, make a distance of 2-3 cm. Mark bonus and penalty steps, indicate the direction with arrows. Fill with drawings empty seats on the map. A digital cube can be purchased at an office supply store or made from cardboard. For chips, use small Kinder Surprise toys, buttons, small cookies...

You can create a geographic puzzle to explore the country. Buy or print contour map, paint each area with a separate color (in addition, you can indicate clues - sea, mountains, attractions...), then glue the map onto a thick sheet of cardboard, cut it into squares or other figures.

It is also very easy to create another puzzle. Collect 7-10 popsicle sticks and cut out a suitable picture from a magazine or draw it yourself. Place the sticks on a flat surface next to each other, stick the picture, wait until the glue dries and cut the sticks. WITH reverse side Attach Velcro to each stick so that you can later attach the puzzle to the felt.


Another name for the game is “say otherwise.” The idea is simple: from 4 to 16 people play. Participants are divided into teams. A team can have 2,3,4 people. One of them pulls out a card on which 8-10 words are written, each word must be explained in other words, you can use sounds (for example: woof-woof, meow...) you cannot show and use words of the same root. You have 1 minute for 1 card, you need to quickly guess as many words as possible. You can make add-on cards on which emotions or instructions will be written. During the explanation, the person must be happy, or vice versa, sad, and the team must additionally guess the emotion and action that the explainer is doing. The team with the most guessed words wins. This game perfectly develops logical thinking and increases lexicon.
Cut out cards from cardboard and beautifully write commonly used words, for example: soup, ice, monkey, enemy, sweet, photograph... There should be at least 30 cards with 10 words written on them. Words should not be repeated.

You can create a playing field for aliases. Mark the steps on it and make chips. The principle of creation is described in the game trip around the world. However, you can play without a field, just appoint a referee who will count the points and record the time.

This is a very fun game played by 2 people. I press the edge of the bean with a coin and it jumps like a flea. The main task is to hit the enemy's goal with the flea, then you get a point and the flea is removed from the field. If a flea lands on your field, you can pick it up and use it next time; if a flea lands on your opponent’s field, the point is not counted and it simply remains lying there until the next turn. If the flea hits its own goal, the point is awarded to the opponent. The game continues until someone runs out of fleas.

To make the playing field, take a box of chocolates, colored paper and thick fabric. Cover with colored paper inner side boxes, make sides of fabric so that fleas do not fly away. Use beans as fleas and don’t forget about large coins.

This game involves from 2 to 10 people. 16 cards are produced. Every two cards contain the same images. One person lays out the cards in a square in a chaotic order with the pattern facing up, while at the same time the person who will play stands with his back turned. He turns for exactly 5 seconds and tries to remember the images. It is turned away and the cards are turned over to the other side. Now he must turn over the cards and find pairs within a minute. The person who guesses the largest number of pairs with the same pictures wins. Cards can be made from cardboard and any drawings can be drawn.

To create this game you will need a cardboard candy box, cocktail straws and small ball, you can use a bead. Think over and draw a labyrinth. Glue the cocktail tubes. Place the ball and start the game.

You can use lids, buttons, sewn circles of fabric, various figures and even plasticine as checkers. Fantasize and surprise everyone with your creativity!


Create original chess that will not walk, but jump. Make 16 white and 16 black jumping frogs and draw the titles. Detailed master class how to make a jumping frog out of paper, described

For dominoes, create 28 pieces, they can be made by coloring pebbles, ice cream sticks, sewn from felt...
Chip scheme
Pebble dominoes
Felt dominoes
Popsicle stick dominoes

When creating this game with your own hands, you can use your city - it will be more interesting. Think about the colors of the districts, print out almost “real” money and come up with realistic tasks, for example: paying utility bills. Create your own exciting original game.

Almost everyone knows this exciting psychological game. It is perfect for a large company. Make cards by drawing them yourself, or simply print them from the Internet, then cut them up.

Such an exciting game can be made from identical buttons, caps, checkers and even M&M’s. How to play it and why it is so exciting, watch in this video!
To create an original and high-quality game, think about the design, materials, and dimensions of the game. Pay special attention to the players’ hobbies and hobbies, maybe this will become the basis for creating a masterpiece. A board game will be a wonderful gift and a reason to spend leisure time with your loved ones.
Watch how to make an exciting game "Rakedr" in this video!
DIY games for children are made very simply from available materials. The ideas presented will help the development of children and older children.
Educational games for children 2–3 years old
At this age, it is important to train fine motor skills; the following pictures with lacing are perfect for this:
- Sun;
- cloud;
- flower;
- machine.

To make crafts of this format for children, you will need:
- white and multi-colored plastic;
- awl or screws;
- scissors;
- fishing line;
- yellow lace.
If you don't have sheets of plastic, use white from an old plastic bucket. Small parts are made from colored containers of the same material. If you don't have any of these, use cardboard.
For the first game for children with your own hands or by asking someone, you need to cut out a square from white plastic, rounding its corners with scissors. Make a circle out of yellow, attach it to the main sheet with fishing line. To do this, make holes with an awl and then sew with transparent cord.
Cut out flowers from colored plastic and attach them in the same way. To make the sun's rays, the holes must be larger. You will do them using a heated self-tapping screw, which you will hold by the head with pliers.
When the holes have cooled, give the lace to the child and show him how to weave it to make rays. Your baby will love these educational games for children. The second is based on the same principle. Only for it, in addition to white, you need blue plastic. You will cut out a cloud from it and also attach it with fishing line.
Other educational games for kids are also interesting.

To make such a flower you will need:
- empty shampoo bottles;
- awl;
- scissors;
- lace;
- cardboard.

Boys will definitely like this machine. To make it, enlarge the image, transfer it to a sheet of plastic, outline and cut it out. Make wheels from white plastic bottle from under the milk. Make holes with an awl, start weaving the lace, and let the child continue this interesting activity.
We can recommend other games for 2 year olds. They are based on the same manufacturing principle, but the toys are voluminous. Take a ketchup bottle cap and make a hole in it with a hot nail or a drill bit. Drop some glue into it, put a felt-tip pen, top part which must first be bifurcated sharp knife. Attach the fly agaric cap into this crevice. It is carved from a red ketchup bottle. White circles can be made from a light milk bottle or you can take buttons of that color.
After making holes in the red plastic with an awl, attach white elements to this mushroom cap and fasten with lacing.

Exciting games for children 3–7 years old
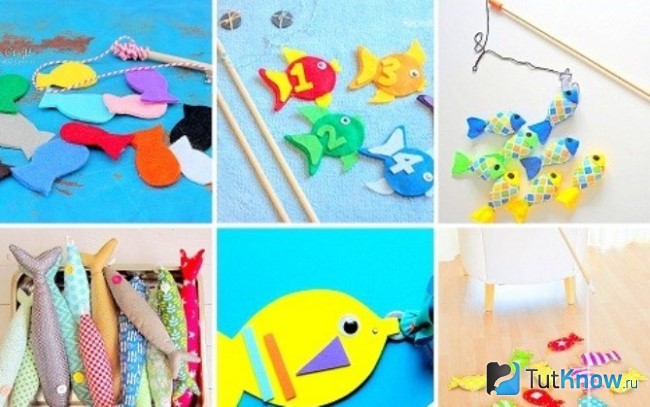
Organize a group of kids fun entertainment. You can play “Fishing” with your family. It's easy to do it yourself. This children's game is not only fun, but also a useful activity that helps develop fine motor skills, coordination, and strengthen hand muscles.
Here are the materials you can use to make your own fish. From:
- fabrics;
- felt;
- plastic;
- thick cardboard.
- felt in a contrasting color;
- ready-made eyes or beads for eyes;
- for the fishing rod - a wooden stick;
- paper clips;
- magnet;
- rope.
If you want the figures to be voluminous and colorful, then take colored fabric and cut out 2 blanks for each fish. Sew them in pairs, stuff them with padding polyester.
If you want to sew felt fish with your own hands, then first make paper blanks and attach them to this thick fabric, outline and cut out. This way you can make fish from other materials, for example, plastic. Now you need to attach 2 eyes to each. To do this, first glue a felt circle and a bead onto it. You need to insert a paper clip into the nose of these inhabitants of the deep sea. Exactly these metal parts will help the fishing rod to be magnetized to them.
We make it as follows. To make a fishing rod, tie a rope to one end of a wooden stick. In order for it to hold tightly, you can make a notch in this place with a knife in a circle, and then wind a string here, on the edge of which you need to tie a magnet, and the game for children, created with your own hands, is ready.
How to make a finger theater?
Here is another entertainment that will make any holiday fun and diversify your leisure time. The finger theater will allow you to act out any fairy tale, and one person can play several roles.
Perhaps your child is a born actor. Then he will, changing his voice, its intonation, speak for different heroes of the action.

One of the most popular heroines of Russian folk tales is Mashenka. Sew it together with your daughter, after which she can try herself in an interesting role. To create this heroine game for children, you will need:
- felt different colors for: body, sundress, trim, scarf;
- rope or yarn;
- ribbons;
- 2 beads for eyes;
- threads;
- scissors;
- needle.

Looking at following photos, you will learn how to sew a sundress. But first you need to cut it out. You need 2 similar parts, differing only in the neck cuts. It is smaller on the back than in the front.
In the photo, the sundress is cut out of yellow felt, the doll’s body is made of orange, and the frill of the sundress, pockets and scarf are made of red.
Please note that the doll's scarf consists of two parts: the front part with a cut-out round hole for the face and the back part.
Let's start sewing a sundress. Attach a pocket to its front part and sew it with thread. Light ones will become an interesting element of decoration. You need to sew the second pocket in the same way. Place the frill of the sundress on its reverse side, stitch it to the bottom of the front and back.

We continue to sew the Masha doll. Place the shelf on the front of the body, stitch both parts together along the neckline and armhole. Roll the thread as in the photo, lowering it onto the doll's face. Place the front part of the scarf on top, stitch it with the head along the inner circle.

Trim the bangs from the threads and sew on the eyes. 2 stitches of white thread will turn into the nose, and decorate the mouth with red.

We will continue to sew the doll with our own hands or with the involvement of children. Thread the thread into a needle with a thick eye, make a stitch on the back of the head, then attach a few more fragments of it on one side and the other of the back of the head in the same way. You should end up with 4 strands of braid, connect the 2 central ones together.

After adding the ribbons, start braiding. Having reached almost the end, tie a beautiful bow. Sew or glue the back part of the scarf to the head.

Now connect the back and front halves of the doll, sew them on the sides on all sides, except for the bottom.

Duplicate the scarf with the outer seam, after which the main character of the finger game for children is ready.

This is what the doll will look like from the back:

Using the same principle, you can sew other fairy tale characters:
- bear;
- hare;
- kolobok;
- mushroom.
Home entertainment for the whole family
Children really like it when adults play with them. If your child is sick or the weather is bad outside and you don’t want to go for a walk, spend this time having fun together. There are many quiet games, because if children are unwell, active noisy fun is contraindicated for them at this time.
Teach your beloved children an ancient entertainment called “Fleas”. Such games are made with your own hands, literally, out of nothing. After all, every house has buttons, and cardboard box can be obtained by removing a pair of shoes from it. The sides of this one need to be cut so that they become 5 cm high. A candy box will also do.
Use a felt-tip pen or marker to draw markings inside the container. It will resemble a football field. Draw a circle in the center, on the sides - opposite each other, two gates. You can first paste over the halves of the field with colored paper of two colors so that you know which one the “flea” will jump into.
If you are making entertainment for children at the dacha, then you can cut out “fleas” from wood. Linden is best suited for this. Grind down the edges of the circles, then you will get the same fun elements that were made in the old days.
For a game you made yourself, you can use the following attributes:
- wooden circles;
- buttons;
- coins;
- beans.
You can come up with the rules of the game on the go. For example, whose flea will jump higher and further, or which one will end up in the goal or in the opponent’s half. In this case, you need to hit her with your “flea”, throwing it from above.
You can also compete in accuracy. Each player is given the same number of fleas. You need to hit your opponent's goal with your own. If the “flea” remains on the playing field of its color, the owner of the attribute takes it and uses it in the future. And if it doesn’t hit the goal and remains on the opponent’s field, he takes it for himself.
Whoever has the most of these trophies at the end of the game wins.
If you want to make another quick game for kids, then tic-tac-toe is for you. The field is drawn on paper, and the chips are made from bottle caps. On some of them you need to draw crosses, and on others - zeros.

When it is your turn, place a cover of a suitable design on the field, and then your opponent will place his. You can make chips not from caps, but from soft material. For these you need to prepare:
- textile;
- ribbons;
- thread with a needle or glue.
It is better to use dense fabric that will hold its shape and will not fray. If it is thin, cut out 2 squares and sew them in pairs.
Sew ribbons folded in a cross to the front side of the fabric squares. Attach circles from the same braid to other blanks. They can either be sewn or glued.
If your baby won't let you cook in the kitchen, demanding your attention, figure out what to do to keep him busy. Draw a game board on a piece of paper and attach it to the refrigerator with magnets. Connect the ice cream sticks with a cross, tying them together with a magnet. Toes can be made from felt or other suitable material. They are attached in the same way.
Intellectual games for children from 7 years old
Older children can be introduced to chess and checkers. A simple sheet of cardboard will do for the board. You need to draw vertical and horizontal stripes on it, shade it to make squares and apply symbols.
If you want to make a chessboard with your own hands so that it is large, then use a sheet of plywood. Apply masking tape to it vertically and horizontally. Cover the surface with dark paint. When it dries, peel off the tape and see what even squares you get.

Craftswomen can sew a field of thick dark-colored fabric onto which light squares are sewn.
Ordinary bottle caps or flat buttons are turned into checkers. Light ones are taken only for one player, dark ones for the other.
Attributes for chess are also easy to make. Draw knights, pawns, etc. on the lid with a marker or felt-tip pen. You can use circles of paper for this. Draw on it and then glue it to the lids.
You can also make dominoes yourself. To do this, dots are applied to pebbles or salt dough figures using a corrector.

When making dominoes with your own hands, follow this diagram:

As you can see, making games with your own hands is very simple. To do this, they use available materials that will help the development of children, teach them new things and allow them to spend their leisure time fun and usefully.
We think you might be interested to see how to make games for children using original ideas. To do this, we suggest that you familiarize yourself with the following videos:
Checkers is a game that trains attentiveness, instills perseverance and a focus on winning. A good age for learning is considered senior group kindergarten. Exactly at the age of 4 - 5 years It is worth training children, developing in them the visually imaginative and predictive function of the mind, accustoming them to logical thinking. Let's talk in this article about how to teach a child to play checkers from scratch.
From this article you will learn
Benefits of the game
Psychologists have established the fact that children, starting from the age of 5, master and actively use the associative sequence “thought-word” or “thought-action”. It is kindergarten age that is considered the most appropriate to begin a step-by-step study of the rules of the game of checkers.
This intellectual game stimulates mental development, attentiveness, and determination. After just a year of training, the resulting concentration and perseverance will help you achieve great success in school. And the ability to calculate the situation several moves ahead, to accept important decisions and take responsibility for them - qualities that will be very useful in adulthood.
If your child is still a preschooler, then you can teach him the game yourself; for this you need to have initial skills or watch educational video lessons on the Internet. If the child is younger school age, and you yourself are new to this matter, then you can send it to a school club, where teaching is carried out using different methods, depending on the level of preparation of the young checkers player.
Advice for parents: swap family evening gatherings in front of the TV for a game of checkers, it will have a positive effect good influence on family cohesion and trust in each other. Perhaps this will become a good home tradition.
Rules of the game
There are several variations of the game in the world - Turkish, English, Italian checkers. They differ color palette, options for moves, the number of fields and, accordingly, the number of pieces. We will look at classic Russian checkers. To make it easier for your child to remember the rules, you can teach him short, funny rhymes.
Checkers board for the Russian version of the game consists of 64 cells, painted in black and white colors, the checkers are also black and white. Before the start of the fight, all figures are placed in the bottom three rows against a dark background. 
All moves in the game are carried out only on a dark background:
"Checkers slowly but accurately
They only walk on black squares!”
- The first mover always has the advantage white pieces:
“You can start the battle with confidence -
White always makes the first move!”

“Everyone knows: both old and young,
We hit the saber forward and backward!”
- Walk in the other direction with this position of the figures prohibited, even if you expose yourself to blow:
“Checkers are probably unlucky,
The checkers only move FORWARD!”

“The opponent’s checker will immediately die,
If yours jumps over it!”

“The fields will suddenly end,
The checker will immediately become a queen!”

“So that your lady is not caught,
It moves along the entire diagonal!”
- Kill the queen, in the appropriate position, any shape can.
- The player who wins the first one will kill all the opponent's checkers:
“The goal of the game is to beat the “enemies”
And so that they don’t have any moves!”
Advice to parents: If you have difficulty explaining the rules to your child, then take advantage of online training courses, where experts not only give instructions for the game, but also conduct online consultations for parents.
How to teach
The first lesson should begin with an introduction to playing field. Let the child first try to arrange the figures correctly on his own; if it doesn’t work, come to the rescue. Explain that the middle must remain free for combat, then proceed directly to the game.
On a note! Try playing with fewer checkers. In the first training game, their number can be reduced to 8. This will allow you to become more familiar with the rules and use a larger number of exercises.
Having reached the moment when the opponents' pieces are nearby and the squares behind are empty, explain that, as in any battle, the time has come to kill the enemy. The one whose turn it is to go does it first.
You can make a move back in the case when you can eat someone else's checker. When one of you gets to the opposite edge of the board, flip the piece over - it's now a queen. For greater clarity, you can stick a colored circle or picture on the queen, showing her importance and the ability to walk as she pleases: any number of squares, both forward and backward.
Usually the child is so carried away and focused that he does not see the entire current situation, does not notice the dangers that the enemy is preparing for him, and does not realize the dynamics of the entire game. An important skill that you should teach a young player is to calculate your own and other people’s moves, and predict possible situations.
Look useful tips from teacher of additional education Matveeva Irina Vladimirovna.
- No matter how paradoxical it may sound, but learning should take place in the form of a game. The usual reading of the rules will not lead to any result. Transform all the figures into warriors and practice the strategy of capturing strangers or crown the most worthy knights as kings. Come up with new stories every day, the participants of which will be your acquaintances, friends, favorite cartoon or fairy tale characters.
- Don't let your baby become overtired. No matter how interesting your game is, it is necessary to take breaks for exercise, a snack or a short walk. This will not only keep you healthy, but will also prevent the game from becoming boring and uninteresting.
- Praise and encourage your child, point out the most successful combinations, inspire victories and new achievements. Don’t scold if your child doesn’t understand something or makes the wrong move, be more patient. Show your child interesting and understandable video material with great grandmasters.
- Don't give in! If the child wins all the time due to the fact that you have successfully “arranged” everything, then there will be no sense in such a game. It is enough to give him a head start only occasionally to increase his confidence in his abilities. Of course, a loss will upset the baby, and tears may even appear, but this will serve as an incentive for further victories. Just explain that it’s not a shame or scary to lose, it’s a shame not to try anything, but it’s scary not to try to do better next time.
- When the game of Russian checkers is clear and accessible, you can play “ Giveaways», « Chapaeva», « Corners" These types of checkers are no less interesting and exciting. When you master these funs, it’s time.
Gentleman's rules

The presence of gentlemanly rules is a feature of Turkish checkers. However, their use in the Russian version of the game is not only appropriate, but also completely justified.
- As a sign of respect for each other, the opponents shake hands at the beginning and end of the game. Thus, at the beginning of the game it promotes a friendly mood, and at the end, despite the fact that there is a winner and a loser, the tension is relieved.
- Distracting the attention of your playing partner or giving hints is strictly prohibited. Cheating, like any kind of fraud, is not held in high esteem in decent society.
- Playing quietly, measuredly, without throwing the pieces, rearranging them without unnecessary noise - signs of a well-mannered person.
- Laughing at an opponent's loss is unacceptable. Respect for a person in any situation is a sign of nobility.
Important Terms
- Simple- an ordinary checker that is not a queen.
- Side checker– a figure located on the edge of the playing field.
- Dame field– the last, 8th row of the playing field.
- King- a figure that has reached the queen's field.
- Move, or quiet move– moving a checker piece from one cell to another.
- Impact stroke– a move in which the opponent’s checker is captured.
- Sacrifice- placing an ordinary checker in such a way that the opponent can kill it.
- Exchange– a move in which both players lose the same number of pieces.
- Passed checker- a checker that will take the place of the king on the next move.
- Breakthrough- a combination of techniques that provides passage to the kings.
- Tetanus– the defeat of the queen determines the order of the move.
- Sieve- such an arrangement of figures in which free fields alternate with occupied ones.
- Locking– the checker is in such a position that it is covered by the opponent’s pieces and has no move.
IMPORTANT! *when copying article materials, be sure to indicate an active link to the original
")


