Make your own folding serving table out of wood. DIY serving table. Glass table
Serving table – functional and practical solution for the home, which is designed to make your vacation more comfortable. Remember how many times during the evening you have to run to the kitchen for drinks and dishes, although all this can easily fit on such a compact and necessary piece of furniture. How to do serving table on wheels with your own hands and can an inexperienced person do it?
Design options
The design of the product can be anything and depends solely on your taste and preferences. You can make a simple and unpretentious table, or you can equip it with many shelves and drawers, using it as an additional tabletop. The style is also individual and tailored to suit interior decoration dwellings, it is advisable to use natural environmentally friendly materials(MDF, wood). In rooms with modern design metal or glass structures: colored, tinted or transparent.
The most comfortable are tables equipped with wheels, since they are mobile and easy to control. A handle installed on one side will help guide the product, and various hooks, shelves and a cutting board will help make it more functional.

Deciding on a drawing of a serving table
The drawing of the serving table is the first thing you should start with in the process of making it. You can make full use of your imagination, giving the design a fancy shape, any size and color, or take it as a basis ready-made solution from the Internet. The diagram is applied to a sheet of paper indicating all the sizes of the elements, places of their attachment, and finishing materials. In the future, you should strictly adhere to these values and monitor their compliance. So that the work does not take too much effort and time from you, you should not give preference to overly complex options, but opt for a classic 4-wheeled table with two tabletops and a handle. The height of 78 cm is sufficient for all occasions, as is the length of 93 cm with a width of 42 cm.
DIY serving table on wheels
When the preparatory activities are left behind, it's time to stock up on tools and materials. To implement your plan you will need:
- board 50 x 100 mm (frame), 25 x 100 mm (table tops), 25 x 50 mm (edging);
- paint and brushes;
- sandpaper;
- tape measure, pencil;
- a circular saw, screwdriver and drill;
- sander and pneumatic hammer;
- drills and screws;
- protective mask, goggles, gloves.
IMPORTANT. The board must be extremely dry, because otherwise, after some time, cracks and gaps will appear on the surface of the countertops. As a result, the structure will become less durable and attractive.
The manufacturing process consists of the following stages:
The serving table will become an indispensable assistant when relaxing in the company of friends or relatives, watching a movie after a tiring day at work. Carefully and carefully assembled, it will become a decoration of the home, a source of pride for its owner and the general attention of guests.
 How to make a serving table on wheels with your own hands
A serving table is, of course, not an essential thing, but it is so convenient when you need to bring food from the kitchen for everyone to watch your favorite show on TV or just drink tea with friends on the veranda of your dacha, and you need to bring cups in your hands to several techniques.
 The dimensions of the table are as follows: height - 0.9 m; width - 0.4 m; length - 1 m.
This table is made from leftovers wooden materials. You will need two long sidewalls with a length of 0.7 m and a section of 15 by 25 mm; two short sidewalls 0.6 m long and the same cross-section; 17 pcs. connecting strips 33 cm long; two legs 87 cm long and 15 mm in diameter; 2 pcs. holders for wheels 110 cm long; handle 35 cm long; load-bearing elements of the axle and the wheels themselves with a diameter of 25 cm.
First, we select the wheels and axle for them. We cut out the elements of the table from wood and sand them thoroughly.
We assemble the frame from the sidewalls, connecting strips, supporting elements of the axle, legs, wheel holders and handles.
We fasten the parts with PVA glue and self-tapping screws. The grooves in the wheel holders must be made very precisely so that load-bearing element the axle held tightly.
The suspension axle can be made from wooden rod with a diameter of 22-25 mm and make a groove of about 28 mm in the casing so that the axis moves freely.
The table drawers are made of 15 mm thick plywood. External surfaces can be decorated wooden planks. The suspension axle must be firmly attached to the box, because it is a holder and a handle at the same time.
The screws and bolts that fasten the table parts must be recessed into the wood.
The movable axle is attached with screws to the underside of the support bar of the holder.
We cover the table with paint or two layers of varnish.
Have you ever wanted to at least mentally be in the distant past in order to feel the spirituality and atmosphere of that time. Paying attention to our everyday bustle, boring and modest interiors, as well as the popularity of minimalism, let's make a serving table from a bygone era that would have the grace of court furniture, but also not be devoid of modernity.
A little background
This idea was inspired by not only the desire to have a piece of something from the past, but a funny and interesting film. One evening, having decided to watch something new from cinema, I typed “www.ivi.ru” into the search engine and came across a wonderful film that told the story of the formation of the monarchy. It was at that moment that inspiration struck, which did not leave me until the end of the work.
Throughout the film, I admired the grace of all the interior details in the kingdom's castle. I was so carried away by all sorts of little things that I completely did not notice the characters in the film. But the film soon ended, and in order to somehow distract myself from the obsession of starting to make this table at twelve at night, I decided to www.ivi.ru on the same site.
Necessary materials for the product:
LDSP (laminated chipboard);
- plywood 6 mm thick;
- plywood 12mm thick;
- a round wooden block with a diameter of about 1.5 cm;
- special wood putty, you can use absolutely any color;
- metal round fittings with thread;
- 4 blocks measuring 50*40 mm;
- 2 blocks measuring 1.5*1.5 cm;
- beautiful self-adhesive film (opaque);
Preparatory work
First, draw a suitable flower and leaf template on paper, required sizes and shapes (but don’t get too carried away, you still have to cut it out); choose the width and height of our table and mark the required space on the plywood; Now let’s lay out and trace the flowers cut out of paper; We slightly adjust the drawing on the plywood, add branches to the flowers and leaves, and fill in the voids. Now we start cutting out the sketch with a jigsaw, using a figure saw, then carefully sand and paint the ends. And also the inside of the plywood.
Important tip: the jigsaw file must be sharp throughout the entire cutting process - replace it with a new one more often, then your pattern will be smooth and without beveled edges. From Laminated chipboard we cut out 2 sidewalls for attaching the handles, putty the ends, make recesses and small holes for the screws, attach a round piece of wood pre-cut to size, putty the heads of our screws, sand them completely, and then paint the entire handle.
Cutting out the top and bottom parts
We cut out two rectangles from laminated chipboard - these are the upper and lower tabletops; at first we already marked out how wide our table will be. Again we make recesses for the screws in the upper part of the first table top where the legs will be attached, and in the lower part of the table top where the handles are installed, we do all this with a small drill so that the chipboard does not fall apart.
We screw the handle to the top tabletop, fill the screws and cut edges of the tabletop, sand everything and paint. Now we take our self-adhesive film and glue it only on top part countertops. Now we attach the remaining legs with self-tapping screws and also putty. We cut out a stand for all sorts of bottles from plywood and sand it.
Connecting all the big parts
Now we have already screwed all the legs and handles, there is little work left to do. We take our sawn surface, which we cut out at the very beginning, and fasten it with screws on the right and left sides. After this, we attach the shelf for bottles to the shelf holders.
You can make a serving table with your own hands using available construction stores boards and perforated metal corners. The final product will look stylish, fitting perfectly into modern kitchen. And if you have ever tried yourself in something similar, for example, done, then this project will not seem difficult to you.
Note: Since perforated corners can be of any length, you have the right to make a serving table of a height and size convenient for you. These parameters largely depend on the purposes for which this piece of furniture will be used. If, for example, as coffee table, it will be lower. But if you are planning to arrange a place where the serving table will serve as the same island, then it should be taller and larger in size.
Required tools and materials:
— 4 corners 38x38 mm, length 79 cm (for vertical corner posts);
— 6 corners 38x38 mm, 53 cm long (for short edges of shelves);
— 6 corners 38x38 mm, 90 cm long (for long edges of shelves);
- 2 shelves 90x53.5 cm, 26 mm thick (in this case, from laminated boards);
— tabletop 120x60 cm, thickness 26 mm (laminated board);
— 4 furniture rotating wheels with a braking mechanism;
— 4 wooden bars 7.5x10 cm, 35 mm thick for mounting wheels;
— cutting board 30x30 cm, thickness 26 mm;
- hacksaw for metal;
- bolts, nuts, washers and spring washers;
— connecting plates;
— a tool for tightening bolts and nuts (for example, a socket wrench);
— shaped cutter with a rounding attachment 6 mm;
— a drill with the necessary attachments for screwing in screws, a 3 mm drill bit;
- a circular saw;
— impregnation for wood;
— screws 25 mm and 50 mm;
— drill attachment for drilling 90 mm holes;
- clamp, flat strip;
- fine-grained sandpaper;
- chisel;
- furniture fittings.
Do-it-yourself serving table: step-by-step instructions
Step 1. Cutting corners

Using a hacksaw, cut the corners for the future table to the selected dimensions. For convenience, you can secure the corners with a clamp before cutting, and place the hacksaw blade at a slight angle to the plane of the corner (as in the photo).
Note: Vertical posts can be made to other lengths.
Take the short horizontal parts of the table (corners 53 cm long). For each corner on one of its planes (sides), step back 40 mm from the opposite ends. Make a cut in these places to the middle of the corner (fold at an angle of 90 degrees). Having made a cut from each edge of the corner along its rectangular fold, remove the resulting pieces of 40x38 mm. This is necessary so that when the short and long horizontal parts of the table come into contact, there are no overlaps on which wooden shelf will lie unsteadily.
Step 2. Assembling the table frame

Assemble the table frame by bolting the long and short horizontal corners to internal parties vertical corners. Do not overtighten the nuts at this stage. Under top shelf(where the table top will be attached) screw it to vertical posts connecting plates - two per rack. This will allow the structure to be stable during operation.
Step 3: Leveling the structure

At this stage, check that all corners are perpendicular. Measure the diagonals - they should be the same. Now you can tighten the nuts tightly, fixing correct form frame.
Step 4. Adjusting the table top and shelves

Most likely, for the serving table that you plan to make with your own hands, you will not find shelves and tabletops in the store required sizes. Therefore, you will have to adjust their sizes yourself. To do this, take measurements, draw cutting lines and attach them to the in the right place straight slats. Please note that the rail should not touch the cutting line, but be from it at the distance at which the saw is placed from the edge of the tool. Check everything again. Now make the necessary cuts.
Step 5: Rounding the Edges

Use a router bit to round the edges of the tabletop. Sand with fine sand sandpaper. Paint the finished edges with a wood stain of the appropriate color (in this case, walnut).
Note: If you chose unpainted boards to make your own serving table, you can paint them along with the finished edges at this stage.
Step 6. Attaching the boards

Center the tabletop relative to metal frame. Drill holes with a 3 mm drill bit in the places where you need to screw in 25 mm screws. Drill and screw in screws from the underside of the shelves.
Step 7: Attaching the Wheels
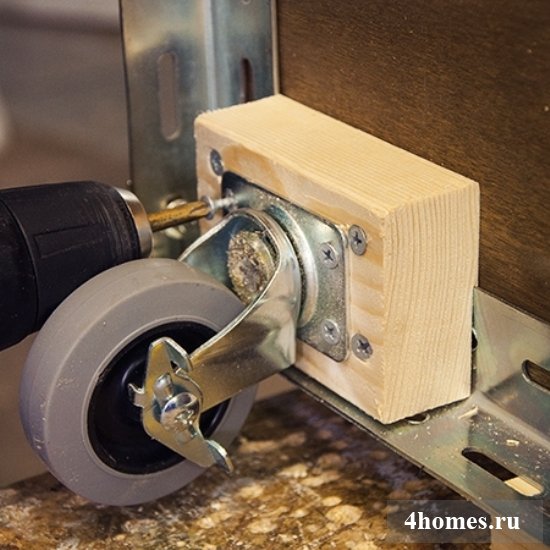
Using a chisel, use a chisel to make a hollow 2 mm deep and 3.5 cm wide along the long edge of the block (see photo). One side of the corner should be hidden in it so that the block adheres perfectly to the bottom shelf. Attach the bars to the shelf with 50 mm screws. Attach the wheels to the bars.
Step 8. Attaching the cutting board

Step back to the center of the table from two adjacent edges of the tabletop by 30 cm. In this place, use a drill attachment to drill a hole with a diameter of 90 mm.
Note: Do not throw away the sawn circle, but screw it onto the underside of the cutting board. Insert the sawn circle into place and watch how the cutting board rotates on the tabletop around its axis.
Cover everything wooden surfaces impregnation, which can be used to treat surfaces in contact with products.
Step 9. Finishing work
Now is the time to equip the mobile table convenient accessories. Attach them to the side or bottom of the tabletop. In this case, a paper towel holder, a glass holder, a ladle holder, a bottle opener and two metal towel handles are used. Place a bucket for food waste under the sawn hole in the countertop.
Well, your DIY serving table is ready!

")


