Toilet installation installation: detailed instructions for installing a wall-mounted toilet. How to install a wall-hung toilet with your own hands Built-in toilet installation installation
Suspension systems are becoming increasingly popular. This is not surprising, since wall hung toilet takes less space, compared with floor systems. In addition, they simplify the cleaning process, as there are no hard-to-reach places. Considering that a wall-hung toilet looks much more aesthetically pleasing, such a high interest in suspension systems. But the process of installing a wall-hung toilet often raises questions, so it is necessary to consider this process.
- Preparatory work.
- Installation installation
- Toilet installation.
Each stage does not cause any difficulties for a person who has experience working with the tool.
Preparatory work
First you need to determine the place where the toilet will stand. If redevelopment is not planned. If only the equipment is replaced, it is natural that the location will not change. Otherwise, everything depends on the future interior of the room. It is important to know which wall is located behind the future location of the toilet. This is due to the fact that it is attached only to the main wall. A plasterboard partition will not work, as it simply will not support the weight of the system and will break. 
When the place is determined, it is necessary to lead to it cold water and a sewer outlet for waste disposal. This must be done before installing the installation system, since after it the work will be difficult. 
When the location is determined and prepared, you can proceed to installing the installation.
Installation of an installation system under a wall-hung toilet
In order to install the installation correctly, it is important to carefully approach the marking process. This stage is very important, since an incorrectly marked system will not fit correctly and, as a result, everything will have to be redone. 
Therefore, before installation, you need to carefully measure everything and determine the height of the future toilet. Experts recommend that it does not exceed one meter, but if the family is tall, this number can be increased. When the location and height are determined, markings are applied for fastenings and holes are drilled. It is preferable to use special anchor bolts rather than ordinary dowels, since the load will be static and constant and quite large. Dowels will not be able to provide sufficient reliability of fastening, so distortions of the system are possible in the future. 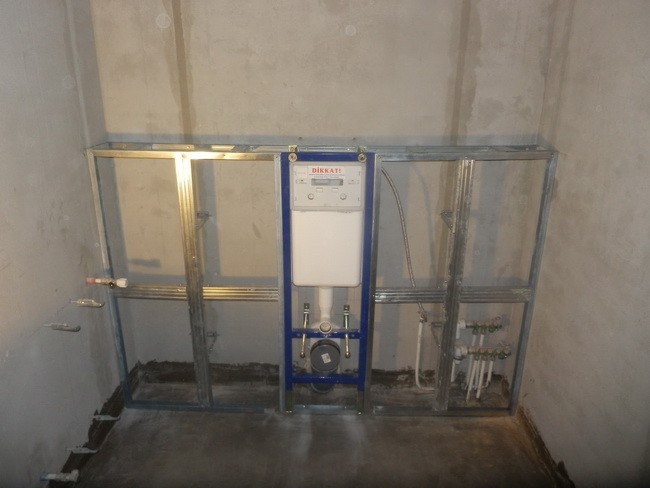
Special attention should be paid to the reliability of fastening and immovability of the structure, since the system will function for many years and must be properly secured. If desired, it can be further strengthened to achieve complete immobility. 
When the installation system is installed, it must be vertically aligned in the front plane, the top plane must be horizontal, and the supporting frame itself must be securely fastened and motionless. This is the only way to ensure good view and normal operation of the system in the future. 
Bowl installation
After all the installation work has been completed, the niche is sealed with plasterboard. It is advisable to use moisture-resistant material so that it does not swell from moisture. At the same time, we must not forget about the need for access to the drain tank, so it is necessary to provide a hatch in the finishing.
After finishing is completed, the toilet bowl is installed. This stage of work is carried out in accordance with the manufacturer’s instructions, since different models may require different actions. But the differences are not significant; the actions differ only in small details. 
If preliminary calculations and the measurements were made correctly, then the height of the bowl will be about 40 centimeters from the floor. This value is considered optimal and most convenient for ordinary people.
If you follow the instructions and carry out the work carefully and carefully, the process of installing a wall-hung toilet will not cause any difficulties. As you can see, there are no difficult jobs, so almost anyone can install a toilet with their own hands.
Video How to install a wall-hung toilet
Setting up a GROHE installation
Designers' quest for improvement appearance toilets, the creation of stylish bathrooms contributed to the popularization of block and frame structures with a hanging bowl.
The installation itself is not cheap, and you will also have to pay extra for its installation. Therefore, many home craftsmen hone their plumbing skills and carry out installation work on one's own. Agree, would it be nice to save money by attaching the toilet to the installation yourself?
We will help you resolve this issue. In the article we describe in detail the device, operating principle and types of structures, and also provide step-by-step technology and photo instructions for installing the toilet.
If the appearance of the external elements of the installation depends only on the designer’s imagination, then its structure internal structure can be divided into 2 options: frame and block.
Image gallery
The drain button frame is secured with latches and can be easily removed. Underneath there is a hole for connecting a water hose with a compact tap. Within this “installation” window on the front wall of the tank there is and, which can be unscrewed from the tank by hand and repaired without dismantling the box.
Myth No. 3. A wall-hung toilet takes up minimal space.
Block and frame installations require an additional 20-25 cm of bathroom space. Therefore, these structures take up even more space than a floor-mounted toilet. The only option for reducing space is to place the installation in a wall niche.
Myth No. 4. There are no spare parts for block installations.
The sizes of components are standardized by most manufacturers, because repairable models have priority when purchasing. In plumbing stores, picking up a broken part will not be difficult. In addition, you can do it yourself.
Step-by-step installation of the installation and toilet
Installing a plumbing installation yourself is not difficult. The main danger is the leakage of the joint between the sewer pipe and the toilet pipe after final installation.
To avoid such problems, you must follow all the rules step-by-step installation installations. Next, installation schemes for toilets with various designs will be considered.
Required Tools
To install the installation and attach the toilet to it, the following tools and materials are required:
- Screwdriver.
- Adjustable wrench.
- Hammer drill with drills.
- Pliers.
- Dowels and bolts.
- Hammer.
- Level.
- Roulette with marker.
- Silicone.
The minimum tools and materials that will be useful when installing the installation itself are listed. When installing the box, other devices are needed, but this work is best left to professionals.
Installing a block installation
There are two ways to install a block installation:
- In a specially prepared niche in the wall.
- On a concrete slab, which is then covered with plasterboard.
Regardless of the type of installation, the list of steps to assemble the installation remains the same.
Step one. Applying markings in the bathroom. In small narrow rooms The toilet is installed along its axis, and in large ones it is better to place the bowl along the axis of the drain.
First you need to draw a line with a marker or chalk from corner to corner of the room along the wall where you plan to install the installation. Then, along the axis of installation of the bowl, you need to draw a line perpendicular to the first, using a construction corner.
Step two. Formation of attachment points. In accordance with the intended axis of installation of the bowl, the locations for fixing the block structure are determined. If the axis of the bowl and the wall is distorted, you can place wooden or plastic spacers under the fastenings to achieve an angle of 90 degrees.

In loose concrete slabs, preference is given to fastening with dowels, which provide maximum area contact of fasteners with the wall
It is necessary to center the location of the dowels relative to the middle of the toilet drain hole. If the distance between the mounting points of the block is 60 cm, then each hole for the dowel should be drilled at a distance of 30 cm from the axis of the bowl.
After marking, you need to drill holes with a drill and insert the fasteners supplied with the product into them.
Step three. Fixation of block structure. The drain tank is screwed to the wall with screws or anchor bolts. After this, a water hose is connected to the structure, and pipes are connected that will connect to the toilet bowl.

Inside the “installation” window there is usually a flexible hose included in the kit, into which water is supplied through an adapter with a tap
Step four. Screwing in the bowl support pins. After fixing the block mechanism, the toilet bowl is attached to it. Metal rods are inserted into the holes for its fastening and the places for their fastening on the wall are determined so that the height of the toilet seat is 40-48 cm.

The rods are made of ultra-strong, rigid steel and can withstand loads of up to 450 kg without deformation. Change their location later without dismantling decorative box will not work
After this, the toilet is removed and holes are drilled in the concrete slab under the rods, which are then fixed in the wall with fasteners.
Step five. Installation sewer drain. The toilet bowl is hung on support pins and a pipe for draining water from the tank is inserted into it. After this, the sewerage scheme is determined and its installation is carried out with rigid fixation of the 110-mm outlet pipe.

Rigid fixation of the sewer line is mandatory, because when installing the toilet bowl, the pipe should not change its position
Step six. Covering a block installation and installing a toilet bowl. After installing the sewer system, the toilet bowl is removed and decorative cladding of the entire plumbing structure with tiles or moisture-resistant plasterboard begins.

The drain button and its frame are installed last. But the operation of the drain mechanism should be tested only after the sealant has dried at the sewer joint.
When the cladding work is completed, the drain button is installed, and the bowl is placed on the drain pipes and metal support pins. After this, the toilet is attached to the wall with nuts.
Instead of lining the drain hole of a block structure, support rods and sewers, they are sometimes filled with concrete.

When mixing concrete for pouring, it is necessary to buy only certified materials, and also follow the technology, because the structure will experience heavy loads
To do this, after the fifth step, a common wooden formwork, and its internal volume is filled with concrete. 5-7 days after pouring, the formwork is removed, and the toilet bowl is docked with support pins rigidly fixed in concrete, sewer pipes and a cistern drain.
Installation of a toilet with frame installation
The installation of a frame installation with a toilet can be carried out in any place in the bathroom. Single-frame structures are attached simultaneously to the wall and floor, while installations with a double frame can be installed in the middle of the room in a special partition.
The installation of both design options differs only in the location of the metal frame and the shape of the decorative cladding, so their installation will be discussed in one step-by-step instruction.
Step one. Assembly frame structure. Installation of the installation begins with the assembly of the metal frame. To compensate for uneven floors and walls, the frame design includes retractable legs. After adjusting the position of the frame according to the level, the legs are rigidly fixed in the required position.

There is a special mechanism to regulate the distance between the wall and the frame. The position of the foot must be fixed firmly to avoid possible distortion frames
The installation is applied to the installation site, and a marker marks the places where it is necessary to drill holes for dowels.
Step two. Installing the tank on a metal frame. The height of the water tank can also be adjusted, but not in all installation models. The recommended height of the release button is 1 m from the floor surface.

The height of the drain button is not of fundamental importance for the operation of the mechanism, but surveys indicate that 100 cm is the best option
Based on this parameter, the level of location of the drain tank inside the metal frame is selected. Fittings for draining water are installed together with the tank.
The frame structure often has a height-adjustable horizontal metal strip. It has holes or clips for attaching the support rods of the toilet bowl, pipes for draining water from the tank and sewerage.
Step three. Sewerage installation. A 110 mm sewer pipe is laid to the frame.
Step four. Fastening the frame structure. Holes are drilled to attach the metal frame, and then it is screwed with screws or anchor bolts to the wall and floor at the designated points. Optimal distance from the frame frame to the wall – 140-195 mm.

It will not be possible to screw the frame close to the wall, because a sewer pipe measuring 110 mm must still be placed behind the metal legs
The sewer pipe is fixed to the frame using available fasteners.
After the frame installation is completely assembled, it is necessary to ensure that the supporting heights of the pins and pipes are adjusted correctly. To do this, a toilet bowl is hung on the structure.
Step five. Checking for leaks. A water pipe is connected to the drain tank and the tap is opened. After filling the tank, a test drain is performed. If there are no leaks, the toilet bowl is removed and the installation begins.
Step six. Forming a box around a frame installation.
There are two ways to close a metal frame:
- sew up with plasterboard;
- cover with bricks and tiles.
Before insulating the installation, it is necessary to close its pipes with plugs or plastic bags. For cladding it is necessary to use moisture-resistant plasterboard sheet 12.5 mm thick. The box will be decorative element, which bears no supporting load.

The front panel of the box must be reinforced at the back with a metal profile so that if you accidentally press the drywall with your hand, it does not burst or fall through
When covering, it is necessary to provide in advance the formation of holes for the pipes and support pins of the toilet bowl.
Step seven. Attaching the toilet to the installation frame. You can begin installing the toilet bowl on the installation immediately after plastering and painting the plasterboard box. If metal carcass lined with bricks and tiles, then the toilet should be installed on it 10 days after completion of the work.

Instead of silicone, you can place a 1-2 mm thick insulation gasket between the bowl and the wall to prevent cracking ceramic coating under loads
Before placing the toilet on the support pins, it is necessary to lubricate the rubber gaskets of the sewer pipes and the drain hole of the tank with silicone. Also, a layer of sealant is applied to the back wall of the toilet at a distance of 5 mm from the edge along the entire perimeter of contact with the wall.
The bowl is fixed to the wall with two bolts screwed onto metal pins. After a day, you can perform a test drain to check the operation of the entire installation.
Block and frame installations do not necessarily require the installation of a wall-mounted toilet bowl. It can be installed classically on the floor. Installation diagram floor-standing toilet differs from the above methods only in the location of the fastening elements and the sewer pipe.
When installing the toilet on the floor, it is fixed both to supporting horizontal rods and screwed to the floor. Bowl manufacturers choose the type of fastening based on the shape of the product.
When fixing the toilet to the floor, it is necessary to mark and drill in floor tiles two holes for mounting. After covering the installation with a box, the toilet bowl is mounted to the sewer and cistern drain pipes, and then screwed to the floor using the existing fasteners.

After final fixation of the toilet, it is necessary to coat the perimeter of the base with silicone sealant so that water and dirt do not get under the bowl
You can additionally use it to connect the sewer pipe and the toilet bowl.
Following the proposed instructions will protect the apartment from flooding and prevent the need to dismantle the decorative box during the first years of operation of the toilet.
Conclusions and useful video on the topic
The videos will allow you to put together a complete puzzle of the toilet installation assembly diagram in your head in just a few minutes. After viewing them, the step-by-step instructions described above will become more understandable and meaningful.
Frame installation assembly process:
Installing a block installation in a niche:
Attaching the toilet to the installation frame:
Proposed step-by-step instruction Installing a toilet with frame and block installations takes several hours of work, if you do not take into account the time to create a decorative box.
The essence of the installation comes down to smooth and strong fastening of the frame, connecting the pipes and docking the toilet bowl with the flush block. Anyone can do this economic man, able to handle the necessary tools.
Do you have practical skills in attaching a toilet to an installation? Share your own installation experience or ask questions about the topic of the article. The comment block is located below.
IN Lately The trend of installing a wall-hung toilet is gaining great popularity in the construction and finishing industry. This type plumbing and sewerage equipment is probably present in every home. In two thirds of houses, toilets are still installed using the old proven method - through floor mounting. Today, more and more often, preference is given to these suspended structures.
Why is this product so popular? Wall-hung toilets look better and more modern, which certainly affects the popularity of the product. You can save a lot of money by installing a toilet of this format. To do this, you will need to do one thing - learn how to install a wall-hung toilet yourself. Is this an impossible task?

Not at all, this can be done by anyone who reads the instructions and installation tips. The first step towards mastering the process self-mounting wall-hung toilet - delving into the main aspects of the design of the device.
Why is it so important to understand the features of a wall-hung toilet? Yes, because after this you will be much more likely to succeed in the process of installing the device. So, a standard toilet of this type consists of three parts, which include:

1. Steel frame (a reinforced element, since it is the basis for fastening the largest and heaviest element of the toilet, its bowl). It is strongly recommended to start the process of installing a wall-hung toilet with this component. The frame must be fixed to the wall and also attached to the floor, so that in the future the toilet can fully withstand the load of an adult’s weight. For this reason, the frame should never be mounted on fragile walls, an example of which are plasterboard partitions(there is a possibility that the fastening will be unreliable and the toilet will simply fall).
2. Drain tank (made of plastic, hidden from human eyes during the installation process by installing it in the wall itself). Its shape does not resemble the cistern of a standard floor-standing toilet, because it must fit in a rather narrow space. On the front wall of the tank there is a special cutout necessary for mounting the trigger mechanism. Modern wall-hung toilet cisterns almost always have a metered flush function, thanks to which you can choose the volume of water used for flushing.
3. Bowl (the only structural element of a wall-hung toilet that is not hidden from humans. It is also its most actively used part. The standard shape of this component is oval, although today on the market of similar sanitary products you can also find toilets with round, rectangular or even triangular bowls) .

Another integral component of the design of a wall-hung toilet is a set of fastening materials, through which the device is installed and mounted to the wall and floor. Such materials include Teflon tape, polyethylene outlet, elastic hose, and studs.
Positive and negative aspects of installing a wall-hung toilet.
Before you decide to install a wall-hung toilet, you need to consider the main pros and cons regarding this issue.
Positive aspects of the installation include:
- saving space occupied by the device;
- lack of an impressively sized drain leg;
- faint noise from water draining;
- extremely easy to care for.

However, we must not forget that installing a toilet with the designated design also carries a number of disadvantages, among which the following points stand out:
- need for mounting cistern inside a wall or niche (otherwise the size of the projection of a wall-hung toilet will not differ from that of a standard floor-standing device);
- the likelihood of movement of sewer and water pipes;
- the need to create a special recess for the cistern.

Methods for installing a wall-hung toilet.
At the moment, two methods have been developed for attaching a wall-hung toilet: on an installation or on concrete base. The owner of a plumbing fixture has the right to choose between these options, guided by only two criteria: if he wants an almost one hundred percent guarantee of fastening that will not come apart even under serious mechanical stress, then he needs to pay attention to installation. If the main goal is to install the toilet faster and without particularly significant material costs, then mounting on a concrete base is most suitable. Let us now pay attention to the aspects of each of these methods.
The main feature of this method of attaching a wall-hung toilet is that the device is attached to the wall using a special frame pre-installed into it, which plays the role of an installation. In order to correctly carry out fastening using this method without the help of professionals, it is necessary to strictly follow the installation plan, which is divided into several stages:

— Installation of the toilet frame. This structural component of the device is attached to the floor and main wall using dowels inserted into specially made holes. Next, at the attachment point, the sewerage and water supply pipes are removed. The installation itself must be level. Requirement for it: complete parallel contact with the wall to which it is attached. At this stage, you need to determine the height of the toilet above the floor. This figure is forty centimeters, but changes at the request of the homeowners;

— Supplying water to the tank. At the request of the device owner, the eyeliner can be supplied either elastic or rigid. Remember, while the water supply is being installed, the tank valve must be kept closed, otherwise a situation may arise with damage to the water supply;

— Connecting the toilet to sewer system. This stage begins with the toilet outlet being inserted into the sewer outlet, and after this operation the resulting connection is secured with corrugation. To accomplish this, the bowl of the wall-hung toilet needs to be screwed onto the installation for a short time. After this, it must be removed again; the time for its installation will come at one of the subsequent stages;


— Covering the work area with plasterboard. The sheets are attached to the frame already at the moment when it is fixed to the wall. Often, the user is provided with instructions for covering with plasterboard by the manufacturer of the product, who includes an algorithm of actions included with the toilet itself. Plasterboard covering can be carried out in two ways: either by completely covering the entire area of the wall, or by covering only the area of the installation itself. See the video of covering the installation with plasterboard below.
— Attaching the toilet bowl is the final stage, its essence: hanging this component of the device on a part of the steel frame using two small pins.
As you can see, there are no particular difficulties in self-installation there is no wall-hung toilet for installation, it is only necessary with great attention pay attention to the installation of the frame itself, since the reliability of the entire final result of the installation depends on its successful and verified fastening.
Installation of a wall-hung toilet on a concrete base.
This method differs from the previous one in that the toilet is mounted not on a frame built into the wall, but on a concrete base created by yourself. The standard list of parts required when installing a toilet in this way includes boards, nuts, screws and washers, two rods, the thread of which is no thinner than two centimeters, and the length ranges from half a meter to eighty centimeters, plastic pipe no shorter than ten centimeters, drain coupling and silicone sealant. In the future, the algorithm for attaching a wall-hung toilet without installation looks like this:

— two rods are mounted into the main wall. In the future, they will be enough to withstand a load of four hundred to five hundred kilograms, which is enough to firmly seat the toilet;
— the height of the toilet is set, after which you can trim and install the flush coupling;
- on the boards that will be used as formwork, places for holes for fasteners are calculated, after which you can begin installing them;
— the depth of the rods is calculated (usually it should not exceed fifteen centimeters), after which they are fixed in the wall using special glue for concrete;
Further installation process wall hung toilet on a concrete base does not have any fundamental differences with the process of attaching a standard floor-standing toilet. The drain is connected, the joints are sealed, the bowl is installed on rods, which are secured with nuts on top. The final touch is to install the cistern above the bowl.
What makes this method of installing a wall-hung toilet fundamentally different from the previous one is that there is no need to purchase and install an expensive steel frame. It is with this method of installing a plumbing fixture that you can save a lot of financial resources.
Cosmetic work after installing a wall-hung toilet.
After completing the main stages of installing a wall-hung toilet, all you have to do is take care of the filing and finishing of the device. Regardless of the chosen installation option for the device, plasterboard sheets are used for its cladding. When installing a toilet with an installation, these sheets close the flush cistern and the steel frame, while the toilet bowl and flush button remain open.

When installing without installation, you can use plasterboard to cover the concrete base, as well as the drain pipe. The hole for access to the tank remains open.
Installation of a wall-hung toilet with DIY installation. Video lesson.
Before you begin installing the toilet with your own hands, you need to make preliminary markings on the wall and floor.
First, determine the vertical, which must coincide with the axis of the frame. There are three options:
- Separate bathroom without washbasin and bidet. In this case, the vertical runs through the center of the wall on or near which the installation is installed.
- Bathroom with toilet and bidet. Both installations are lined up. And the vertical axes for each frame should be positioned so that they fall in the center of the selected location, taking into account the ergonomics of the bathroom. Under standard conditions, both axes should “divide” the wall into three equal parts.
- Combined bathroom. The vertical line on the wall should pass through the geometric center of the selected location.
The next step is to mark the vertical center of the drain key. For a block system, this is the only reference point, and it is usually located at a height of 1 m above the finished floor level. Therefore, you need to take into account the thickness:
- leveling screed;
- heated floors with insulation and their own screed (if provided);
- finishing layer (tile adhesive plus tiles).
At the frame installation standard height this size (1 m) is specified in the diagram, and it is short, then they are guided by the installation height of a particular model.
Further marking is carried out as follows:
- A horizontal line is struck level in the center of the key or the top of the frame and the installation width is marked on it.
- From these points, vertical lines are drawn down. They continue on the floor parallel to each other and perpendicular to the plane of the wall.
- Mark on each line a distance greater than the installation depth indicated in the passport. The actual size must also take into account the gap from the tank to the wall of 1.5 cm, the method of laying the sewer pipe and its maximum outer diameter at the joints. So with an installation depth of 12 cm minimum distance from the wall to the front surface of the installation is 13.5 cm - if the pipe “goes” under the ceiling, 15.5 cm - if the sewer pipe runs along the wall. And this does not take into account irregularities.
- Connect the marks - this will be the line along which the places where the legs are attached to the floor are located.
- Check the perpendicularity of this line relative to the side wall. If necessary, adjust it, making sure that the shortest distance to the wall is no less than the actual depth.
Marking on the wall for a block installation is much simpler and consists only of marking the attachment points to the wall. In accordance with the diagram and focusing on the recommended height of the flush button, a parallel line is struck from the vertical axis on each side at a distance equal to half the installation width. And on these lines the points of attachment of the frame to the main wall are marked.
Materials and tools
Even when purchasing the installation, you need to check the completeness. In addition to the frame itself, the tank, the inlet valve and the flush elbow must be:
- drain elbow;
- key;
- fastenings and fastening elements;
- plugs for flush and drain pipes (to prevent debris from getting in during operation);
- gasket for mounting a wall-mounted toilet (sound insulation).
In the case when you are installing plumbing fixtures yourself for the first time, it would be good to find out if the seller has spare parts for installation (if something goes wrong). All leading manufacturers produce spare parts and repair kits for installations - pipes, elbows, inlet and flush valves, membranes, seals and transitions. In addition, there should be an assortment different kinds fasteners and fasteners, which can be purchased separately.

You also need to purchase a set of pipes for connecting the wall-mounted toilet to the installation, silicone sealant for the joints of sewer pipes and fum tape for installing a stop valve on a water pipe.
To install a wall-hung toilet with installation, you will need the following tools:
- level, tape measure, ruler, construction corner, pencil or marker;
- hammer drill and concrete drills;
- hammer;
- set wrenches(as well as an adjustable or gas wrench);
- screwdrivers;
- pliers.
If you immediately install a frame from a profile for subsequent sheathing with plasterboard, then you also need a tool for this work:
- metal scissors;
- drill;
- knife or hacksaw;
- screwdriver
Features of installation and toilets installation
As mentioned above, there are three options for “installation and toilet” combinations.
Wall-hung toilet with block design
Easiest for self-installation An option for mounting the system is to install the frame on the surface of the main wall and lay a quarter-brick partition below the structure to provide a reliable support for the wall-mounted toilet. The butt size of a single brick is 12.5 cm plus 1 cm of vertical seam from masonry mortar, and the final 13.5 cm is just right for most models whose installation depth lies within these limits.
Another option is to purchase a block installation, which includes two special floor supports to “support” the wall-mounted toilet bowl. These supports are placed on the sanitary ware fastening pins, and they do not allow the bowl to “fall” back. Such models include Geberit Kombifix (110.340.00.5). If such accessories are not included in the kit, they can be purchased separately, for example Geberit Kombifix stops (457.888.26.1) or Alcaplast mounting kit (M90).
Do-it-yourself installation of a block installation proceeds according to the following algorithm:
- At the marked fastening points on the wall, holes are made with a puncher, to which the frame is screwed with dowels.
- Drive in dowels or anchors and screw the frame to them.
- Insert the tank into the frame, connect it to the water pipe (the water supply tube may be included in the delivery package) and to the flush elbow.
- Screw in the mounting studs to secure the bowl.
- Connect the drain elbow to the sewer through an adapter pipe (from the kit or purchased additionally).
Wall-hung toilet with frame installation
This is the most common design option hidden installation- it is suitable for installation near any wall or partition, regardless of its load-bearing capacity.
Installation of the toilet installation takes place in the following sequence:
- Holes for dowels are drilled at the marked attachment points to the floor and wall.
- A cistern with a flush mechanism and a flush elbow is attached to the frame.
- Install the frame and attach the legs to the subfloor.
- It is adjusted in height and horizontal level using retractable support elements. The structure is secured with bolts in the required position.
- Using metal fasteners, the structure is fixed to the wall. Typically these are studs with an adjusting head on the frame side and mounting angles or plates on the wall side.
- Screw in the pins and lock. Install the mounting angles in place and screw them to the wall.
- Adjust the position of the frame vertically by tightening or unscrewing the studs using a head (adjustment depth up to 45 mm). The position of the structure is secured with a lock nut.
- Attach the cuff for the drain elbow to the frame. The elbow is installed, connected to the sewer pipe through an adapter, and fixed to the frame with a clamp.
- Connect the tank inlet valve to the water pipe using the supplied or purchased adapter.
- Attach the studs for the hanging bowl.
- A button and a toilet are temporarily installed. They open the water, test the system for operability, check the tightness of connections and connections.
- If no problems are found, the button and toilet are removed. Close the holes of both elbows with plugs and begin covering the installation.
Note. One of the features of installing a frame installation is the ability to install it on a finished floor surface. In this case, marking and installation are carried out without adjustments for the thickness of the finishing coating layers.
Floor-standing toilet with block installation
One of the low-budget options for using a block installation system is a concealed-mounted cistern without a frame with a front flush button. Moreover, this option can be used for walls made of any materials. The load from a 6-liter tank can be withstood by a half-brick wall or a frame made of metal profile or a wooden beam (if the tank is attached to the frame itself or embedded elements).
The only problem that may arise during installation is the alignment of the flush hole of the floor-standing toilet with the flush elbow of the cistern.
Attaching a floor-standing toilet to the installation
Correct installation of a floor-standing toilet on an installation is only possible if the tiles on the floor have already been laid or there is an exact level of the finished surface. In this case, markings are made on the wall by selecting the center of the flush hole in the toilet as the reference point rather than the flush key. And the installation takes place in the following order:
- Select a location for installing plumbing fixtures.
- They mark a vertical axis on the wall. Mark on it the point of connection of the floor-standing toilet to the flush elbow of the cistern.
- The dimensions of the block installation and attachment points are noted relative to this point.
- The tank is secured (in a niche, on the wall, in a frame partition).
- Connect to a water pipe.
- Install the flush elbow.
- They make a sewer line (along the wall, in a grooved channel, inside a frame partition.
- The system and toilet are temporarily connected. Check the operation and tightness of the system.
- Close the flush and drain pipes with plugs, and the studs with tubes.
- The installation is covered with plasterboard (with holes for flushing and draining). Or they seal the niche and grooves with mortar.
- The wall is being finished.
- Connect and secure the floor-mounted toilet.
Installation procedure for a wall-hung toilet
The hanging bowl is mounted after the installation for the toilet has been installed and finished Finishing work. And depending on the type of installation, installation method and wall materials, there are the following options for preparation for finishing:
- install a block or frame system and cover the entire surface from floor to ceiling with a double layer of plasterboard;
- install a frame or block system and make a box from plasterboard;
- install a frame system in a frame wall;
- install a frame or block system in a niche and or cover it with a layer of plaster.
After the installation and communications are “hidden” under the rough surface of the walls and floor, finishing is carried out with selected materials (tiles or decorative plaster). Then they begin to install the wall-hung toilet.
Note. It is believed that the maximum benefit from the hidden installation of the tank and communications is achieved if the installation for the toilet is installed in a niche.
Niche for installation
A niche is made in the wall for installation if the installation depth of the frame, materials and wall thickness allow such work to be performed. And in addition to the niche in the wall, they also cut channels for water and sewer pipes, which, like the installation, must be installed secretly.
Important. This method is not suitable for load-bearing walls made of bricks (for walls made of reinforced concrete, it is technically impossible to make a niche with your own hands). And if the arch of a niche can be reinforced with an insert made of a metal profile (standard practice for an opening), then this option is not suitable for hidden pipe laying - cutting horizontal channels into load-bearing wall prohibited at the regulatory level.
And without horizontal grooves, it is extremely difficult to make hidden wiring - only if the pipes approach the niche from below, and before it are laid in a screed or between the joists of a wooden floor.
For a niche in the wall, there is only one option provided by the manufacturer - for a block installation with an attached toilet.
In addition to this option, they also use a bathroom niche in which the water supply and sewer risers pass. In this case, a frame made of a metal profile is installed in a niche, and a frame installation for a wall-mounted toilet is attached to it.
Installation of a frame with a tank in a niche
The complexity of this method is that the installation of the frame in the niche is “non-standard”. The installation instructions from GEBERIT and GROHE do not cover this option, and the kit does not include fasteners for this.
Installation of the frame in a niche proceeds according to the following algorithm:
- Mark the line for installing the legs on the floor, taking into account the installation depth, the location of the water and sewer risers. The markings must be perpendicular to the walls of the niche or in the plane of the adjacent surface.
- The verticals on the walls of the niches are set off from this line.
- Mount reinforced guides of the UA50 profile on the floor, side walls of the niche and ceiling.
- Install the frame into the profile and fasten it to the floor, having previously drilled holes for the dowels.
- Set the height of the legs and the horizontal level of the frame.
- Fasteners (studs or other type of fastening) are made to a specific size to rigidly fix the installation to the “far” wall of the niche. Drill holes for these fasteners and attach the frame.
- Cut a section of the UA profile to the width of the niche. Attach it to the side profiles and frame.
- Install flush and drain fittings for a wall-hung toilet. Install studs to secure the bowl. Connect the tank to the water supply and the drain elbow to the sewer. Temporarily hang the toilet and connect it to the installation. Check the system for leaks and operability.
- Remove the tank, close the flush and drain holes with plugs, and close the toilet studs with protective tubes. Attach plasterboard cut to size to the profiles in two layers.
Sewage supply
Supplying water to the toilet installation does not cause any difficulties. And for any connection of the tank (from the side or from above), lay a rigid or flexible pipe Half an inch is always possible. With connection to the sewerage system the situation is more complicated. The diagram for the installation shows two types of connections:
- the knee goes down at a right angle;
- the knee is rotated 45° in the plane of the frame.
In most cases, the connection of the installation to the sewer system is based on these options.

The first option, for example, is used for direct connection to the drain, when the frame stands in the same niche as it. The second option is used when laying a drain pipe to the riser along the wall.
But there are cases when both options are not suitable due to limited space and the unique geometry of the bathroom - the large diameter of rigid pipes and fixed angles knees prevent you from doing it correctly. And in order to solve the problem of how to turn a sewer elbow away from the installation and provide the required slope angle, they use, for example, D 90/110 MM FLEXI corrugation from the ALCAPLAST company. But in this case, it is necessary to check the slope of the corrugation.
Connecting communications
To connect to the water supply, the installation kit includes an inlet valve with an external outlet for a ½-inch pipe and an angle shut-off valve inside the installation.

For toilet installations with a bidet function, an additional tube is provided for the intimate hygiene fitting. And to ensure comfortable temperature, such models are also connected to the electrical network to heat water, which is used for washing. And for this purpose, fastenings are provided for mounting the protective tube of the electrical wiring.
How to check the system for functionality
After connecting to communications, before sewing up the installation, it is necessary to check the operation and the system for leaks. To do this, pre-install the toilet with the following installation:
- adapters with cuffs and sealing rings are inserted into the flush and drain holes of the installation;
- “put” the toilet on the studs and move it as close as possible to the installation so that the adapters fit more tightly into the toilet (it won’t be possible to push it in tightly - the pipes are too long);
- open shut-off valve on the intake valve;
- when the tank is full, drain the water (for pneumatics, you need to connect the button and flush valve with tubes, for mechanics, activate the flush valve rod by hand).
After checking and fixing possible malfunctions The toilet bowl, adapters and button are removed.
How to install a wall-hung toilet to an installation
Even when choosing a location and marking, it is ensured that the height of the wall-hung toilet from the floor without a lid is 40 cm. But if after laying the tiles it turns out that it will hang 2 cm higher or lower, this is acceptable.
The wall-hung toilet is mounted on studs after adjusting the size of the adapter pipes for connecting the toilet drain and flush to the installation:
- Remove the protective plugs and tubes.
- Insert the adapters into the elbows and mark the level “0” on them - the plane of the surface of the installation cladding.
- Then insert the adapters with the other side into the toilet (put a sealing cuff on the flush bowl). Mark level “0” on the toilet.
- The adapters are shortened by the difference between the two marks.
Place a gasket on the studs (it serves to protect the finish and dampen structural noise when the flush is running) and proceed to install the wall-hung toilet on the installation:
- Rubber bushings are inserted into the holes for mounting the wall-hung toilet.
- Insert adapter pipes into the drain and flush holes of the bowl.
- Put on wall-mounted toilet onto the studs so that the adapter pipes fit exactly into their holes on the installation, and the bowl fits tightly to the wall.
- Place elastic washers and steel washers on the studs and tighten the nuts.
- Before finally tightening the fasteners, you can slightly adjust the horizontal level relative to the height of the toilet from the floor.
Installation of the flush button
According to the principle of operation, there are two types of toilet flush button: mechanical and pneumatic.
Even at the installation assembly stage, a flush valve is installed. Each company has its own design, but the principle of operation is common:
- a mechanical button activates the flush using a pull rod, separate for each key - economy mode and full flush;
- For a pneumatic flush, two tubes go from the valve to the button - for each mode there is one.
Installation of the flush button begins with its connection to the flush valve. For a mechanical drive, the rods (pins) must be “adjusted” in length and each connected to its own key, while for a pneumatic drive, the tubes must be connected.
Then the button is “snapped” into the socket.
Common Difficulties
The main problems arise due to the limited size of most bathrooms. This is especially true for strictly residential buildings, when in addition to the small “dimensions” there is added poor geometry of the room - the absence of right angles and parallels in the enclosing surfaces. In this case, even the slope of the wall is checked before installation. And leveling the walls further reduces the room for “maneuver” when installing the installation under the toilet.
Helps you avoid mistakes and rework right choice type and model of installation, as well as accuracy of marking, frame location and compliance with the installation diagram.
And the main condition is careful handling of mechanisms and sanitary ware. Even “tightening” the fastenings of the intake and exhaust valves or the hinged bowl can lead to a violation of the tightness of the connections or damage to the device itself.
What is important to know. It is necessary to buy installations and plumbing from reputable brands. It is better to do this with dealers or trading companies that have appropriate agreements with service centers and provide a guarantee for the purchased product. In addition, if necessary, you can buy from such sellers additional accessories or a repair kit for the selected installation model.
Toilets with installation are real aristocrats in the world of plumbing. These are convenient and compact devices, usually distinguished by an excellent design and a price that is not at all sparing to its owner. In addition, installing a wall-hung toilet is a rather complicated task and requires very careful execution.
And yet, the ranks of supporters of toilets with installation are steadily growing. Many home craftsmen, after studying the recommendations and instructions, successfully cope with installing this complex structure on their own.
It is only important to perform each stage of installation work correctly.
A wall-hung toilet is much more complex than a regular compact or monolith. The installation is called a durable metal frame. This frame is installed inside a wall niche and securely fixed to the wall and floor.
There is some space left between the wall-hung toilet bowl and the floor. It is easier to clean the bathroom in such conditions, since there is no toilet leg
The flat plastic tank is already attached to the frame. Then the necessary communications are brought to the niche, finishing is done and the toilet itself is hung.
The toilet remains outside, and the rest of the contents remain hidden in the wall. The flush button, which is usually located on the wall above the bowl, is also displayed on the wall. Even from this condensed description it can be understood that installing such a device is a labor-intensive process.
But still, the model with installation has many advantages:
- aesthetic appearance and attractive design– the bowl seems to float above the floor;
- compact dimensions, leaving wide space for placing the toilet in both small and large bathrooms;
- the absence of a leg makes cleaning the room much easier;
- The design of the installation is universal, it is possible to choose some elements to suit your taste and budget;
- Frame and tank breakdowns are extremely rare, and repairing or replacing the drain button is usually not difficult.

The bowls of wall-hung toilets vary markedly in configuration, design, shape, size, design, color and other characteristics, which leaves wide scope for choosing suitable plumbing fixtures
Among the disadvantages, the high price should be noted. Taking into account installation costs, the cost of such a toilet can be twice that of a standard floor-standing model.
However, manufacturers take into account the growing popularity of wall-hung plumbing fixtures, so relatively few inexpensive models. Another drawback is that the tank and frame, hidden in the wall, are not very accessible for repair.
In the event of a serious breakdown, you may have to remove the entire wall and re-do the finishing work in this area.
Materials and tools
To install a toilet with the installation of a built-in toilet, you must purchase the following items:
- installation frame with a plastic tank;
- wall hung toilet bowl;
- flush button;
- studs for attaching the toilet;
- a set of pipes for connecting the bowl to the tank, etc.
The installation is usually supplied complete with a flat plastic tank, as well as adapters, pipes, fasteners and a flush button. The kit usually includes a special material that protects the structure inside the wall from the effects of condensation, and also reduces the noise level from the operating tank.
When purchasing, you should carefully check the kit in order to immediately purchase the missing elements. The toilet bowl is also purchased separately. The dimensions and configuration of the installation, like other parts, are standardized, so they can be changed if desired.
For example, you can choose the new double flush button, which saves water.

The diagram clearly shows the installation device with a plastic flush cistern and the necessary connectors, which is intended for installing a wall-hung toilet
To complete the installation, you will also need a number of tools, first of all, a hammer drill and concrete drills that match the fasteners. Also needed building level, spanner wrenches, tape measure, pencil for marking, knife for cutting drywall, etc.
Installation procedure for a wall-hung toilet
Schematically, the procedure for installing a toilet with an installation can be represented in the form of a number of basic steps:
- Make a niche of a suitable size in the wall.
- Bring sewerage to the niche.
- Install the installation frame.
- Bring cold water supply pipes to the installation site.
- Connect the toilet cistern.
- Close the niche, install the flush button and finish.
- Hang the toilet, connecting it to the tank, as well as to the sewer.
You will also need a certain amount of drywall, both for installation and finishing work.
Each stage of the installation of a wall-hung toilet requires close attention. The service life of the device, the number and nature of breakdowns largely depend on the quality of installation work.
The results of even minor errors made during the installation process may not become obvious immediately, but only during operation. Repairs can be very costly and time-consuming, so it is better to correctly install all the elements of this device right away than to redo it later.
The detailed installation procedure for a wall-hung toilet is presented in the following video:
Niche for installation
To create a niche and install the installation, only walls with appropriate bearing capacity. The installation can withstand a weight of about 400 kg, and part of this load falls on the wall. Therefore, it would be unwise to install a wall-hung toilet on a plasterboard wall; it might simply collapse.
So, to install the installation, you need to hollow out a niche in the wall with the following parameters:
- height – 1000 mm;
- width – 600 mm;
- depth – 150-200 mm.
Sometimes depth requirements are not easy to meet. In this case, a niche is made to the possible depth, and its deficiency is hidden with the help of drywall and finishing.
Thus, there is space for experimentation in the field of interior design. For example, you can make a built-in closet in the space between the ledge that appears and the wall, or hang open shelves there.
But the idea of simply placing a frame along the wall and then completely covering it with plasterboard does not make much sense. In this case, it is easier and cheaper to put a regular compact in the same place, which will take up the same amount of space or even less.

If the bathroom already has a niche for water supply and sewerage communications, it makes sense to install the installation in it
Residents of the upper floors apartment buildings sometimes installed in a niche fan boner. In this case, part of the vent riser is cut off and an air valve is installed where the outlet to the attic is located.
In some bathrooms, a niche for communications is provided by the design. It can also be used for installation, but some modifications may be necessary, for example, changing the position of water pipes and moving the sewer riser.
If a home craftsman has no experience in performing such operations, it is better to consult with a specialist or even entrust him with performing this part of the installation work.
Sewage supply
Before installing the frame, you must ensure that the sewer pipe is correctly connected to the installation site. You will need a pipe with a diameter of 100 mm. It should be laid as close to the floor as possible, and it is imperative to maintain the correct slope.
The connection point should be 250 mm from the center of the wall niche. An oblique bend with an angle of 45 degrees is put on the horizontal part of the pipe. After completing these operations, you can begin installing the installation.
Installation of frame with tank
There are four points for mounting the toilet installation. In two places the legs of the frame are attached to the floor, and in two more places the frame is secured to the wall using brackets. In this case, you should definitely use a building level so that the structure stands perfectly level both vertically and horizontally.
If the installation is installed even with a slight misalignment, interruptions may occur in the operation of the internal mechanism, which will lead to rapid failure of the structure. To level the frame vertically, use adjustable legs.
The horizontal position is set using wall fasteners, the position of which can also be changed as needed. Once the position of the installation is precisely set and fixed, you can screw it to the wall. To give the frame greater stability, the legs can be additionally cemented.
A layer of screed 20 cm high will be sufficient, but this measure is not mandatory.

The height of the frame legs for a wall-hung toilet can be adjusted. This allows the structure to be aligned horizontally and strictly level.
At the bottom of the installation there are several holes intended for further installation of the hanging bowl. The distance between the floor and these holes should be approximately 300-400 mm so that the toilet bowl can be hung high enough from the floor. Special pins should be installed in these holes.
They are inserted all the way into the wall and secured with special nuts. The studs are designed for later hanging the toilet.

The studs, which are intended for hanging the toilet bowl, must be inserted into the corresponding holes on the frame and secured to the wall
Connecting communications
You should start by connecting the sewer system. Typically, the installation is equipped with a special black outlet designed for this connection. It should be adjusted to the sewer pipe. The second side of the outlet is secured to the installation with special clips.
Connection to the water supply is made on the right or left side of the installation. The water pipe is connected using a threaded connection already installed in the structure.
To supply water to the tank, you can also use ordinary flexible hoses. It is easy to install and inexpensive option, but the service life of hoses is shorter than that of pipes, so one must take into account the need for complex repairs to replace them.
At this stage, it is necessary to check the reliability of the connection of the tank with plumbing system. To do this, you need to open the water supply tap, which is located inside the tank, and fill the container. All connections are then checked for leaks and repaired if necessary. There is no need to drain the water.
Check sewer connection can be done as follows: put the bowl on the studs and perform a test flush without securing the structure.
After this, the bowl should be removed from the mount, checked for the presence or absence of leaks, and then continue installation.
Finishing work
If the installation is installed correctly and the tank does not leak, you need to sew up the niche with a sheet of plasterboard and perform finishing work. It is recommended to take a double sheet of special moisture-resistant drywall. Regular drywall will soon be damaged due to contact with condensation.
To correctly cut all the mounting holes in the sheet and not spoil the material, use a cutting template. Typically, such a template is supplied with the installation.

When the installation is installed and all necessary communications are connected, the niche is sewn up with a sheet of moisture-resistant plasterboard, on which finishing work is then carried out.
In the bathroom, the walls are most often tiled ceramic tiles. Further work on installing a wall-hung toilet can only begin after this stage is completed.
It would not be a mistake to even completely complete the renovation of the bathroom, and only then continue with the installation of a wall-hung toilet with installation.
Installation of a wall hung toilet
This stage can be called the simplest, since the bulk of the work has already been completed. But first it is recommended to wait until the layer of tile adhesive has completely dried. Install the toilet bowl as follows:
- Adjust the dimensions of the drain pipe, which should protrude 50 mm beyond the wall.
- The pipe intended for sewer drainage is cut in the same way.
- Install the pipes in their designated places.
- A special large gasket is placed on the previously installed studs and pipes; its configuration is similar to a truncated pyramid.
- Place the toilet bowl on the studs, connecting it securely to the pipes.
- Install plastic inserts and rubber gaskets.
- Place and tighten the mounting nuts.
- Cut off the protruding part of the rubber gasket.

Hanging the toilet with the installation, connecting it to the sewer and cistern, as well as installing the flush button is carried out after finishing the finishing work
After this, you can check the operation of the sewer system by flushing water from the tank into the toilet bowl. To adjust the height of the toilet bowl above the floor, you can change the position of the retractable pins and studs designed to hang the bowl. In this case, they usually focus on the height of the visitor.
The universal height is considered to be a distance of 40 cm from the edge of the bowl to the floor level.
Installation of the flush button
All that remains is to install the flush button. It can be pneumatic or mechanical. This is not a complicated operation, since all connections are already provided on the installation and should already be connected to the corresponding hole on the wall.
To install a mechanical button, you will need to install special pins and then adjust their position. The pneumatic model only needs to be connected to the tedious tubes on the installation, and it will be ready for use.


")


