How to make a wall pot. Beautiful and original flower pots. Unnecessary teapot as a flower bed
It is known that little things made by hand give a home a special charm; many can tell about the tastes, habits and hobbies of the owner. And one of these individual features of your home can be flower pots, made by you yourself.
In addition, each of your green pets has its own character, requirements for planting and care conditions, and a pot made according to “ individual project» is able to fully satisfy both your aesthetic tastes and the urgent needs of the plant.
Making your own flower pots
Clay pots
Clay is considered a traditional material for making flower pots. And, of course, you can buy a clay pot in a store without any problems.
But it's possible make it yourself, even without a pottery wheel at hand.
To make it you will need:
- clay;
- oven for firing the finished product.
Before starting work, knead the clay thoroughly until smooth.
Separating a small part from the total mass, form a ball and, flattening it, give the shape of a round disk. You have the base of the pot ready.
Form a rope with a diameter of about 0.5 cm and a length equal to the diameter of the bottom. Strengthen the rope on the bottom and start making the next one. This way you will form a clay pot of the size you need.
Leave the finished work to dry for a couple of days, after which the product must be fired.
 Don't know how to do it correctly? We'll tell you!
Basic conditions proper reproduction hyacinths are described, do not neglect them if you want to grow a healthy and beautiful plant.
Cement pot
This product will not only be original, but also durable.
To work you will need:
- several bricks;
- cement;
- sand;
- two plastic containers, different in volume;
- In addition, you will need a hammer drill and an old bowl or pan in which you will mix the solution.
 Prepared Grease clean containers with oil(can be plant-based): smaller in volume - on the outside, larger - on the inside. This way you will protect them from excessive sticking of the solution.
Prepare a mixture of sand, cement and water. Place the prepared solution in a container bigger size, and place a smaller piece inside. The greater the difference between the volumes of these vessels, the thicker the walls of your pot will be.
Place bricks or other weights inside a small container. The cement mortar must dry within 2 days. After this, cut the plastic containers and free your product from them.
In this way you can make quite large flowerpots. Small pots made in this way will look rather cumbersome, but, nevertheless, also original.
If desired, such a pot can be painted after drying. acrylic paints or decorate in another way.
Plaster pot

The procedure for making a pot from plaster is similar cement technology. Only other ingredients will be needed:
- gypsum;
- water;
- two plastic containers of different sizes.
We take a larger container, grease it with oil inside, place a smaller container inside, grease it with oil on the outside, and set it required level and pour in the plaster, having previously made a solution in a 2:1 ratio.
To have a more complete idea, I recommend watching the video of this process below; in addition, at the end of the video they will show how to decorate such a pot using the decoupage technique.
Wicker pot
 If you are a fan of eco-style, you can try to weave a flower pot from twigs. The process is quite labor-intensive, but the result will undoubtedly please you.
You'll need:
- twigs, preferably even;
- a piece of burlap;
- strong twine;
- glue;
- base container in the form of a cylinder.
Trim the twigs so that their length is slightly longer than the height of the base container.
Use twine to tie the twigs together to create a solid “canvas” that you could use to wrap the cylindrical base. Cover the base with a piece of burlap, and place the resulting structure of twigs on top. Secure with twine. If instead of twine you take a bright jute cord, your product will turn out more elegant.
Mosaic pot
 Pots made using the mosaic technique are beautiful and original..
As a “mosaic” you can use small pebbles, shells, fragments of porcelain or dishes, or colored glass.
In this way, you can decorate both small pots and large vases.
To work, in addition to the “mosaic”, you will need:
- tin base (this can be either an empty tin can or a tin bucket);
- plaster;
- mounting mesh;
- grout for tiles.
Cover the tin with plaster, and then wrap it with mounting mesh, “sinking” it into plaster mixture. Next, lay out the entire surface of the future pot (excluding the bottom) with the prepared “mosaic”. After this, leave your product to dry completely.
Finally, treat the surface with tile grout, to make the pot smooth and eliminate cracks and the gaps between the pieces of the “mosaic”.
Remove any remaining grout from the surface with a soft cloth.
Pot made from a piece of wood
 Original floor flowerpot can come from a small old stump, and from a piece of a fairly thick branch you can make a smaller pot.
To make such a “house for flowers,” remove the core from the tree, clean the inside and sand it.
If desired, you can free the stump from the bark or leave it in its “natural” form. In any case, coat the top of the product with several layers of wood varnish.
After complete drying new pot can be used for its intended purpose.
Coconut shell planter
 Coconut shells serve as an excellent container for plants that do not need frequent watering.
Hanging plants will look good in it.
Making such a design is quite simple: cut a coconut in half, extract the flesh, then drill holes in the bottom for drainage, and holes at the edges in order to thread a cord or chain through them.
Place expanded clay on the bottom, and place the substrate on top - the pot is ready!
Felt pot
 Felt products are now at the height of fashion. Why not give your favorite flowers a felt “nest”?
Take pieces of felt, ready-made or felted yourself, cut out the details of the future pot and sew them together! In such an unusual pot, plants will feel very comfortable.
Mini cactus garden
 Unusual containers for planting cacti and other slow-growing species indoor plants can be made from wine corks.
To do this, the core of natural cork is removed with a knife. The mini-pot is filled with soil.
On one side, using a heat gun, a magnet is attached to it, powerful enough to hold the weight of the “pot” with the plant.
Such mini-containers can be attached to any metal surface, for example, to the refrigerator door, forming entire flower arrangements.
Other ideas for unusual homemade pots
- If you are a fan of high-tech style and you still have unnecessary computer floppy disks, you can build original flower pots from them. By the way, they are perfect for growing violets and other small plants.
- By gluing together 5 square mirrors of the same size or 5 ceramic tiles, you will receive an easy-to-make, but stylish and original flower pot.
- Pots can be made from old vinyl records. If a vinyl disc is heated, it becomes soft and pliable, easily taking on the most unimaginable shapes.
Using old things
Sometimes The most unexpected objects can serve as flower pots. So, porcelain, earthenware and clay dishes can turn into an excellent container for planting indoor plants. Cups, deep salad bowls, teapots with flowers planted in them will enliven a country or Provence style interior.
Enameled dishes are also suitable for planting flowers. But this is more of an option for a country house.
By the way, if you couldn’t find a suitable pot for bonsai, an elegant salad bowl is perfect for this. You just need to carefully make drainage holes in the bottom using a drill.
Sometimes the most unexpected things can turn into flower pots. For example, an old cosmetic bag can also serve as a container for planting flowers.
Decorating finished flower pots. How to decorate a pot with your own hands?
To create a flower pot with unusual design, it is not necessary to make it “from scratch”. You can take ordinary standard pots as a basis and decorate it yourself and according to your own taste.
By painting a clay pot with acrylic paints and varnishing it, you will get a real designer item. By the way, such work can be entrusted to a child - and the image on finished product will delight you with its sweet spontaneity.
You can decorate ordinary plastic pots by simply covering them with bright scraps of fabric. Or you can crochet “clothes” for a standard pot - such containers will add special coziness to your home.
 By covering the pot completely or partially with braid, twine, lace or simply bright threads, winding them around the container, you will get an original and stylish decoration for your home.
Can be decorated regular pot buttons, shells, coffee beans, cereals or beads.
Even used to decorate pots eggshell . It must first be treated with a soda solution and dried. The prepared shell is glued to the surface of the pot using PVA glue, gently pressing down in the process so that it cracks. Next, the surface of the pot is covered with ink, which fills the voids between the pieces of shells. After this, the surface of the pot is wiped with a cloth and varnished.
Regular plastic pot can be decorated using decoupage technique using PVA glue and a paper napkin with a design you like. The design is cut out and glued to the surface of the pot, carefully leveling it so that wrinkles do not form. After drying, the finished picture is coated with varnish.
Other photo ideas for flower pot design


Using the tips above, you can create a truly unique pot at home, as well as decorate and decorate it with your own hands.
In specialized stores, supermarkets and markets you can buy flower pots of any size, color and shape, but there is always a chance that you will see the same product at your friend or at work. If you want originality, you can make pots yourself using scrap materials.
How to make pots with your own hands
The idea of making flower pots for your home or garden with your own hands is a great way to recycle some unnecessary things, give free rein to your imagination, have a good time, and then enjoy the fruits of your labors for a long time. I won't list everything possible options materials that can be used in this case, since there are a lot of them and this list can be started, but continued indefinitely. I’ll tell you about several options that have already been tried by me or my friends.
Flower pots made from tin cans
The simplest material that can be found in every home can easily turn into beautiful element decor of your house, apartment or cottage.
You will need:
- metal tin cans;
- white enamel;
- color pigment;
- multi-colored cords;
- glue "Moment".
Manufacturing:
- Prepare your materials.
Prepare everything you need for work in advance
- Wash the jars and dry thoroughly.
Before applying paint and glue, wash and dry the cans
- Make several holes in the bottom of each jar for water to drain when watering.
- Carefully paint the jars with white enamel and leave until completely dry. In this case, enamel was used to paint radiators.
Choose the type of paint suitable for working with metal
- Dilute the pigment of the desired color in a small amount of white enamel and apply paint to some of the cans as your imagination tells you.
Choose your favorite colors and combine them with each other
- Decorate the remaining jars with multi-colored cords or thick threads. To do this, gradually apply glue to the jar and tightly, end-to-end, wrap the jars with cords of the desired color.
Use cords or thick threads to decorate jars
- Replant the plants and place homemade pots on the windowsill or terrace. It is recommended to use such products indoors or outdoors without direct sunlight and precipitation, since under the influence of these factors the pots will quickly lose their beauty.
Flower pots made from tin cans look neat and beautiful
The note. You can use jars of any size, coloring them in different colors and decorating as you wish.
Below I suggest you get acquainted with another way to make a flower pot using a metal can.
Video: flower pot made from a tin can and plaster
Flower pots made from plastic bottles
Plastic soda or water bottles can also be used to make unusual containers for planting your favorite flowers.
You will need:
- transparent plastic bottles;
- acrylic paints;
- permanent marker;
- ornamental varnish.
Manufacturing:
- Place it on the table necessary equipment and materials. You can immediately prepare the plant and soil.
To make the cutest flower pots you will need materials available to everyone and a little patience.
- Using sharp scissors, trim each bottle to create cat ears at the front and a tail at the back. In the same way you can carve cubs, frogs or other animals.
To easily give workpieces necessary forms, use sharp scissors
- Carefully melt the edges of the workpieces so that they lose their sharpness.
- Make holes in the bottom of future pots for excess water.
- Paint the plastic blanks outside and inside with acrylic paints of your choice and let dry.
- Using a marker, draw the cat's face: eyes, nose, mouth, mustache. If you don't have a permanent marker, use a brush and acrylic paints.
Animal faces can be drawn using a marker or a brush with paints
- Coat the pots with non-toxic craft varnish.
- When the varnish is dry, fill the pots with soil.
Before pouring soil into the pots, let them dry thoroughly.
- Replant the plants.
Cat pots fill the house with goodness and comfort
Video: flower pot from a plastic bottle
Flower pots made of cement and burlap
Creative flower pots will not go unnoticed by guests and will delight the owners for a long time.
You will need:
- sand;
- cement;
- crushed stone;
- water;
- cloth;
- plastic containers for the base.
Manufacturing:
- Prepare a solution of sand, cement, crushed stone and water, based on the proportions 1:3:5:1/2.
Mix the solution components thoroughly
- Select containers required sizes and suitable pieces of cloth.
- Place the cloth in cement mortar and soak for 1 minute until the fabric is well soaked.
- Throw pieces of cloth over containers that act as frames and leave for 12 hours.
It will take at least half a day to completely dry the workpieces.
- After the specified time has passed, turn the pots over and let them dry completely from the inside.

Let's see how you can transform your favorite indoor flowers? For example, if you create flower pots with your own hands, then such decor will please the eye and add zest to the interior. In addition, by arranging flower stands and/or shelves with your own hands, you will also find it convenient to care for your pets.
Design options for pots for indoor flowers
What is the difference between a flower pot and a regular flower pot? Translated from French cache-pot means "to hide the pot." Thus, a flowerpot is a decorative “wrapper”. Certainly, the best home there will be a clay pot for flowers, but it quickly loses its attractiveness appearance, since ceramics allow water to pass through and stains appear on its surface that cannot be removed. Often as protective film glaze is used, but over time it also cracks and crumbles, and then the pot will either have to be replaced or decorated. In this case, a flowerpot comes to the rescue - with its help you can easily hide unsightly places and create decor in the same style.
If you have a couple or three pots, then the easiest way is to arrange them beautifully on the windowsill. But if there are more than a dozen colors, then placement can become a problem. The most common way to hang flowerpots is to use ready-made hanging hooks or make holes for rope. But you can make the mounting method creative.
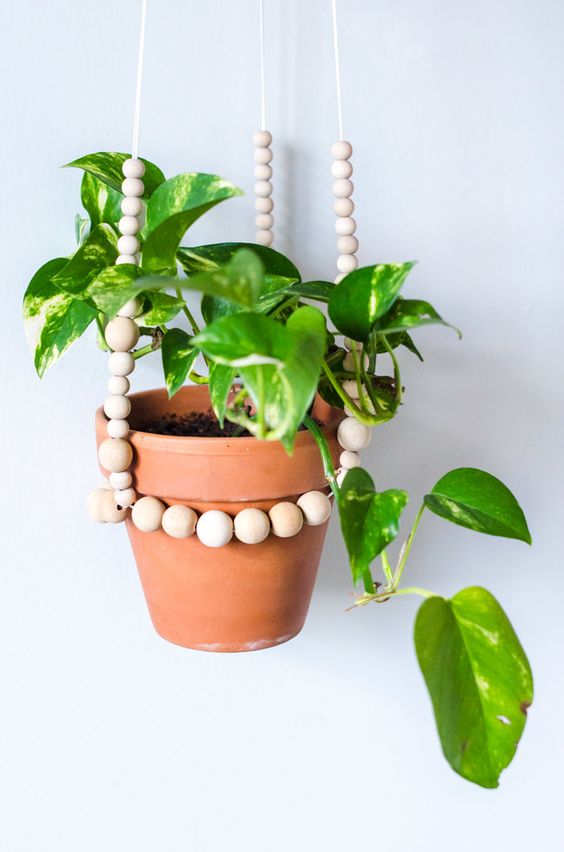
You can organize a simple crossbar or build an entire structure under the ceiling, on which, for example, hang several.

The design of a one-piece flowerpot does not provide drainage holes, and openwork ones do not hold excess moisture, so this must be taken into account when watering.
Or here’s an idea for hanging flowerpots, even those who don’t know how to do it can do it:
If you need to small space place a lot of flower pots, then this idea is for you!

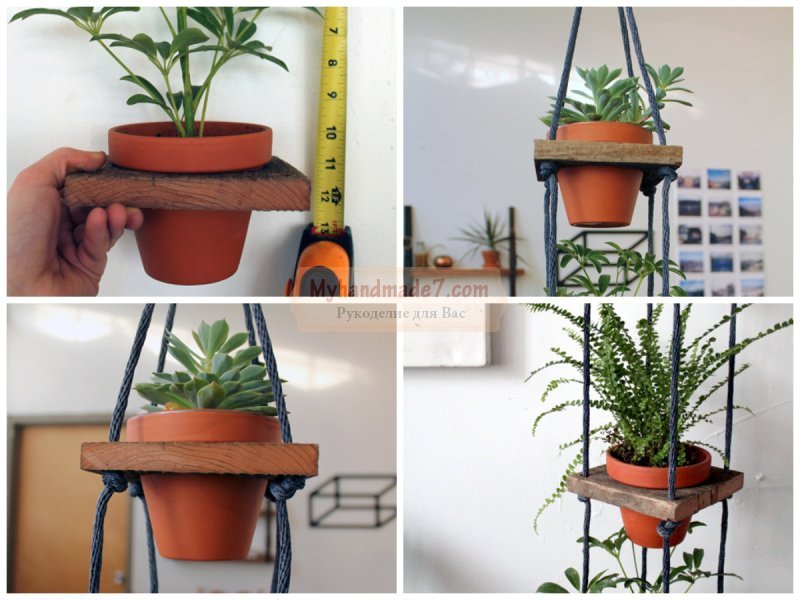
By using simple techniques from wooden blocks and rope you can make a whole shelf for flowers with your own hands, arranging suspended structures. More detailed instructions in this video:
Imagine, combine different ways, how more colors you can place, the more comfortable your home will be.
Making flowerpots with your own hands from scratch: materials and master classes
In this section we will look at options for independent “cases”, which are made separately, and then a flower pot is “settled” in them. For indoor flowerpots, the choice of materials is unlimited and depends only on overall design and your preferences. The most common and used for hand made:
- cardboard,
- paper straws,
- felt,
- recyclable materials.
From felt
From simple materials for handicrafts and children's creativity Wonderful things come out, you just have to use your imagination. Look, a charming flowerpot from...


DIY stands and shelves for pots
Making a flowerpot or decorating a pot is not everything. This beauty needs to be put somewhere! There's no way around this special shelves and stands. You can build a structure on the wall.

Or you can order a whole shelf for the floor.

Or this stepladder bookcase.

And it’s not at all necessary to ask someone. If you buy blank parts cut to size in a store, then even a gentle woman’s hand can handle the assembly. Like in this video:
But it’s much more interesting to use your imagination and adapt unusual objects under the shelves to place flower pots. For example, pallets. Paint it with stain or dark paint and voila - a great shelf is ready.

And in this tool cart, various plants coexist perfectly, creating mini-plants.

"Cross" will not give bad advice! :)
Categories,All photos from the article
Wooden flower pots can become a real decoration for your home, apartment or suburban area. Such structures are easy to assemble with your own hands from the cheapest materials, look great and last a long time, and if necessary, can either be repaired with minimal labor costs or just as easily disposed of.
In the article we will tell you what advantages such products have, and also provide tips on making the simplest models.

Advantages of wooden flowerpots
Flowerpots made from wooden parts, are found a little less frequently than plastic or ceramic ones.
At the same time, these designs have a number of obvious advantages:
- The material is very easy to process, so not only a professional carpenter, but any of us, if available, can make a flowerpot or flowerpot. minimum set tools and skills.
Note! Second aspect this advantage– wide range design possibilities. Using a saw, jigsaw and hammer, you can make a flower pot of almost any shape and size.

- The price of the products is quite low: the work does not require either expensive raw materials or complex devices. In principle, pots can be made literally from what is at hand, spending only on fastenings and finishing.
- If the technology is followed, the protective flowerpot can last up to ten years. At the same time, worn parts are replaced quite quickly and easily, so repairs will not be difficult either.
As for the cons, the main problem that we will have to face is the hygroscopicity of wood. When in contact with wet soil, the walls of the flowerpot can either begin to deform or rot, so we will definitely include moisture-proof and decorative treatments in the manufacturing algorithm.
Manufacturing of wooden structures
Option 1. From a log or stump
If you plan to grow flowers on your property, then a stump, log, half-block and other fragments of a tree of this type will serve as an excellent preparation for a pot or flowerpot.
The appearance of such “pots” will fit perfectly into any site design, and the manufacturing instructions will be extremely simple.

- To begin, we select a stump or log of the diameter we need. How bigger plant that we plan to plant, the larger the flowerpot should be, otherwise root system will not be able to fully develop, and beautiful flowers we can't wait.
Note! From thick trunks you can make containers even for small flower beds - as long as the diameter allows.
- Next, use a saw to cut off part of the log required length. As a rule, flowerpots for soil are made about 40 cm high, and for a high location - 1 - 1.2 m.
- Then we take a drill with a drill up to 25 cm long and about 20 mm in diameter. In the upper plane we drill several holes at the same distance from the walls. We also use a drill to make a series of nests in the center of the deck, destroying the core.

- Using a chisel, remove the wood, forming a container for the soil. We carefully align the edges, forming fairly thick and strong walls.
Now we can proceed in two ways:
- if you have a ceramic or plastic pot of the required diameter, then simply place it in a flowerpot made of logs, protecting the wood from moisture;
- If there is no pot, then we carefully treat the insides of the stump with moisture-proof impregnations, then line it with polyethylene and only then fill in the drainage and soil mixture.
The idea of creating interesting flower pots with your own hands has become a popular topic among landscape and interior designers, since primitive plastic pots have long ceased to surprise anyone. Today we’ll look at how to make a flowerpot yourself without special effort and material costs.
Materials for flowerpots
The most commonly used materials for making decorative items are:
- wood is natural and beautiful, you need to choose it high quality and resistance to moisture;
- ceramic pots for indoor flowers are very diverse and can be painted or glazed;

- Stainless steel is characteristic of hi-tech style;

- metal products can be made multi-tiered or forged;
- plastic flower pots are practical and lightweight, so they are often used outdoors;

- Polystone is very plastic, so you can use it to make flower pots for the wall or floor of any shape, and it is also absolutely harmless.

Pots made of mirror tiles
Often, small mirror tiles are used to decorate walls, but they also make decorative pots look beautiful and stylish.
- To create one product you will need 5 tiles and a hot glue gun.
- Place one tile on flat surface table with the mirror part down - this will be the base of the figure.
- Apply the remaining 4 tiles perpendicularly to its sides, one by one, fastening the joints with hot glue.
- As soon as the glue has completely set, place a light pot with a plant in the resulting box. All is ready.
- The ability to reflect surrounding objects makes this interior detail quite interesting to contemplate.

Wooden model made of timber
It is better to make outdoor flower pots from timber, as the material is quite wear-resistant. This option will do for home amateur carpenters who love to tinker with wood.
- For natural product you will need 24 blocks of 15-20 cm each (depending on how tall the flower pots are).
- It is necessary to lay the beams like a well, forming a square box with through openings, attaching a couple of boards as the bottom.
- It is better to connect pieces of wood to one another using self-tapping screws.
- Suspension ropes are tied to the corners of the top row of bars.
- Such flower pots hung from any tree in the garden or on the veranda.

Coconut planter
You can make an exotic flowerpot from the shell of an ordinary coconut. They look especially interesting and harmonious in such products.
- In the part of the nut where the three dark “eyes” are located, carefully make holes with a knife or screwdriver. Drain the juice through them.
- Using a grinder (metal hacksaw), cut the dense shell crosswise.
- When the nut is dry, cut off all the inner flesh with a knife.
- Use a drill to make 3 holes near the top edge of the shell for hanging.
- Thread wire, ropes, chains or special metal hangers through the holes.

"Clothes for the potty" made of burlap
If you are interested in how to make a flower pot to decorate a fence, pay attention to the seasonal fabric model.
- To make a flowerpot in rustic style country, any thick fabric will do.
- Cut out two blanks in the form of semicircles or squares like a pocket, and hang it on the fence.
- In order to strengthen the pot into it, you should sew a strip of fabric or a wire threaded into the fabric to the upper edge.

Vinyl planter made from an old record
It’s impossible to find intricately curved pots or stands in a store, so by spending just 20 minutes of your time, you’ll get a unique piece. Required materials:
- old gramophone record;
- pan or jar for molding;
- acrylic paint;
- Tight work gloves to prevent burns.
Created decorative stand under the pot according to the following plan.
- Place the record on a plate.
- Place a jar of the diameter you need later on on top.
- Place the entire structure in an oven preheated to 150 degrees for a couple of minutes.
- Very soon the plate will begin to soften and melt. As soon as you notice this process, immediately put on gloves and remove the structure from the oven.
- Immediately begin shaping the product around the pan or jar.
- While the material remains soft, use a screwdriver to make 3 holes in the walls to subsequently install the suspension.
- Finish the design of the cooled product by painting the outside and, if desired, inside with acrylic paints.

Flower pots made from branches or sticks
Wooden flowerpots fit most harmoniously into the garden interior. Please note that large flower pots are decorated with long branches, so prepare them in advance required quantity material.
- sticks or branches;
- thick twine;
- a piece of burlap;
- hot glue;
- simple plastic pot.

Weaving pots for indoor plants from wooden sticks is done as follows:
- Even twigs or sticks are cut into equal pieces of about 20 cm.
- The branches are tied together from below and above to form a single canvas. Tie a knot on the first branch, lay the next branch, and tie the knot again. Continue this way until you have tied all the branches together.
- On the right pot Wrap a piece of burlap out of plastic, securing it with a glue gun.
- Wrap a wooden cloth around a flower pot and tie the ends of the ropes together.

Wicker macrame plant pot
Hanging macrame flower pots are suitable if there is no more space left on the window sills. Need to:
- 8 m of natural fiber rope;
- pot with a diameter of 10 cm;
- 4 large and 4 small balls (a rope folded in half should fit freely into their holes);
- wooden ring for curtains;
- masking tape;
- acrylic paint with brush.

Before you weave a flowerpot with your own hands, familiarize yourself with the technology:
- Paint the balls and wooden ring. Glue tape onto the pot, forming a pattern, paint on top, and tear off the tape until the paint layer is completely dry.
- Cut the rope into 4 equal pieces of 2 m each.
- Fold them in half, thread them through the ring, and fasten them so that a loop is formed.
- Pass each pair of ropes first through a small and then through a large wooden ball.
- Measure 40 cm on each pair of ropes and tie a knot on them. You will end up with 4 knots at the same height.
- Separate the pairs of ropes, and tie each of them to the adjacent one. You will end up with some kind of zigzags. The distance between the bottom and top rows of knots should be 6 cm.
- Now tie the rightmost rope to the leftmost rope. This will give you a circle.
- Repeat the procedure. Divide the ropes again and tie a series of knots, departing 6 cm from the previous one.
- Finally, collect all the strings and tie them into a large knot. Step back 6 cm from the previous row of knots, cut the ropes, leaving a small tassel.
- Take the pot and insert it into the resulting cocoon.

The resulting wall planter can be hung in a room or used to decorate the façade of a house. For clarity, below is a training video.

Swan made of putty
This floor-mounted flower pot is suitable for garden decoration. An artificial swan looks expensive and interesting, but the cost of such an idea is cheap. You will need:

- 5 liter plastic bottle;
- small pieces of reinforcing mesh;
- metal rod;
- gypsum starting putty;
- water;
- bandage;
- Oil paint;
- sand.

Manufacturing instructions:
- Turn the bottle on its side.
- Cut off top part bottles, screw on the cap.
- Place on a flat surface and fill with damp sand.
- Bend the rod in the form of a two, securing it in the cork.
- Mix the plaster according to the instructions on the pack. Place it on a film-lined work surface. Place a bottle of sand on top of the plaster. Shape the swan's body and the beginning of the neck.
- Apply plaster to the walls of the bottle too, leveling it with a wet brush.
- Bend the wing mesh slightly and attach it to the putty on the sides.
- With wet hands, form the “feather” and neck, wrapping the plaster layer by layer with a bandage.
- Make a tail from a piece of twig and putty.
- Eliminate all defects, and after 2-3 days clean the product with sandpaper.
- Apply a layer of primer for painting, after drying, cover the bird with white enamel, decorate the eyes and beak.

As you can see, making an original and modern flowerpot with your own hands is as easy as shelling pears, and the result will not only decorate your home and yard, but will also inspire you to new ideas. What decor options do you like best? Share your experience in the comments.
Video: Weaving macrame flower pots
")


