Do-it-yourself garden beds: fresh ideas for arranging them (photo). Beautiful and convenient: do-it-yourself fencing for garden beds What material is best to frame garden beds from?
We will send the material to you by e-mail
City dwellers love to spend time at their dachas, where some organize only a recreation area, while others plant flowers, vegetables and grow fertile trees. Spending several hours a day or a week in the process of cultivating the land, the question arises of how to make beds with your own hands, not like everyone else. Interesting ideas come to mind for many summer residents and owners of private houses. Let's look at original photographic examples and several instructions for creating such beauty.
A beautiful flower garden without any hassle
How to create beds with your own hands, not like everyone else: interesting ideas for ready-made options
When decorating their garden, many people think about how to create beds with their own hands, unlike everyone else. Interesting ideas come to mind, but the process of implementation becomes difficult and not everyone succeeds.
There is no need to despair; you can take a ready-made version as a basis, and use its drawings to bring your own original creation to life. Keep in mind that not only the structures themselves will decorate the site, but also the combination garden paths and the grown crops themselves will be included in the general landscape design.
Here are some interesting photos of garden bed design:


- Big. The area of this design exceeds 12 m². In such open spaces, plants are planted that practically do not need weeding: potatoes, beans or pumpkins.
- Hilly option. Height is from 80 to 100 cm, and there are no requirements for length. To create, the top layer of soil is cut off and fencing is made of metal or chipboard. A small depression is made in the middle of this structure, where water accumulates during irrigation.
- High. For this design it is worth choosing sunny areas. It is advisable not to exceed 1.5 m in width. The height of the ridges varies, but do not forget that this option requires frequent watering.

- Deep. Instead of a hill, you make a trench where you place peat, compost and manure, and lay soil on top of everything, the height of which does not exceed 25 cm.
- Narrow bed for vegetables. Most often used in greenhouses. Also suitable for open ground. Plants with small shoots on top but a strong root system are planted in such structures.

When choosing a garden bed option, you should take into account the characteristics of the crops you plan to plant. Some plants prefer moist soil, so high beds are rarely chosen for them.
How to arrange garden beds at your dacha with your own hands with photo examples
To arrange your garden, it is worth considering not only the shape and subtype of the bed itself, but also choosing the material for its framing, as well as arranging the paths. Why make a planting area around it? There are several reasons for this:

- Aesthetic side. Such designs look neater and more interesting.
- Less weeds will grow. For their development, the free area is reduced, and weeding is much more convenient.
- The ridges do not crumble from rain or watering.
- Soil moisture remains longer after watering.
Important! Select the right material for making beds. It must allow air to pass through and not emit toxic substances.
Good options come from:
- flat slate for beds: an inexpensive option that will serve as additional decor, but do not forget that it is quite fragile;

- wood: natural and easy to install, but short-lived and requires treatment to prevent rotting;

- galvanized steel with polymer coating: long term operation, but will not be cheap;

- stone or concrete: durability and beauty, but this option incurs material costs and also requires a certain skill in masonry;

- border tape: the simplest and affordable way registration

The paths between the beds can be left as is, sprinkled with small pebbles or covered with paving slabs. This depends on the garden decor option you choose.
How to make a fencing for garden beds with your own hands
The simplest options for fencing that do not require much time and have affordable price: flat slate and border tape. The second method allows you to create any form for planting fruit crops.

To make an interesting decor on your site, you first need to buy flat slate for the garden bed. The average cost is from 300 to 500 rubles. depending on the thickness of the material. The classic size of one element: 100 by 150 cm.
The installation of flat slate itself will come down to several simple steps:
| Photo example | What to do |
|---|---|
 | Having chosen the location and dimensions of the place for planting vegetables, cut the material to the desired height and length. Along the perimeter of a flat ridge, dig a trench half the depth of the purchased slate. |
 | Place the workpieces in the prepared trenches and fill them with soil. Be sure to compact the soil to stabilize the structure. |
 | Use metal pegs to secure the structure. And pour fertile soil inside. All is ready. |
To make it easier, watch the video on the topic:
It’s even easier to use your own borders for garden beds. The softness of the material allows you to make any shape, and for strength, the material is not only dug into the trench, but also plastic pegs are used. Here are some interesting photo examples of finished works:


Related article:
In the article we will look in detail at why it is useful, what types of garden border strips are on sale and how to properly install this device?
Photos of unusual beds at the dacha with your own hands
It is not at all necessary to spend a lot of money on fencing for planting fruit crops; you can use the simplest and most affordable materials that you have left over from construction or other work. Often used are scraps from boards, bricks or pieces of corrugated slate.

Those who like to do everything themselves, as well as decorate the garden with fancy shapes, often make things from scrap materials. Photos of some works are presented below:


Related article:
Photos of do-it-yourself strawberry beds: features and examples of creation
Strawberries are planted in almost every garden. The juicy and unpretentious berry is a favorite delicacy of adults and children. But for it to really turn out delicious, you need to properly prepare the bed.

Today there is a wide selection of materials that can accelerate the growth and productivity of bushes. For example, the price per meter for spunbond is only about 100 rubles, but such a fabric has many advantages:
- creates unique conditions for berry growth;

- has excellent ability to pass air and water;
- does not allow weeds to develop;
- the soil under the canvas warms up faster;
- the extra whiskers do not take root and there are virtually no slugs.

If you don’t want to spend money even on such a simple and comfortable material, you can make beds from plastic pipes. Here are some interesting photo examples:


Interesting do-it-yourself strawberry beds made from car tires
Coming up with an option suitable for landing delicious berries, various improvised materials come to mind. Including beds for strawberries made from tires. Moreover, you can create a unique vertical structure that takes up little space in the garden and produces a large harvest.

The tires themselves will be useful for the job. the right size, chisel, wooden block and soil with seedlings. An additional frame is not required, since the tires have a metal cord that ensures proper structural strength.

Holes for seedlings are made with a chisel, and the tire itself can be placed on a block. Make a few holes and the simplest design is ready. Here is a video on one of the creation methods.
Video: growing strawberries in tires
Instructions on how to make a strawberry bed from a pipe with photo examples
Planting strawberries in a tube (horizontally) is a common option in areas with little free space. Moreover, the material itself can be either metal or PVC. Here are some interesting examples:


You can even use a sewer pipe for a strawberry bed. Let's take a closer look at how to make a design for a delicious berry:
- Prepare two pipes with different diameters, the thin ones should be 20 cm shorter than the thick ones.
- In the large one, drill holes with a large diameter (7 cm) at a distance of 15 cm. And in the small one, three rows of holes are made with a diameter of 0.5-1 cm and an interval of 8-10 cm.

When the preparatory work is completed, assemble the structure. To do this, place plugs on the pipes. You dig the thick one into the ground, and attach a small pipe for watering into it in the center. The soil is filled in and bushes are planted. To make it clear, watch the video on the topic:
The designs of vertical beds for strawberries made from plastic pipes are interesting. Here are some photo examples:


How to make multi-tiered strawberry bed structures with your own hands
Modern materials, as well as available tools, allow you not only to do it yourself, but also to recreate real pyramids with beautiful bright bunches of strawberries from photos. And also make multi-level “houses” for flowers.

Making a pyramid for growing strawberries on your own is not that difficult. You can use various materials for fencing: wood, metal, plastic. As well as all kinds of improvised means:
- flower pots;
- car tires;
- cutting pipes of different diameters;
- boxes of vegetables and fruits.

There are no exact criteria for the shape of the base. You can make it round, square, rectangular, polygonal or even a wavy line. Let's look at a simple way to make a multi-tiered bed for strawberries:
| Photo example | Sequence of work |
|---|---|
 | Let's take the classic pyramid as a basis, but with a sharp tip. We will assemble from wood, since it is easier to fasten. |
 | Assemble the first tier. It should be the biggest one. The width of the bed for strawberries should be 40 cm. A stainless steel mesh can be laid down, it will protect the roots from pests and prevent waterlogging. |
 | At the bottom of each tier, pour sawdust and shavings, as well as dry grass. That is, you get a mesh - sawdust - grass. Then a layer of earth. It is advisable to leave the total height of the pyramid at one meter, otherwise it will be inconvenient to care for the berries. |
 | It is better to make the sides of the levels at an angle, and before planting, treat the entire structure with varnish or paint to protect it from rotting and increase service life. |
To make your work easier and faster, watch the video on the topic:
Photo of strawberry beds made from bags
Vertical beds for strawberries – perfect option for a small area. You can buy them ready-made at the store or make them yourself. Moreover, the second method is a real flight of fancy. In addition to the considered methods of constructing beds from pipes, tires and wood, you can make unique decor with fruitful bushes from bags.

The process of growing strawberries in bags is no different from a classic or vertical bed, but the results are very interesting options for creating beds is not like everyone else.


Advantages of do-it-yourself slate beds with photo examples
The use of flat slate for beds has been known for a long time. Every gardener has seen such structures at least once. The material for the sides has a number of advantages:
- durability due to the absence of corrosion and rotting processes;
- looks beautiful and neat;
- easy to mount tall structures, and even multi-level options;
- affordable price;
- Available for open sale in any city or online store.

Despite the ease of installation and undemandingness in additional processing, slate has negative aspects that must be taken into account when choosing fencing for a place for planting strawberries:
- gets very hot in the sun, so the beds should be watered more often;
- vulnerability from mechanical damage: If you accidentally hit it with a shovel or cart, the slate will crack.

But the wavy material makes very neat and beautiful beds:


How to make wavy beds from slate with your own hands
From the photos above, you can see that creating a bed of wavy slate does not have to be even and rectangular. You can make structures in several levels or bevel corners, choosing the best option for your site.

Sometimes slate scraps left over from the roof are used. This is the cheapest option for arranging a vegetable garden, since it does not incur additional costs, but there are inconveniences in working with different pieces. The easiest way is to buy corrugated slate sheets of equal thickness and length. Moreover, the average price for them varies between 200-300 rubles. for 7-8 waves. Average dimensions: length – 1.75 m, width – 1.13 m.

To lay such a fence in the ground, it is enough to dig a small trench along the perimeter of the future ridge. Place the slate in even lines in this hole, about half the total height, and cover it with earth. To understand the sequence of actions, watch the video on the topic:
Features of do-it-yourself flat slate beds
Many summer residents prefer to fence their beds with slate, as it is affordable and simple. It also does not require any specific skills or abilities, as is the case with laying a stone border.

At the same time, such a practical and harmless material has several recommendations for installation as a fence for flower beds or beds:
- For convenience, a full sheet of flat slate is sawed in half or divided into parts of 1 and 0.75 m.

- The elements should be secured to each other using metal corners, painted with a special anti-corrosion varnish. This prevents the ridge from spreading.

- If you want to change the color of the material used, do it in advance and not after installation.
Also, follow safety precautions and carry out installation wearing construction gloves so as not to injure your hands on sharp corners or screws. The result may be a beautiful vegetable garden that stands out from the neighbors’ beds:


Price for slate for beds
If you don't have any leftover pieces from your roof repair, you can buy slate bed strips. The price for them varies, depending on the thickness of the material:
It is easier to work with ready-made strips, since the need for cutting is eliminated. At the same time, you can find very cheap options with or without delivery, and also order a kit through online stores.

The installation of flat slate for beds itself will not take much time. Watch the video instructions to understand all stages of the work:
How to make beds in a greenhouse: photos of interesting works
A greenhouse is a place where summer residents like to plant heat-loving fruit-bearing plants. You can see peppers, tomatoes, cucumbers and much more in them. Some people arrange the area for a greenhouse or insulate the structure so that they can harvest crops all year round.

For whatever purposes the greenhouse is used, it is small space, if you do not take into account commercial options, where you need to place several beds.
Advice! Try to think in advance about how many plants will be placed in the greenhouse in order to calculate the number and width of the beds.

Borders that protect fertile soil from spreading are collected from the most various materials. There are beautiful creations made of wood or neat designs made of metal, and border tape and improvised means are also applicable. Here are several options for arranging a greenhouse:


Related article:
Option for successful placement of beds in a 6x3 greenhouse with photo
There are many design options, one of the common ones is 3x6 greenhouses. How to arrange beds in a long and narrow space is a question that worries many. There are several common options according to the location of planting sites in the greenhouse:
- Two large ridges with longitudinal and transverse passages. Less space for planting, but there is free access for careful care of the plantings.

- Long, wide two beds along the walls of the greenhouse. In the middle there is a passage with a width of 50-70 cm. This arrangement allows you to plant different crops, adjusting the distance between them, and calmly take care of them.
- Three identical parallel ridges. Usually the structures are narrow, which makes it easy to weed the entire area around the plants.

- There is a wide place for landing in the center, and narrow places along the walls. Easy to care for, but leaves little usable space for plants.

When choosing the location of planting sites in greenhouses, keep in mind that the beds near the walls should not be more than 1 m wide. And the dimensions of the central one cannot exceed 3 m. This is due to the need for free weeding and loosening of the soil.
How to make a bed in a 3x6 greenhouse: photos of practical methods
Most often, gardeners choose a large ridge in the middle and small ones on the sides. This the best way plant several varieties of plants in one greenhouse so that they do not interfere with each other’s growth and fruiting.

If you choose a 3-meter wide bed in a greenhouse, then place it exactly in the center, leaving enough space for passage. The path can be covered with small pebbles or covered with film to prevent unnecessary weeds from sprouting.
It’s not difficult to make a bed with a width of 3 meters yourself. First, you need to decide on the material of manufacture. And then dig a small trench around the perimeter and deepen the structure. Be sure to compact the soil on top.

It is worth making a layer of organic fertilizers under the soil and laying out drainage to prevent the soil from becoming waterlogged. Here is a video example of how to redo the beds and make 3 narrow identical stripes:

- Natural material. Components are selected depending on the type of soil and laid on top for a natural greenhouse effect. Files are used thick fabric, leaves collected from autumn, humus and much more.

When there is no need for heating, since the greenhouse is located in a warm or temperate climate zone, others are used unusual options for planting plants.

For example, you can organize vertical placement of beds in a greenhouse. In this case, everything depends on the imagination of the author and the crops to be planted.


Below are beautiful photos of beds in a greenhouse that you can recreate on your own:
Autumn and spring preparation of beds: how to increase productivity

Professional gardeners know the need to prepare any soil in the fall and spring. Such prevention prevents large weed growth and increases productivity. First of all, the area for planting is dug up. Moreover, in the fall this is done as late as possible: almost before the onset of frost, and large lumps of earth are left so that the roots of weeds and pests freeze. In the spring, on the contrary, they loosen it to enrich the soil with oxygen and quickly dry out after the snow season. If there are perennial fruit-bearing shrubs on the site, then the need for wrapping for the winter depends on the planted variety. For example, girl's grapes

Important does not need insulation.
! For any crops and plants that will decorate the garden or provide benefits, it is worth following individual care recommendations.
Let's take a closer look at the features of preparing the soil for winter and spring planting.
Spring preparation of beds for planting: basic recommendations Spring is the most active period in the life of any summer resident and owner of a vegetable garden near the house. Seedlings are already growing on the window, which very soon should be transferred to open ground or a greenhouse. But you can’t just “poke” the plants into the ground, otherwise they will die or not bring the desired harvest.

- That is why a lot of time is devoted to spring soil preparation. The soil should be kept loose. To do this, the garden and garden are dug up. On used to facilitate the work process. In modest gardens and greenhouses, summer residents still have a shovel in their hands.

- Feeding the soil before planting. During constant digging in spring and autumn, microorganisms necessary for fertility die. To replenish their balance, you can purchase them in specialized stores. the following drugs: “Emochki”, “EM-1”, “Baikal-1” and others.

- It is worth taking care to protect the crop from pests already at the preparatory stage, and not after the appearance of the harvest. For this purpose, drugs are purchased, for example Metarizin, and applied to the soil along with other types of fertilizers.

It is worth considering the characteristics of the crop that you will sow in the selected area. For example, preparing a bed for carrots in the spring includes several stages:
- Despite its unpretentiousness, carrots do not like poor soil. At the same time, you shouldn’t overdo it with fertilizers either, since the taste of the vegetable and its shape change.

- You should not add manure to the garden; for carrots it and compost are the worst growth aides.
- The bed must not only be well dug up, but also loosened using a hoe or rake. The better and deeper the soil is dug, the better the harvest will be.
- Before sowing, the seeds are soaked for a day and then dried a little before planting.

- Don’t forget to moisten the bed well for vegetables that love moisture. Don’t forget about watering during the growth period.
- It is advisable to change the place for planting carrots every year and avoid clay soil.
By following these recommendations, the harvest of orange vegetables will be excellent. There are fewer requirements for preparing a bed for onions in the spring. The main criterion for obtaining good harvest– choosing a landing site. The vegetable grows best in sun or partial shade, but bulbs should not be planted in swampy areas of the site.

Watch all the details about growing onions in the video:
Autumn preparation of beds for winter: features and rules for planting garlic
Autumn is not only a pleasant time for harvesting, but also the process of preparing the soil for the next season, as well as wrapping non-frost-resistant plants and removing dried branches in anticipation of winter.

- Loosening the soil. It is not necessary to dig deeply; it is enough to remove the remains of plants and loosen the beds to a depth of 3-4 cm. But this should be done before frost.

- Deep digging is not useful for all types of soil. If your garden is dominated by sand and loose soil, then you should not dig in the fall. But in clayey soil, digging is necessary.

- It’s worth feeding the “tired” soil before the cold weather. You can add manure, humus or other organic fertilizers, which are also selected according to the type of soil.
By following the three suggested tips, it will be easier to dig the ground in the spring, and the first shoots will appear much earlier.

But work in the garden before the onset of cold weather comes down not only to digging and removing old plants, but also to planting some crops. For example, to prepare beds for garlic in the fall, you should follow certain rules:
- A bed for garlic is best made using fencing. For example, you can make a structure from slate or wooden planks. This will help avoid spreading in the spring, after the snow melts.
- The height of the ridge should not exceed 20 cm. This norm is derived from the rate of soil heating by the first rays of spring.
- Pour black soil into the prepared structure. If there is no special soil, be sure to apply fertilizers to enrich the soil for high yield garlic

- Pay close attention to what crops previously sprouted in this place. If you have collected beans, cucumbers or tomatoes, be sure to process copper sulfate before planting garlic.
- Bulbs should be planted before the cold weather, at the end of October. It is better to cover the ground after landing with any suitable material. And the cloves themselves must be placed vertically in the soil, bottom down. The distance between the garlic is 8 cm, and 25 cm should be left between the furrows.
To make it easier to grow garlic on your own plot, watch the video
The productivity of plants depends not only on the time of planting the seeds and their germination, but also on the planting location and the height of the embankment. We hope that our tips for building garden beds at the dacha with your own hands will be useful not only to novice gardeners.
Selecting a location
Some vegetable crops, for example, peas, dill, sorrel, lettuce, can grow in partial shade. But most plant species are not able to fully ripen in the absence of light.
Therefore, when placing beds on a garden plot, they are primarily guided by their illumination - it is advisable that they be warmed by the sun from the very early morning until 6-7 o'clock in the evening.

Decorative garden plantings
When choosing a landing site, it is necessary to take into account the following requirements:
You should not plant plants in lowlands or on northern slopes, where the soil freezes deeper than on flat areas; the yield in these places will be low; plus the water in this place will constantly stagnate, which can lead to rotting of the roots
The site should not have a strong slope, otherwise water will simply drain from it when watering, and the plants will not receive enough moisture
Should not be near the plantings large trees, buildings and fences that can shade plants
It is advisable to place them north to south so that they are evenly illuminated by the sun throughout the day.
To grow vegetables for a family of 3-4 people, about 1 hectare is enough; the rest of the territory can be planted with potatoes, berries and flowers
To make the plot look neat, try to make “correct” beds of the same width and length; standard sizes– 3.5x0.8 m
Don’t forget about plant compatibility: some of them don’t get along well with each other
Dimensions

In principle, you can make a bed of any length – up to 10 m. We agree, such beds look original. But constantly bypassing them when watering is very inconvenient. It is better to prepare an embankment 3.5-4 m long. This size is considered optimal. Or break a long bed into two using a small path. This will make it much easier for you to move around the area.
Standard width 0.8 m. Do not save space (!) and under no circumstances make it wider. You may be able to reach the center of the bed when planting and scatter the seeds, but weeding will turn into a real pain. Don't believe me? Try an experiment and prepare a small but wide mound. Believe me, next year you will lose the desire to make beds of this size.
A more compact version, only 0.45 m wide, is made for carrots. This crop does not like dense plantings - the sprouts must be well ventilated. For the same reason, try not to place it next to carrots. tall plants. Otherwise, you will significantly reduce its yield. In dense plantings it will grow small.
Shape and height
When designing a plot, we can decorate it with beds different shapes, from standard rectangular to triangular, trapezoidal or oval.
There are plenty of ideas for unusual garden beds online. The main thing is that it is convenient to approach them from either side for watering and weeding. The height of the embankment depends on many factors, including the type of site. In most cases, it is enough to raise them to a height of 35-50 cm. This will be enough to prevent the roots of the plants from rotting.
But such structures are very labor-intensive. Plus, they will need to bring at least a couple of KamAZ trucks of fertile soil to the site. For one small bed you will need at least half a ton of it.
Raising beds is often required for growing heat-loving crops, for example, cucumbers. After all, in high beds the earth warms up much faster. It is often impossible to get an early harvest without this.
Sometimes they raise beds just for their own convenience.
In this case, caring for plants is much easier. Just remember, in the garden beds high altitude the soil dries out much faster, so you will have to water the plants more often. Experts also advise raising the planting area in areas located in the shade. The optimal height of the embankment in this case is 50 cm.
To prevent water from rolling onto the path when watering, the bed should be slightly concave inward.
Arranging a high bed

A box for it can be made from available materials: boards, plastic, metal or stones:
It's better to put it on the bottom metal mesh– it will protect the plants from the ubiquitous rodents.
Crushed stone, expanded clay or broken brick are used as drainage. The thickness of this layer is 10-15 cm.
It is better to pre-treat the prepared soil with agents against pathogenic microbes and insect pests. If you don’t want to use chemicals, mix the soil with a small amount of wood ash - it will protect the plants from harmful bacteria.
You should not fill the garden bed with soil up to the very edges - it will constantly spill out onto the path. You need to leave about 5 cm.
Drainage

When the site is located in a lowland or swampy area, growing many types of crops on it becomes a problem. Even if vegetables and berries ripen on it, due to excess moisture they quickly deteriorate during storage.
Their taste also changes - much less sugar accumulates in them. To prevent this from happening, take care of the drainage of the wetland.
Most gardeners know that cabbage, melons, zucchini and cucumbers require more moisture to grow than other crops. But it turns out that it is also possible to grow massive heads of garlic only in areas rich in moisture. On dry soil, even with abundant watering, it is rarely large.
For the above types of plants, drainage is not required (unless, of course, the stagnation of water in the beds is insignificant). It is better to drain the area for growing other crops.
To build multi-tiered beds, you can knock down special boxes from wood. It is highly undesirable to use metal - it heats up quickly in the sun, and the soil in them will dry out even faster. If necessary, paint metal containers with light paint - light surfaces heat up less.
Ready-made boxes, racks or containers are often used for such structures. suitable size. You can also place large containers filled with soil on the shelves.
Lazy beds

Such mounds are used when planting a large number of plants. They are small in height and externally look like bulk trapezoids without the use of a box. True, such embankments will have to be made every season - they settle during the winter.
Make a shallow ditch in the area of the path, throwing the earth onto the ridge. Level the soil with a rake. The bed is ready.
Let us repeat - the drier the soil on the site, the lower the height of the embankment should be. In swampy areas, dig paths as deep as possible and make the bed higher. On sandy soil You don’t even need to do this - just trample the paths well on the dug up ground with your feet, thus marking the location of the paths.
Boxes for beds
Decorative options, limited to a box, are a favorite technique of many gardeners. After all, caring for them (watering and weeding) is greatly simplified. Using boxes is a good way to protect against soil erosion. In addition, the paths between them will always be clean, without streaks or puddles.
As a rule, paths are covered with wood, tiles or concrete so that grass cannot break through the ground.
Before you begin installing the box, the place for the garden bed must be prepared by digging up the ground, carefully removing all weeds. Level it carefully with a rake so that water can be evenly distributed over the entire surface when watering or raining.
When digging, you need to cover a slightly larger area. Otherwise, the roots of perennial plants will again emerge from the ground. Getting them out from under the box will be problematic. It is better to first dig up a neglected area twice in spring and autumn.
It is simply unrealistic to get rid of the roots of perennial plants in one go. To make the job easier, simply turn the sod over with a shovel so that the plant roots are above the ground. Gradually they will dry out under the sun's rays and die.
Wooden box

Wooden box
simplest wooden box assembled from 4 long and 8 short boards of suitable size. They are connected in pairs using bars. Nails, screws and metal corners are used as fastening elements.
You will also need 4 pegs or cuttings of reinforcement 0.6 m long - they are driven into the ground from the outside to enhance the strength of the structure. To ensure that the bed is perfectly level, its walls are aligned building level horizontally and vertically.
Stone or concrete box

Stone or concrete box
Such structures are characterized by high strength and long service life. However, they will not be cheap.
Plus, the procedure for their construction requires a lot of time. And moving the bed will be a serious problem - the structure will have to be broken up.
Metal boxes

Metal boxes
If you have scrap metal on hand, you can make beds from it. Such structures are light in weight and, if desired, can be easily moved to another place. They can be easily painted in any color, so they look quite decorative.
However, to create such products requires the ability to work with a welding machine. You can cut the metal at your nearest scrap metal collection point.
Slate fencing

Slate fencing
It is quite resistant to rotting, even when buried in the ground, and can last a long time.
The disadvantages of slate structures include increased fragility - high precision and accuracy are required when assembling and cutting them.
Plastic structures

Plastic structures
If you have several left after repair plastic panels, you can make a fence out of it. Bright, they stand out against the background of plants.
Moreover, plastic can lie in the ground indefinitely - it is not afraid of moisture. However, under the bright rays of the sun, this material quickly fades and loses color.
Mulching
Weeding often takes gardeners a lot of time. If the area is large, this becomes a serious problem. You just have to spend the day and night in the garden.
To reduce the time spent on endless weeding, prepare so-called smart beds. The principle of their manufacture is simple. To protect plants from weeds after planting, cover the gaps between the sprouts with sawdust, pine needles, straw or dried last year's tree leaves.
Mulch the soil and cover it with a dark film. It is spread out before planting, making small holes for the plants. Transparent film is not suitable for these purposes - weeds will continue to develop when exposed to light.
It has been proven that mulching significantly (almost 30%) increases productivity
After all, covering the top layer of soil protects the fertile layer from weathering and rapid drying out. Plus under layer organic matter Beneficial microorganisms and earthworms multiply faster.
Using this method, you can quickly put even abandoned areas in order - just cover the ground overgrown with weeds with mulch for a couple of years.
Unfortunately, in wetlands, mulching often leads to a sad result - covering the soil leads to stagnation of water in the beds, and as a result, rotting of plants. But even in this case, mulching can be useful.
The only difference is that you should not cover the ground for the winter and early spring. Wait until the soil dries well.
Mulch should not be used during rainy seasons. If the summer turns out to be hot, with the help of mulch you will get rid of not only weeding, but also frequent watering. The moisture underneath will evaporate much more slowly. In wet areas, be sure to prepare drainage around the perimeter of the beds to remove excess water.
Warm beds
Achieving an early harvest in our climate is not so easy. At the first return frost, tender sprouts planted in open ground will simply die. Surviving plants will be stunted and diseased. The ideal solution for growing in this case is warm beds.
They can be used for many types of crops: first greens and radishes, heat-loving cucumbers, zucchini, pumpkins, eggplants, tomatoes, etc.
Let's look at the basic rules for creating warm beds and how to grow each crop on them:
They can rise above the ground or, on the contrary, be built below ground level.
They are buried no more than 0.5 m into the ground. This is quite enough to protect the sprouts from spring frosts. At greater depths, the plants will be in the shade and will be pulled together.
They are raised to a height of up to 0.5-1 m. In principle, they can be made even higher - caring for them will only be simplified.
The first layer to be laid is a drainage layer of fine crushed stone and sand. You can replace it with broken brick, but remember that over time this material can decompose when exposed to moisture.
The next layer is plant waste. The heat released during their decay will serve as natural heating. It is better to prepare such a bed in the fall, during harvest. You can use cut tops or any weed left after weeding as a “warm layer”. The most important thing is that it does not have time to form seeds.
For cucumbers, pumpkins and zucchini, manure is often used as a warm layer. When overheated, it heats up much more. For crops such as tomatoes, manure, as well as pure humus, is contraindicated. The plants on it will only increase their green mass. You may simply not be able to wait for a harvest made from manure - the ovaries will immediately fall off. Therefore, to warm up tomatoes, use ordinary vegetable waste.
The last layer is fertile soil. It is poured at least 30 cm thick.
Novice gardeners sometimes complain that their neighbors have high yields in their warm beds, but for some reason nothing grows in theirs. Indeed, if a layer of grass or manure is only slightly sprinkled with soil, it will simply be impossible for the plant’s roots to gain a foothold in it. And the food for the sprouts will clearly not be enough. Overheated plants serve only as a layer of insulation. Therefore, without a solid layer of soil, you will not achieve a harvest.
Next, arcs are placed over the bed and covered with film. Covering material such as spunbond (agrofibre) should not be used for these purposes. It can be spread directly on the ground in case of return frosts or used as additional shelter. Unlike polyethylene, agrofibre has many holes through which precious heat will freely escape.
This bed “works” for about 4 years. After it is completely depleted, a new one is prepared, and the rotted plants are used as fertilizer when digging up the beds. The first two years of warm bed The most heat-loving crops are planted - cucumbers, pumpkins, zucchini, eggplants, etc.
In the third or fourth year, any garden crops can be planted in this place - from carrots, beets, onions to potatoes.
When it gets warm, the plastic film is folded back on both sides during the daytime so that the plants get a little air. Otherwise, they will simply “burn” from the heat. At night, the plants are again completely covered with film.
Read also:
Paths between the beds

The French way of planting crops
French version- one of the ways to decorate a site. Unlike traditional ways planting, such a garden always has a strictly symmetrical shape. Moreover, it is absolutely not necessary to make the beds rectangular. They can have the shape of rhombuses, ovals or semi-ovals, etc. The most important thing is that each of the segments is strictly symmetrical to the neighboring one.
As a rule, for ease of caring for crops, French beds are located at a certain height.
It is advisable (but not necessary) to plant plants symmetrically. For example, radishes are located along the edge of all the beds, lettuce is in the center, and red cabbage is on the other edge.
Unlike the French, English do not require strict symmetry. The main emphasis in them is on lawns, with the help of which the site is decorated. Against the background of sown grass, planting even ordinary garden plants look like ornamental crops. Essentially, it is a mixture of a vegetable garden and a flower garden.
garden house with the English planting method it looks like a huge vertical bed. At its walls they plant climbing plants. Pots and vases of various shapes are placed along the building. Each of the plants is carefully cared for - despite the riot of vegetation, there is no smell of “wildness” here.
It is not a complicated process, but before starting work you need to learn some subtleties. It is important to choose the right material for the structure, taking into account all the advantages and disadvantages. The installation of the fence must be consistent, otherwise a number of mistakes can be made. In this article I will try to analyze all these points in detail.
Why do we need fencing for garden beds?
Before you start building fences, you need to understand what important functions they perform. Among the functions of fencing for garden beds, the following positions are distinguished:
- Protection from mechanical damage;
- Reducing the number of weeds;
- Prevention of shedding (especially important when loose sandy soil predominates on the site);
- Box formation;
- Decorative function.
Types of fencing for garden beds

Fences for garden beds vary in the material from which they are made. And each material, in turn, has a number of advantages and disadvantages. We'll talk more about the most common materials for fencing below.
Stone fencing for garden beds
Natural material, can be easily collected on the banks of rivers. It is not easy to match stones to the same size, so cementing may be required. If you lay out the cobblestones in several layers, you can achieve enough high design, which will not allow weeds to disturb your plantings. Stone beds will have quite a lot of weight and sink into the ground. To avoid such a situation, you can dig a trench around the perimeter of the bed and then lay sand or gravel in it.

Fencing for beds made of twigs
Wooden rods are another natural material that serves as a base for fencing. To give the fence a shape, you need to prepare pegs of a certain height. Branches should be selected at least 1 meter in size. A plastic pipe can become a shelter for pegs - this is necessary in order to prevent the process of rotting. When the pegs are securely fixed in the ground, you can proceed to weaving the fence.
Brick fencing for garden beds
Bricks left over from other structures will be a suitable building material for constructing a fence for the garden bed. First you need to prepare a shallow foundation and fill it with cement. Bricks are laid in different ways: horizontally, vertically, flat or sideways. If your house or bathhouse is also made of brick, then such beds will fit perfectly into the design of the site, especially if the pattern and method of laying bricks on the fences repeats the masonry on the building. Brick is an environmentally friendly material. Moreover, it is easy to work with. Renewal of such beds does not occur often, since the material is durable, which is another advantage of using brick in country house construction.

Wooden fencing for garden beds
Wooden fences are the most common. This material is very pliable for work and is environmentally friendly, but is not resistant to rotting. Using protective varnishes and solutions, you can extend the service life of wooden fences. Depending on the type of wood, there are several types of wooden fencing:
- Beam. The fairly high cost is compensated by reliability and durability.
- Boards. Affordable material in terms of price. The boards can simply be placed on the sides of the bed and secured with pegs or bricks. The advantage of this method will be the quick assembly and disassembly of the structure, the disadvantage is its fragility. To strengthen the fence you will need metal corners.
- Logs. Beds built from logs are similar in properties to beds made from timber. The advantage of this method is the possibility of using cut trees and, accordingly, saving on the purchase of materials.
Pay attention to the increased hygroscopicity (humidity) of the wood. During the season of melting snow or long rains, fungus may appear on the wood. Rotting of the material not only gradually destroys the structure, but also increases the acidity of the soil, and this can lead to undesirable consequences for plants.

Metal fencing for garden beds
The main advantage of such fences is obvious - the design is very durable. Most often, sheet metal is used, which is distinguished by its flexibility. There are also disadvantages: the sun increases the temperature of the material, which transmits it to the soil. Thus, the soil can become too dry, which has a negative effect on the plants. When building metal beds, it is better to take care of shading the fence in advance. For the construction of garden fences from sheet or profile iron It’s better to take care of the top edge, because the teeth left behind can cause some inconvenience. Instead of rotting wooden structures, metal has the property of rusting. This drawback can be eliminated either by using special coatings or by choosing a stainless material.

Concrete fencing for garden beds
Concrete fences are most often used on uneven surfaces. Beds located on slopes are a common occurrence, so this material contributes to additional strengthening of the structure. You can use both blocks and slabs, and pouring mortar. Concrete curbs can be easily decorated with tiles. Another advantage of such fences is their high reliability, but it is worth considering the fact that you will not be able to quickly dismantle the building.
Slate fencing for garden beds
In most dacha plots you will find unnecessary remains of slate used in everyday life and for dacha affairs. This material can no longer be used for roofing, but it can be used as a basis for fences. will suit the best way. Slate is easy to use. Remember that slate is very brittle material, and tends to break due to loads, but for fencing beds its strength will be quite sufficient. The main thing is to carefully transport and install slate sheets.

Plastic fencing for garden beds
Plastic bottles and containers can also be used to fence your garden beds. To make them heavier, bottles installed in the ground are filled with sand, crushed stone, gravel or ordinary soil. This design is not particularly durable and reliable, but the cost of fencing in this case will be extremely low. You can purchase ready-made plastic sides that are lightweight and impact-resistant. Plastic is resistant to low temperatures and moisture, but you need to choose quality material. Neglecting this recommendation can result in a fence that will become cracked when exposed to frost, and deformed when exposed to high temperatures. In this case, it will be necessary to dismantle the structure almost every season. Polycarbonate is often used to build greenhouses, which means you can find leftover material on your property and use it to create fences for garden beds.
How to make fences for garden beds with your own hands

The process of creating fences for your beds is not complicated, but it requires a competent and patient approach. I suggest that you familiarize yourself with the recommendations for constructing a structure made of wood, as the most affordable, simple and durable structure. The step-by-step instructions consist of several important steps.
- The first stage is theoretical; you need to understand what shape and size of the bed you would like to get. Apply markings to the area, cut the wood, focusing on the measurements and markings. The easiest way to fix the boards together is with regular nails, but you can use metal corners, which will provide additional strength to the frame.
- I advise you to also make legs for the box, but this is not necessary. If you are going to dig down the sides of the box by only 1-2 cm, then the legs will not be needed. If the structure is dug into the ground to a great depth, then nail thick pegs with pointed ends to the corners of the boards. If necessary, you can increase the number of such legs, which will ensure greater stability of the structure.

- Prime the boards, as this will protect them from the sun, water, fungus and other climatic effects. In addition to buying building material in the store, you can make it yourself, you only need a piece laundry soap And quicklime. Combine one kg of lime with two liters of water. Grind 150-200 grams of soap and pour hot water. After this, the solution is mixed with the previously obtained mixture. Such a primer will be cheaper than store-bought material, but will be inferior in its protective properties.
- The next step is application. This treatment will improve the appearance of the fence and also protect the structure from unwanted weather influences.

- The box can be installed in two ways. The first involves placing it directly on the soil and further filling it with soil. In the second option, you need to build a fence with a recess. Place the box in the chosen place and dig it up from the outside. Next, remove the box and dig up the soil inside the future bed. Return the box and secure it with earth.
- In order for the soil to settle, fill the bed with soil and water it.
From all of the above, some conclusions can be drawn. First, build your garden bed fence based on your personal preferences and the materials you have available. If there are unused bricks or bottles on the site, use them. Secondly, pay attention to the advantages and disadvantages of each type of building material. And most importantly, take a responsible approach to the creation and installation of the structure itself. By following all the requirements, you will reliably protect your plants from various damages and weeds, and also decorate your site.
When spending a long time at their dacha, many city residents tend to plant not only ornamental plants and fruit trees, but also vegetable crops. For this purpose, a vegetable garden is planted on the site. In such a situation, there is a need for proper arrangement of beds.
When creating them using a variety of shapes and fencing, it is possible to obtain non-standard decorative solutions that turn the garden corner into the highlight of the entire summer cottage.

Preparation stage
When choosing a place for beds, they are guided by the degree of shade tolerance of a particular type of vegetable and green crops. Usually good lighting is required, so choose sunny place, distant from tall trees and country houses.
In this case, it is advisable to avoid lowlands with close ground aquifers, since constant stagnation of moisture has a detrimental effect on the root system.

It is not recommended to arrange ridges on slopes, as they do not retain water, and the plants will constantly experience moisture deficiency. Their optimal placement is from south to north, which will ensure uniform lighting and heating of the surface throughout the day.

Before calculating the area of the future vegetable garden, think through the main dimensions of the beds. There are several varieties:
- Classic version. For standard rectangular beds, it is recommended to have a width of 0.8-1.0 m and a height of 50 cm. The minimum length is 1.5 m. Leave row spacing of about 40 cm.
- Large ridges. They are made for unpretentious crops that do not need frequent weeding, such as pumpkin, zucchini, beans or potatoes. The shape can be square or rectangular with an optimal area of 12 m2.
- Knollikovye. High (85-100 cm) mounds are poured elongated shape. Their length is not regulated, limited by the dimensions of the garden. The top surface is made flat. To retain moisture, several depressions are made.
- High. Ridges up to 1.5 m high must have a fence. In the standard version, a box is constructed the desired shape, at the bottom of which a metal mesh is placed to prevent rodents and a crushed stone drainage layer is poured. Then fill with soil mixture, not reaching 50 mm to the top cut. Plants on such structures will need more frequent watering than usual.
- Deep. Pre-dig a trench. Fill it with rotted manure, compost with the addition of peat. Pour soil up to 25 cm high.
- Narrow. The width for such beds is selected in such a way as to plant vegetables or herbs in one row. They are often built in greenhouses or small areas.
Important! When planning a specific version of the beds, the characteristics of the plants are taken into account. For example, high or hilly ridges are not suitable for moisture-loving plants. Heat-loving pumpkins, cucumbers and zucchini will develop well here. The configuration can be not only the standard rectangular one. Triangular, trapezoidal, diamond-shaped, oval and even round mounds for vegetables look original.

Multi-level beds
To achieve rational placement vegetable crops in small areas, as well as in order to obtain a decorative effect, multi-level structures are created. The number of such structures is usually limited, since it is more difficult to care for plants. For planting, crops with a shallow, underdeveloped root system are selected.
Parsley, lettuce, and dill adapt well in such conditions. Low-growing compact tomato bushes can be placed. Often grown in multi-level structures strawberries, making it possible to exclude the contact of ripening berries with the soil, which contributes to their excellent presentation and good preservation.

To create multi-tiered beds, wood is often used, from which special pallets and racks are assembled. It is not advisable to use metal parts, as they quickly heat up under sunlight. The soil in such structures quickly loses moisture. If you decide to install metal multi-tiered beds, you should paint the parts with light paint.
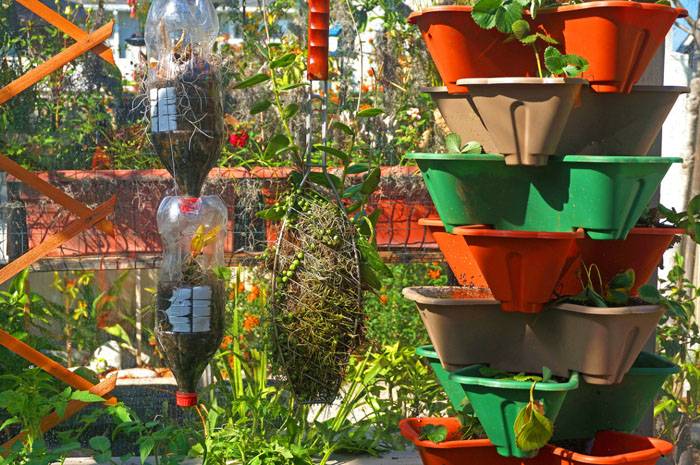
For vertical beds, available components are also used: containers, boxes, racks, shelves, installed in various compositions. You can even adapt a chest of drawers, pots various configurations and dimensions, pipe cuttings, tires.

Fencing beds
In an effort to create country garden aesthetic decorative overall appearance, when arranging beds you need to think about their shape, size, and framing. The material selected for the tracks also plays a role.
Advantages of fencing for garden beds
- Gives the area a neat appearance;
- There is an opportunity to dream up and use non-standard solutions;
- Available materials are used, which makes the arrangement of fencing economically profitable;
- Weeding is simplified;
- The beds do not crumble, which allows for better moisture retention;
- The advantages include the ability to choose color combinations that harmoniously fit into the landscape and create a certain thoughtful composition.
Important! For fencing beds, you should select a safe material that does not emit toxic compounds during operation.
 Metal fencing
  Wooden box beds
  Board fencing
  Slate fencing
  Plastic fencing
  Edged board fencing
Wooden fencing
Wood attracts with ease of processing and simple installation. But this material is short-lived. The prepared parts should first be treated with impregnation to prevent rotting.
To make your own garden beds with wooden fencing, you use various parts. These can be vertically dug narrow dies, pegs, or cuttings of logs. If the latter have a large diameter, they should first be sawed along the longitudinal center line. Unsanded birch logs look great.

You can weave a fence from willow twigs. Convenient to use are boards made from floor slats, slabs, planks, clapboards, and picket fences. They are easy to install, secured with stakes. If necessary, the fence can be quickly dismantled and moved.
Advice! If you plan to use the garden beds for more than one season, it is better to use high-quality wood material: dry bars, wide wooden panels, edged board, block house, thick lining.


Using slate
You can quickly create a neat frame for a bed of any configuration using flat slate. This is an inexpensive and durable material. Its fragility must be taken into account.
- First, mark and level the perimeter of the bed, making straight lines. It is advisable to check the joints using a square and control all dimensions.
- Cut slate sheets into strips and dig a trench so that its depth is equal to half the width of the prepared material.
- Install slate panels strictly vertically, fixing them together metal corners with a protective anti-corrosion layer.
- Gently sprinkle with soil, compacting each layer. Metal pegs are installed in several places on both sides of the slate fence, securing the structure.
- All that remains is to fill in inner space fertile soil, and a neat, aesthetically pleasing garden bed is ready.
Sheets of wavy slate, which give an interesting sound, are no less successfully used to make fences. The combination of two types of slate – flat and wavy – will diversify the decor.


Metal fences
Fencing made from metal parts, have a long service life. It is necessary to select options with corrosion protection.
A good option is an aesthetically pleasing profiled sheet of galvanized steel with a polymer surface coating. These types of fencing for garden beds will be quite expensive, but their cost will be offset by durability. The advantages of corrugated sheets include reliable protection against corrosion, a wide range of colors, and light weight.


Stone fencing
The beds, framed with stones of various sizes and shapes, look static and very decorative. This is a durable option. During installation, certain skills in laying such material are required if you decide to use cement-sand mortar as a binding material.
A simpler option is to fill stones between metal bars, which at the preparatory stage strengthen the perimeter of the ridges. Such pergons look noble, introducing an innovative sound even into an ordinary landscape.

Stone beds at the dacha can easily withstand any external influences, are durable and allow you to create any configuration and shape.

Border tape
Plastic curb tape is easy to install without requiring any special skills. Considering the variety of colors, this material looks very decent. Thanks to its flexibility, it allows you to frame beds of any configuration.
This material is frost-resistant and durable. Withstands shock loads and does not fade for a long time. To ensure the strength of such a fence, the tape is installed in a shallow trench, soil is sprinkled, compacted with palms, and plastic pegs are installed on both sides.


Concrete frames
For a static ridge that does not involve transfer, it is advisable to create concrete fencing. The surface of the site is leveled, a ridge is marked and formwork is made. If desired, you can deepen it a little by digging a trench 10-15 cm deep.
Typically, boards or plywood scraps are used for formwork. The optimal width of the future fence is 15 cm. Pour cement-sand mortar and immerse the reinforcement in it. They wait a few days. When the concrete dries, remove the formwork and fill the interior space with soil.

What can you use to make garden beds at your dacha (ideas, photos)
Summer residents use other materials for fencing ridges. This can be brick laid in various ways. It can be used in one piece, installed on an edge along a rectangular or square embankment. The bricks divided in half look interesting and are installed with the corners up, creating a dynamic design.
A budget option is plastic bottles that are dug vertically around the embankment with their necks up. Select different color variations. This can be a single-color fence or a frame made up of bottles with rolls of different shades. Interesting view it turns out if you lay them horizontally.
If you have scraps of picket fence, it’s easy to build a small decorative fence. Foam blocks are also used as fencing.

Design of paths
Paths between the beds play a role in creating a decorative ambiance for the vegetable garden. They can be loosened, weeded and compacted. Gravel and small stones are used for sprinkling. This option allows you to save the area from the spread of weeds.
Advice! If the material is pre-painted, an interesting composition is created. The vegetable garden becomes one of the central decorative corners surrounding dacha landscape.
Paving slabs, metal sheets, wood flooring or self-cast concrete panels are also used for paths.

Arranging beds in a greenhouse
There are many options for placing beds inside a greenhouse. The classic method is to fill two large side ridges. They are separated by a central longitudinal and two transverse passages. This solution does not always provide enough space for plants, but it does provide access for care.
You can create three narrower mounds parallel to the long side of the greenhouse. With a small width of the beds, weeding, pinching, pruning and other methods of caring for plants are easier.

A convenient option is to make a wide ridge in the center. In this case, narrow embankments are left along the walls. If the greenhouse has sloping side surfaces, then tall crops are planted in the center, and compact bushes are placed on narrow beds.
The paths can be covered with a thick film, scraps of roofing felt, plywood, which prevents the germination of weeds. To prevent the ridges from crumbling, provide fencing for them.

A non-standard decorative garden with a creative approach can decorate country cottage area. The size and configuration of the beds play a role. When designing, the materials used to make the fences are of decisive importance. They bring an important note to the creation of an overall harmonious and decorative look paths, which, if desired, can be made of color, wood, concrete, slabs.
The organization of garden space can be different, but fencing for beds, bushes or flower beds will easily fit into the landscape design. The designs are practical, you can create them yourself using suitable technology and choosing materials.
Types and features of fencing
The fences used in the garden area are varied and differ in appearance, design, and materials. The main purpose of any option is to provide plant protection from weeds or flooding and crop separation. From an aesthetic point of view, fences are also important, because they allow you to properly organize the garden space and decorate the area.
Fences help maintain order in a summer cottage
For beds
Beds are present in many garden plots. To separate garden crops and ensure order in the dacha, you need borders for the beds. They can be made from various materials, but all designs are easy to make with your own hands. It is important to use high-quality and environmentally friendly materials. Otherwise, plants will not develop as efficiently as possible, because many artificial materials are unsafe for them.
Wooden sides
Fences for plant beds are often made of wooden borders. This option is practical, easy to create and allows you to neatly divide the beds. The structures must have parameters equal to the parameters of the bed. Wooden products in the form of a box are made from boards with a thickness of 2 cm. The elements are fastened with self-tapping screws, treated with a wood preservative or painted. When choosing a material, it is best to give preference to larch, as it is more durable. Pine or other elements will also work, but processing is always necessary.
Wooden fencing is practical, environmentally friendly and simple, but has the disadvantage of fragility. Under the influence of moisture, ultraviolet radiation, and temperature changes, wood becomes cracked, deformed or rots. Therefore, the boards need to be treated with antiseptics or painted.
Slate
Simple slate products are easy to make with your own hands if you already have the material. Old slate removed from the roof when replacing the roof is often used to create edges. The canvases are cut into long elements, the height of which corresponds to the thickness of the soil layer of the bed. The main advantage of this option is the availability of the material. The disadvantages are that old slate is very fragile and releases harmful components into the soil.
When creating sides, you need to additionally strengthen the slate elements with reinforcing angles or rods. They are installed along the length of the bed every meter; the rods seem to support the slate parts. Appearance The application of such fencing is quite laconic; the structures can be painted with compounds intended for outdoor use.
Metal fencing
Reliable fences for garden beds can be made from corrugated sheets or sheet metal with galvanized or polymer coating. The cost of such structures is high, but if such material exists, it is important to know its features. The sides are strips of metal that are fastened with special corners. A protective corner is also fixed along the upper edge, making the operation of the structure convenient, because the edges of the sheets are sharp.
Metal structures quickly heat up in the sun and contribute to the heating of the soil. This should be taken into account when using metal to separate beds.
Video: beautiful fences for garden beds, a selection of ideas
For bushes
Bushes of raspberries, currants or other crops need additional support, as their branches spread widely and lose their shape. For this purpose, fences made of wooden bars, PVC water pipes, metal and metal-plastic pipes are used. In any case, the structure consists of supports that go deep into the ground and provide stability to the fence. The branches of the bushes are supported using the upper part in the form of a hoop. This option is universal, in demand and easy to use.
Pegs and strong rope are often used as an easy option. Supports are installed in the ground around the circumference of the bush, and then the rope is pulled. The height of such a structure should be slightly less than half the bush. The structure allows you to raise the lower branches and make caring for the plant simple and easy.
The advantages of bush stands are as follows:
- preventing crop rotting, since the lower branches of the bushes do not touch the soil;
- ease of watering and caring for plants;
- more convenient harvesting;
- simplicity of designs from various materials;
- preventing the growth of bushes;
- the ability to form the required shape of the bush.
The disadvantage of this design is that it cannot be used for very voluminous bushes with heavy branches. In this case, more reliable options that have reinforced supports and square shape. Such products can be made of metal or wood, metal-plastic pipes.
Fencing front gardens and flower beds
A front garden or flower garden can be open or closed. In the first case, fences are not used, and in the second, a fence is necessary. At the same time, the design separates ornamental plants from the rest of the site and complements the landscape design of the area.
You can separate ornamental plants using a variety of wooden structures. A classic low picket fence is a universal option for any site. Metal fencing, which is made from strips of metal coated with a polymer colored coating, is also effective. Wrought iron fences for the front garden look beautiful, but are expensive.
Any option for fencing a flower bed or front garden must be beautifully designed, because the decorative function is important when using such structures. The height is calculated depending on the size of the plants that need to be separated from the main area.
Supports for grapes
Grapes are often grown for decorative purposes. For this you need pergolas or horizontal trellises. Such structures can be in the form of a gazebo, bowl-shaped or arched. Wood is often used as a material for manufacturing, as it is environmentally friendly and easy to use.
It’s easy to make trellises from wood with your own hands, but when using metal elements you need a welding machine, fasteners with an anti-corrosion coating and other parts. Wooden elements treated with stain and varnish are fastened with nails or self-tapping screws, creating a structure of the required shape. In any case, the sizes of the trellises are selected depending on their location. It is possible that the finished gazebo on the site will serve as a support for the grapes.
Video: making trellises with your own hands
Preparation for installation
To create any fence or small enclosure, it is important to calculate its parameters. Dimensions depend on the type and purpose of the structure. For example, fences for flower beds often do not exceed 50 cm in height, while taller structures are required for ornamental shrubs. The length of the fence depends on the perimeter or circumference of the flower bed, but you should not place the structure close to the outermost plants in the flower garden.
You need to step back about 30 cm from them, which will ensure comfortable care and proper development of greenery.
Before constructing the fence, you can draw a diagram showing the shape and design parameters. And also the diagram shows the location of the main supports in the form of columns, the distance between them. This will allow you to calculate the required amount of material and determine installation features.
How to choose material Sides or a small fence can be made from a variety of materials. When choosing, you should be guided by the purpose of the fence. For example, laconic, easy-to-use and environmentally friendly wooden borders are best suited for arranging beds. You can separate the shrubs or flower garden with brighter and original options
. Available elements are also suitable for this purpose. In any case, the quality of the material must be high, and installation technology should also be taken into account.
- The base for the fence can be made of the following materials: Plastic bottles. You will need a large number of parts, which depends on the length of the fence. The bottles should have approximately the same bottom size, and for installation they just need to be deepened into the ground around the perimeter of the flowerbed. The containers should be filled with sand for greater strength. Pre-staining will make such a fence unusual and beautiful.
- Polycarbonate. From segments cellular polycarbonate, colored or transparent, it’s easy to make a fence for a flower bed. The ends of the elements must first be coated with transparent sealant or silicone, and after drying, the parts must be deepened into the ground along the perimeter of the flower bed. The segments are glued together with transparent glue for exterior use.
- Wooden boards, picket fence. There are many options for fences made of wooden elements. Designs of any shape can be easily made bright and original, or you can create practical borders for a garden bed.
- Concrete slabs are convenient for durable fencing. Elements of the same size are deepened into the soil along the perimeter of the flower bed. The soil around the fence should be compacted well.
Before choosing any material, it is important to pay attention to its quality. Polycarbonate and concrete products are expensive, but reliable and durable. Boards and metal profiles require anti-corrosion treatment, which will make them more practical. Therefore, it is worth familiarizing yourself with the features of the material, its advantages and disadvantages.
Table: pros and cons of materials
| Material | pros | Minuses |
| Plastic bottles | Availability, easy installation and operation, possibility creating any garden bed design. | Low strength, large quantities required elements, reinforcement for bottles is necessary. |
| Polycarbonate | Practicality and accessibility, simple mounting, variety colors, durability and comfort. | It is important to process the ends of cellular polycarbonate, high price. |
| Wood | Possibility of creating any fencing option, accessibility, ease of installation and operation, versatility for any climatic conditions. | Antiseptic treatment or staining is required, fragility in the absence of treatment. |
| Concrete or stone slabs | Reliability and durability, simple installation, practicality and convenience in operation. | High cost, requires a large number of elements. |
Calculation of quantities of materials and tools
When constructing a fence from boards for a flower garden, you need to determine the height of the structure, which depends on the size of the plants. A fence about 40 cm high is suitable for most flowers. After this, you need to retreat 30 cm from the outer plants and measure the perimeter of the flowerbed. The resulting indicator is the length of the fence. A picket fence requires support posts, cross slats and slats. The distance between the pillars is 1 m, and between the slats is about 5 cm. In this case, the width of the slats should be about 10 cm. For a structure with a height of 50 cm, two cross beams. Thus, for every 100 cm of fence, approximately 7 slats are needed.
A fence for a flower garden can be made from ready-made picket fence sections, which can be wooden, plastic or metal. To do this, you need to determine the length of the fence and, depending on this, select the number of finished sections.
To install a wooden fence yourself, you will need the following tools:
- tape measure and building level;
- shovel and crushed stone;
- nails or screws;
- hammer or screwdriver;
- brush, wood preservative, paint.
Before work, you need to prepare the picket fence by sawing the strips into elements of the required length. The transverse logs should be a little more than 1 meter long, since the distance between the supporting posts is 100 cm, but the bars must be attached to supports.
Installation of fencing for a flower garden
Before work, apply an antiseptic intended for wood to all wooden elements. This will preserve the quality of the material and make the work easier. For this purpose, you can use stain, which can be of various shades. natural wood. If the boards are very rough, then before processing they need to be sanded with medium-coated sandpaper. After this, you need to remove the dust and apply a protective agent.
Drying of the product takes several hours, and the exact time is indicated in the instructions. After this period, you can begin installation, which includes the following steps:
- With pegs and rope we mark the line of the future fence and the place for support pillars. Using a shovel, we make 40 cm deepenings for supports, the height of which should be about 1 m. We pour sand in a 5 cm layer at the bottom of the holes, install pillars, fill them with crushed stone, and compact them with soil on top.
- You need to attach the fence slats to the transverse joists, maintaining the distance between them. Nails or self-tapping screws are used for fixation, and evenness is checked with a building level. It is worth considering that the fence is assembled in sections, installing each section one by one. The planks must be attached to the joists with a distance of approximately 5 cm from the edge.
- The prepared sections are fixed to installed poles using self-tapping screws. Levelness is checked using a building level. In this case, the lower edges of the planks should not come into close contact with the soil. The distance between the soil and the sections should be about 3–5 cm.
Bush fences
Raspberry bushes, currants and other garden crops need fencing or convenient support to allow the plants to develop comfortably. One of the simplest options is a design made of PVC pipes, which has rectangular shape. For work, pipes with a diameter of about 20 mm are required, as well as corner fittings that allow you to connect all the elements.
You can make a fencing for bushes with your own hands using welding machine for PVC pipes. And also pieces of products are needed. Their length corresponds to the height of the structure (depending on the parameters of the bush). The diameter of the fittings is selected depending on the parameters of the pipes. After cutting the elements, you need to make holes near the bush, in the corners, up to 30 cm deep. The frame of the future fence is welded using a machine, connecting long sections with fittings. The structure is installed in the holes, compacting the soil.
Grape support
Growing decorative or actively fruiting grapes requires the creation of supports or trellises. In the first case, any structures that allow the vines to grow easily are appropriate. For example, small gazebo with lattice walls will provide beautiful weaving stems.
Installation of a simple version of trellises involves the installation of two supports made of 50x50 mm beams, the distance between which is determined depending on the required width of the structure. A fixing block is attached to the upper ends, and then thin slats are mounted in the form of a lattice. All parts are pre-treated with stain or other antiseptic. Ready design Can be varnished for exterior use.
Video: how to make a simple fence for a garden bed or flower bed
Fences or fences will provide anyone garden plot order and aesthetics. Simple designs easy to do with your own hands by choosing high-quality materials.

")


