Material for pouring a garage roof. How to cook bitumen correctly and from what to fill a garage roof, what proportions are needed? List of construction tools for making concrete
Covering a garage roof is very different from covering a residential roof. In the first case, waterproofing and reliability come first, not appearance, which is very important when designing the second type of roof. The garage roof must be prepared for temperature changes and seasonal changes amount of precipitation so that there are no leaks in the future. Most often, bitumen is used to fill the roof of a garage. We will talk about the nuances of this process in this article.
First of all, let's look at how to properly prepare a bitumen solution for pouring a garage roof. The popularity of bitumen for covering garage roofs is determined primarily by its relatively low cost compared to other materials of this type. But it is worth remembering that bitumen roofing may begin to flow when the sun's rays are constantly directed at it, and in winter time, such a coating may crack. But, if bitumen is the only option, then it needs to be welded correctly.
To prepare 10 kg of mastic, you need to use 8.5 kg of bitumen, 0.5 kg of used crankcase oil, 1 kg of asbestos, sawdust, chalk or other suitable filler.

It is best to cook bitumen in a container that has thick walls, as there is a risk of the material burning. The heating temperature is in the range of 160-200 degrees, the higher it is, the less you need to cook the mixture. Typically, preparing the material takes about three hours.
Important! There is no need to raise the temperature above 200 degrees, as coke may form inside the mixture, which will cause the finished coating to crack.
As soon as the mass becomes homogeneous with a glossy surface, it means that the bitumen is ready. If bubbles and yellow-green smoke appear, the mixture is overheated and may be spoiled.
After it has become clear that the mixture is ready, it must be removed from the heat and added crankcase oil and filler in small portions. You can immediately fill the prepared roof with bitumen.
Roof preparation
The roof must be prepared before pouring. It is worth paying sufficient attention to this stage and devoting a lot of time to it in order to carry out subsequent work efficiently.
First, remove all debris from the roofing. After this, weak points in the roof are identified. If you are just doing a repair and not a full fill new roof, then you need to find vulnerabilities through which the roof leaks and cut the material on them with an ax to the base. But this is only on the condition that all surrounding coverage can still be used. In the future, you can simply patch the cut-out areas without replacing the full covering.

Important! Spot repairs are not always the right solution. In most cases, it is better to replace it immediately if possible. old roof fully.
Also, if the roof was previously covered with roofing felt, then there may be bubbles on its surface. In this case, each bubble is cut crosswise, and the triangles are folded back. All dirt that has accumulated inside is removed. Later it will be possible to spot fill each such zone.
Features of pouring a flat roof
For garages, the more common roof design is flat. Usually it consists of several slabs supported on the walls of the structure. This design has weak points in the joints between the slabs, so a screed is required, and it is better to cover it using rolled materials.
For roofing felt roofing, which is the most affordable and easiest for the average car owner with a garage, you need to prepare certain materials:
- Ruberoid
- Bitumen
- Special purpose soil mixture
- Mastic
- Petrol
You will also need tools such as a sufficient container to heat the bitumen, sharp knife or another tool for cutting roofing felt, brushes and spatulas.
Before carrying out work, in order to speed up the process and then not have to wait for the finished bitumen, it needs to be heated up. This should be done in a large metal container. Quantity calculation required quantity material is determined based on the roof area. For example, if you fill a roof with an area of 30 square meters, then two buckets of bitumen will be enough.
While the bitumen is heating up, you can begin to prepare the roof. What is done at this stage was described in detail at the beginning of the article. This includes removing debris and identifying crisis areas of the roof. Be sure to thoroughly sweep away all dust after cleaning up the garbage. If the roof surface is wet, it must be dried. There may not be enough sun and air for this, so you can use a blowtorch.
Important! Never use a gas burner for drying.
While the preparation work is being carried out, the bitumen becomes the desired consistency. First, we prepare a primer from it, which will be used to seal cracks and holes. To do this, take 76 grade gasoline and pour ready-made bitumen into it. This must be done very carefully, constantly stirring the mixture.
Important! There is no need to change the mixing sequence, as the mixture may ignite.
The finished solution is divided into two parts. One should be liquid and the other thick. In the first case, you will get a primer, that is, a primer for filling cracks and holes, and the second is needed to level the finished surface.
Advice! If spot repairs are being performed, then before pouring problem areas roofing felt patches are installed and glued using a torch.
In order for the roofing felt to stick better, it is heated with a gas burner. It is best if the roof in this place is also warmed up, thus increasing traction. The attached piece of material must be pressed very well over the entire surface, since the integrity of the future coating will depend on the correctness of this work.

After sealing all problem areas, if any, you need to lay out the lining layers of roofing material evenly, without folds. The beginning of the spread is the lowest part of the roof, and the end is the highest. The sheets are laid out with an overlap of 15 cm and very careful heating is required so that they stick to each other and to the roof, forming a single surface.
Important! In places where the sheets cannot stick together, soft fasteners can be installed.
A layer of roofing felt has been laid, so each joint must be lubricated with primer. After laying the layers and treating them with a primer, you need to lubricate the finished surface with a layer of bitumen mastic, which was prepared at the beginning of the work. The layer must be no thicker than 5 mm, otherwise it may rupture when temperatures change. winter period.
You can also lay down another layer of roofing material if necessary. This is done on the mastic, perpendicular to the sheets that were laid in the beginning. Their edges must be wrapped and fixed with slate-type nails.
After all, the top layer of roofing material is laid, which has a rough coating that can protect the roof from bad weather.

If all the work is done correctly, then such a roof can serve without repairs or leaks for 15 years. During pouring, instead of roofing felt, you can use other more plastic materials that are offered by construction market at the moment, but they are somewhat more expensive.
These are, for example, European-type roofing felt and Rubemax. These modern materials They are more wear-resistant, which gives the roof a longer service life.
Alternative to roofing felt
You might consider filling the roof with bicrost. This material is different in that it does not require finishing bitumen mastic. Its installation is carried out using heating gas burner.
This material is easily attached to the roof, thanks to a pre-applied layer of oxidized bitumen. This is a material that helps bikrost adhere to the roof surface much faster and more reliably.
Work algorithm:
- You need to roll out the roll to about 50-60 cm
- Warm up his internal honor with a gas burner
- Press tightly ready material to the roof surface and walk along it with a T-shaped stick
- Next, you need to stand on the finished coating and, having rolled it out to 40 cm, heat the underside with a burner and press it tightly to the roof.
- So you need to gradually lay the first roll, and then all subsequent ones.
Important! The overlap of each roll on the previous one should be around 6 cm.

Conclusion
Filling a garage roof with bitumen is a complex process that must be approached with full responsibility and with some experience, since even if the algorithm is followed, difficult situations arise that a beginner may not be able to solve.
The decision to construct a concrete roof during the construction of a garage must be justified and carefully considered, since this material is only suitable for buildings whose service life is designed for long time. If you are going to use the garage for no more than 10 years, then sandpaper is not worth it and it would be wiser to opt for less durable, but more expensive and difficult to install materials.
Concrete is one of the most durable materials. But there is one drawback: over time, it can be destroyed due to moisture.
Before starting construction, it is necessary to decide on the shape of the future coating. This is a question not only of the appearance of the building and the ease of its operation, but also of the complexity and labor intensity of the construction itself.
Roof covering

Scheme gable roof garage.
When constructing garages, coverings of two forms are used: horizontal or inclined (gable). Of course, there are roofs and more complex structures, but they are most often exclusive options and concrete is rarely used in their manufacture.
Gable concrete coverings are also not the most common type. Because, despite their good performance characteristics, filling them is quite difficult. This is due to the properties of the concrete itself: it is heterogeneous and quite heavy, and when poured at an inclined angle, the concrete mass tends downwards. Thus, it is almost impossible to obtain a layer evenly distributed in thickness over the entire roof. To form gable roof It is necessary to use mobile formwork, which is quite difficult to manufacture, and the construction of such a roof will take much more time.

Tools for floor screed: level, water level, tape measure, trowels, spatula, drill, mixing container.
It’s another matter if the roof is not poured with concrete, but if you use ready-made reinforced concrete slabs, factory-made or hand-made. But when installing slabs, due to their weight, construction requires the use of special machinery and equipment, which in itself can significantly increase the financial costs of constructing a garage. In addition, roofing made from slabs requires the purchase and additional material For reliable waterproofing joints.
It is because of these shortcomings that when building garages they most often choose the option of a horizontal (straight) roof. The principles of work for creating this type of roof are reminiscent of creating a conventional concrete screed, therefore the approach to its production should not differ from usual work. The only thing that needs to be foreseen in advance is the possibility of prompt delivery of the solution to the installation site. Typically, a concrete pump is used for this or a primitive block lift is made.
Tools for work
To pour the concrete itself during creation you will need:
- leveling rule concrete mixture on the surface. It represents wooden slats(cut wooden board from one smooth surface) with a handle attached to it;
- tamper for pouring and removing air bubbles from it. Looks like this tool like a wooden (at least 40 mm high) block or half a log with a handle. The main thing is that the tamper is heavy enough (weighing at least 2.5 kg);
- brush for ironing cracks - a large paint brush (round) with stiff bristles;
- a piece of steel rod to remove voids in the poured mortar.
All these tools can be purchased at the store, or you can make them yourself to avoid additional expenses. If you don't want to work hand tools, then you will have to purchase (or rent):

On construction sites for manufacturing large quantities It is better to use electric concrete mixers for the solution.
- vibrating screed (gasoline or electric) - it will replace the rule (rent - approximately from 300 to 1500 rubles / day, depending on the model);
- trowel - replaces the tamper and complements the work already done with the vibrating screed (rent - approximately 1,500 rubles / day);
- construction probe.
In addition, do not forget the tools for diluting the concrete mixture:
- concrete mixer (rent - approximately 250 rubles/day) or construction mixer;
- mesh for sifting sand (if the sand is uncalibrated);
- shovels;
- a container for diluting the concrete mixture (if you dilute it manually);
- containers (buckets) for lifting the finished solution to the installation site.
It is also necessary to remember about the manufacture of formwork and reinforcing mesh, and, accordingly, about the materials and tools for their creation.
Coating materials

During the cold season concrete mortar Floor slabs will harden much longer than in warm weather.
- metal I-beams for load-bearing structures. For the construction of a garage roof, the span of which does not exceed 5 meters, the use of beams 12 or 15 cm high (the twelfth or fifteenth “I-beam”) will be technically justified;
- concrete grade 250. The smartest and easiest way is to purchase already ready mixture or make it on site using a concrete mixer (“concrete mixer”), since a solution prepared by hand may not reach required quality and consistency. To prepare the mixture yourself, you must use crushed stone of a fraction of 10-20 mm, cement grade PTs 400 and sand. Proportion required for preparing concrete: 3 buckets of cement, 4 buckets of sand, approximately 2 buckets of water;
- periodic profile reinforcement with a diameter of at least 10 mm. If the reinforcing mesh is not supposed to be welded, but knitted (which is quite acceptable when installing garage floors), then you will also need wire with a diameter of at least 1.5 mm;
- construction boards for the manufacture of formwork;
- roofing felt or steel sheet for the base for pouring.
Once you have prepared all the tools needed to construct the garage floor, you can begin pouring.
Making a roof from monolithic concrete
Manufacturing of substrate and formwork
The lower flanges of the beams are lined with boards, on top of which a layer of roofing felt is laid dry or placed a metal sheet to create a foundation. If you think that the support is not reliable enough and may not support the weight of the roof, then take care of supports; for an area of 50 sq. cm, 1 support will be enough.
When constructing the formwork under, make sure that the boards fit closely to each other. Otherwise, when pouring the concrete mixture, “cement milk” may leak through the cracks, on which the strength of the monolithic concrete coating of the garage largely depends.
Manufacturing of reinforcing mesh
The reinforcement is laid across and along the beams, making sure that the mesh cells are equal to 200x200 mm. If the mesh is supposed to be welded, then it is more convenient to carry out the work on the ground and already finished design lift to the top floors of the garage. You can knit reinforcement directly on the roof. But additional fastening of the reinforcing bars to each other is required, otherwise the mesh may move when pouring concrete.

If you are welding the reinforcing mesh, it is easier to do it on the ground, and only then lift it to the roof.
In order to avoid excessive consumption of concrete mixture and the coating to be even in thickness, crushed stone is placed under the reinforcing mixture. When laying out the reinforcement, you need to ensure that the gap between the mesh and the formwork is maintained at least 4 cm. Otherwise metal parts may protrude beyond the surface concrete pouring or located at its very edge. This, in turn, can lead not only to uneven pouring of the mixture, but also to subsequent bleeding rust spots that cannot be destroyed. This will not affect the technical characteristics of the roof in any way, but will have a bad effect on its appearance.
Concrete laying
Lay the mixture in strips, guided by the beams. The thickness of the layer must be at least 15 cm. Before starting work, be sure to calculate the time of work so that there are no unfinished strips left. Concreting of such strips must be carried out continuously to ensure uniform drying of the concrete. IN ideal Pouring the coating should only take 1 day.
When laying concrete, make sure that reinforcement mesh did not move.
To avoid problems with removing the formwork later, its inner walls must be lubricated with any lubricant, which is at your disposal, for example, used machine oil.
After pouring equal portions to cover the garage, it is leveled over the surface as a rule, carefully compacting it with a tamper, “knocking out” air bubbles from the coating. Particularly large bubbles and air pockets are pierced with a probe or steel bar after. The formwork also needs to be tapped from time to time so that the solution lays more evenly. It is necessary to compact the surface until it shines from the moisture that appears, which does not cover the future ceiling with an even layer. Without careful compaction, it is impossible to achieve the required quality of a monolithic concrete roof. The laid and compacted mixture can be further leveled with a shovel, a construction trowel or using a trowel.
Cracks, crevices and gaps should not be allowed to appear on the surface of the coating: they not only reduce specifications garage and its covering, but can lead to the destruction of the entire concrete covering, since moisture enters them, which, when frozen, destroys the concrete monolith. But imperfections need to be removed after the mixture has dried.
Defects are eliminated using a method called “ironization”. concrete surface moistened generously with water, thin layer pour cement on it and rub it in paint brush until the coating is completely smooth and shiny and the powder is no longer absorbed. In this case, wet water stains should completely disappear.
Drying the concrete surface
Many builders do not pay due attention to this stage, simply covering the roof with a film to protect it from precipitation and leaving it for a while. But this approach is insufficient in the manufacture of truly high-quality roofing.
The concrete coating of the garage must be kept moist throughout the hardening period or, as builders call it, “formation”, 22-18 days. To do this, after the initial setting, the roof must be covered with some loose, air-permeable material, for example, shavings, sawdust or burlap, and moistened generously with water. For the first 3 days, watering should be repeated every 4 hours. Then, for 1 week, the coating is moistened 3 times a day. After every spill concrete covering together with shavings (burlap and the like) must be covered plastic film. Naturally, in cold weather, concrete that has not yet risen must be protected from freezing.
10 days after pouring the roof, the formwork can be removed.
There are several technologies that can be used to repair a garage roof yourself. The choice of a specific method for carrying out restoration work depends on the level of wear of the roof, its type and directly on the type of motorhome.
Restoring the roofing of a house for a car is currently carried out using three main technologies: soft materials, hot bitumen, tiles or profiled sheets. Private garages are mostly covered with inexpensive and at the same time durable materials - modern ondulin and flexible tiles, corrugated sheets. You can easily select optimal method“treating” the roof of a motorhome, focusing on the type of roofing.
Regardless of the technology chosen, you will need to properly prepare the roof for repairs. Inspect the roof, determine the level of its operational wear, determine the roofing elements that need to be replaced mandatory. In cases where the old coating as a whole is still quite suitable, remove only the problem areas by cutting them out with an ax. Subsequently, they can be replaced with new elements, significantly reducing the cost of repair work.
Preparing the roof for repairs
If the coating was made with roofing felt or a similar material (equipped soft roof), swellings and cracks often appear on it over time. Such problem areas need to be dealt with even before repairs begin. This is not difficult to do: cut the defective areas crosswise with a well-sharpened knife; Bend the resulting triangles and clean out debris and dust from them.
When carrying out repairs, you will need to fill such areas with corrected defects with bitumen. Below we will talk in more detail about how to correctly perform such an operation. Clean the roof surface thoroughly and wash it with water if necessary. Now you can begin restoration activities.
Bitumen is a popular material that provides high quality repair work carried out independently. Repairing a garage roof with its help will require you to stock up on the following equipment: a ladder, an old bucket without holes, gloves, gasoline and firewood, rope, a metal hook, bricks.

Garage roof repair with bitumen
The work technology is as follows:
- Build a grill for heating using bricks and build a fire under it.
- Place a bucket with bitumen poured into it on the fire and wait until the material acquires the required plasticity.
- Use a metal hook and rope to lift the bucket onto the roof.
- Fill defective areas of the roof with plastic material. You can use a wooden board to give the bitumen stream the desired direction.
When pouring, pay special attention to those places that you cut into preparatory stage. Such areas must be filled completely. Then, when it rains, water will not penetrate through the roof into the garage. The entire soft roof or exclusively damaged areas can be filled with bitumen.
For a long time roofing repair Domestic home craftsmen perform it using roofing felt. It is treated with a special mastic (bitumen) and placed on the damaged areas of the coating. In general, the technology for roof restoration using roofing felt looks like this:
- Cut out pieces of material according to the required geometric parameters.
- Pour mastic into the holes on the roof (you can also use molten resin).
- Cover the defective areas with pieces of roofing felt.
- Fill the made patch with mastic.
- Bend the holes cut crosswise, place another piece of roofing felt on top of them (it should be slightly larger in size than the area being repaired) and pour mastic again.
Ruberoid can be used to renew the entire roofing area. In this case, you will need to fill the garage roof with tar. After this, lay sheets of roofing felt on it (an overlap of 13–15 cm is required). It is recommended to fill tar in parts. Then it will not have time to harden, and you can calmly repair the entire roof piece by piece.

Ruberoid for roofing repair
Sometimes bubbles form on the surface of the roofing material during installation. It's OK. Using a knife, cut them, and then press (as tightly as possible) the cut sections to the roof and apply another layer of tar on them.
If you want your garage roof to be completely protected from precipitation, it is recommended to lay two layers of roofing material. Then you will definitely get very reliable coverage, which will not let a drop of water into the motorhome. Even easier to repair garage roof bicrostom. To carry out such restoration, you do not need to purchase tar and mastic. Bicrost is laid using a gas burner. The scheme is as follows:
- Roll out the roll of material (about half a meter).
- Heat the underside of the bicrost with a gas unit.
- Press (you will need a special stick in the shape of the letter T) the heated material to the roof.
- Stand with your feet on the area you just laid, roll out the roll another 50 cm, repeat the steps for heating the bicrost and installing it.
Note! All subsequent strips of material should be laid with a 7–9 cm overlap. The cost of repairing with bicrost is significantly more expensive (3-4 times) than restoring a roof with bitumen or roofing felt. But with its help you restore roof covering literally in a couple of hours. Labor costs when using bikrost are minimal!
If your motorhome is protected on top with metal tiles or corrugated sheets, repairing them is also quite simple. Not at all difficult to replace separate element tiles or install a new profiled sheet. However, when the need arises to completely replace the roofing, the cost of such work will be significant due to the high price of the coatings used.

Installation of new profiled sheets on the roof
Metal tiles are mounted on the roof from bottom to top. To install it, universal self-tapping screws with a special rubber gasket are used. You can make cushioning products yourself. It's even easier to purchase them at hardware store. There are latches on the bottom and top edges of the tiles. With their help, you will install products (the operation is carried out with an overlap). There is no point in describing the procedure - everything is really simple.
You will have more trouble replacing a corrugated roof. We'll have to stock up circular saw, screwing device. Perform the work according to the scheme below:
- IN top corner roofs (choose any one), install a profiled sheet (experts advise to start by just lightly grabbing it with a screw).
- Attach two more products in series.
- See if the edges of the sheets coincide with the line of the roofing ridge. If necessary, align them.
- Fasten the roofing products tightly.
Pro tip! It is best to fasten the middle of the profiled sheets in a checkerboard pattern, and their lower and upper parts - through a wave.
Filling a roof screed with concrete is not possible for every type of building. Garage roofs can be either inclined or horizontal.
IMPORTANT! Sloping roofs guarantee effective disposal of precipitation, but it is not recommended to use heavy materials (for example, concrete screed), because the pressure on the supports increases.
In this case, the greater the angle of inclination, the higher the pressure exerted. In addition, when equipping the screed on sloping roof Certain difficulties may arise. For this reason, cement screed is most often equipped with horizontal roofs brick or reinforced concrete garages.
Preliminary stages of roofing a garage
Compliance with the sequence of work recommended by experts is the key to the quality of the arrangement flat roof garage. At the same time, we should not forget that the composition of the screed will directly depend on the type finishing and differences in elevation.
Before screeding the garage roof, you need to assess the scale of the upcoming preparatory work. After all, the quality of the finished coating will depend on their quality:
Preparation of the solution
After everything has been done preparatory work, you can start preparing the screed solution.
The screed usually includes the following components:
- Cement, which is the basis of the screed. The strength and other operational parameters of the surface depend on the quality of this component.
- Sand acting as fine aggregate.
- Fiber fiber. The use of this component increases the strength of the screed, reducing the level of plastic shrinkage of cement. Experts recommend using polypropylene fiber fiber, which reduces the likelihood of cracks to a minimum.
- Plasticizers that increase the plasticity of the solution, while reducing the volume of water required for screeding.
The ideal option for preparing a solution is considered to be ready-made dry mixtures, which already contain all the necessary components. All that remains is to dilute it with water and you can fill the screed.
How to make a concrete pour correctly?

It will take about three weeks for the screed to harden completely.. After this period, the roof is ready. But if you wish, you can make additional waterproofing to be sure that the room will not get wet.
Laying an additional waterproofing layer
To equip the waterproofing layer of the finished screed, you can use roofing felt.
 The procedure is carried out in the following sequence:
- Bitumen mastic is applied to the surface. You can buy it in a store or make it yourself. At self-production For bitumen mastic, it is recommended to use diesel fuel or used machine oil.
- On bitumen mixture roofing material is laid and pressed down.
If there are no financial problems and the budget for repairing the garage roof is dimensionless, then homemade bitumen mastic with roofing felt can be replaced with a modern waterproofing membrane.
Conclusion
If you follow the screed manufacturing technology, and also use building materials that are low cost, you can make a fairly durable garage roof.
Repairing a garage roof with bitumen is very different from roofing works, which are performed on the roof of residential buildings. When covering a roof with bitumen, first of all, reliability, strength, resistance to temperature changes and the quality of waterproofing are taken into account. Bituminous coating does not have the same attractive appearance as coating made from corrugated sheets, metal tiles or even slate. However, if you consider that you are choosing a coating not for a residential building, but for a garage, the main factor of which is reliability, then bitumen coating will be one of best options. Also very popular are materials such as built-up rubber and roofing felt.
The principle and technology of applying bitumen are different, since garage roofs can be different, for example, it can be gable or single-pitch, inclined, flat, and so on. Garage owners should decide in advance which roofing material, as well as the method of applying it, is suitable for their roof.

Many car owners know that a roof leak can have a negative impact on the condition of their car. This phenomenon occurs especially often at the change of seasons. How to prevent such harmful effects? Nowadays, there are quite a lot of construction roofing materials that cope well with these tasks, namely protection interior space garage from rainwater.
Work order
- Surface cleaning. In order for the mastic to have good adhesion to the roof surface and not begin to deteriorate over time, it is necessary to properly prepare it. To do this, you need to clean the roof of dust, dirt and other small parts. Mastic is applied only to a dry roof; bitumen is not recommended for use during high humidity air, heavy rain or other unpleasant circumstances due to which the bitumen could be damaged. In the event that it is not enough sunlight You can use a blowtorch, which can heat the surface to the required temperature.

- Surface inspection. In the case where the roof has previously been covered, it must be checked for holes, swelling and peeling of the upper part of the material. Quite often it happens that a certain amount of water accumulates at the site of the formed hole, causing the surface to be destroyed. Therefore, it is worth thoroughly drying the roof, and then applying mastic to its surface. Torn or loose pieces of the previous coating must be removed. To be more sure that the bitumen will adhere tightly to the base of the roof, use an ax or other suitable object to make notches so that the bitumen can penetrate to the base of the concrete.

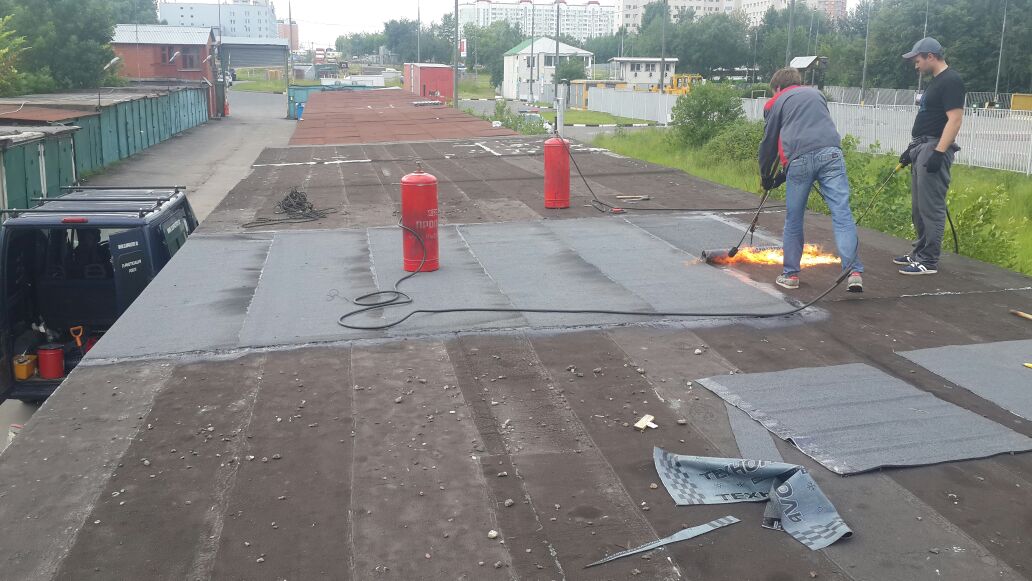
- Heating bitumen. Using a gas burner, you need to melt the material, so you can fill the garage roof with bitumen. Heating is carried out by gradually rolling out the roll, melting it with a gas burner. Do not forget also that the material must be compacted tightly; for this you do not need to use special tools, as you can do the job by pressing the bitumen firmly against the base with the sole of your shoe.
Important! When heating bitumen, do not neglect safety rules. Shoes must have high and thick soles, and hands must be wearing gloves. Otherwise, if the substance comes into contact with your skin, you may suffer a serious burn.
- Pouring the roof.

- After the bitumen has completely dried, you need to apply a primer to the roof, which will help improve adhesion. Next, dilute gasoline with molten bitumen. However, do not forget that when pouring mastic into gasoline, you risk causing a fire, so slowly pour gasoline into the bitumen, and not vice versa. The first composition is used to fill all peelings, cracks, holes and other irregularities. To make it, you need to mix two components in a special percentage ratio of 30 to 70 (thirty percent mastic and seventy percent gasoline). Also, the first layer will be used as a primer and applied to the entire surface of the roof. The second layer is more dense, it is mixed in a percentage ratio of 70 to 30 (seventy percent mastic and thirty percent gasoline). Make sure that the bitumen layer is less than 5 cm, otherwise it may break in winter.

- Installation of patches. In those places where there are renovation work it is necessary to properly repair the previous damaged layer. To do this, it is necessary to cut out suitable patches from roofing felt, and then fuse them onto the damaged area.

- Covering the roof with cushioning layers of roofing material. This work is performed sequentially, starting from the bottom row and ending at the highest point. Do not forget that you need to lay the roofing felt with an overlap, which should not exceed 15 cm. It depends on how tightly the roofing felt is glued service life. That is why it is advised to carefully heat and trample the material.

- Pouring bitumen mastic. After you have completed all the previous operations, proceed to fill the roof with bitumen mastic. You should not apply mastic in large thick layers, as it is recommended to just brush the roof. If, after evaluating the waterproofing layer, you decide to apply a second underlay layer, then remember that it must be applied perpendicular to the previous layer. Upper part the coatings must be additionally lubricated with mastic, the edges must be nailed with slate nails and lubricated with a thick primer.

In order to carry out roof repairs, you need to stock up on some materials and tools, without which roof repairs will be much more difficult. You also need to know how to properly prepare hot bitumen, because if you prepare it incorrectly, you risk the quality of the waterproofing.
Materials
If you decide to carry out repairs or complete replacement roofing using hot bitumen, then you need to seriously prepare for this work and stock up necessary materials. Carrying out roof repairs using improvised means is very inconvenient, and the work itself can take much longer than planned. It is worth noting that thanks to the use of such roofing material you don’t have to spend a lot on expensive tools; almost every home or garage has everything you need to heat up bitumen. So, you will need the following materials:


How to make it correctly this material you can see by watching this video:
Bottom line
Filling a garage roof with bitumen is quite simple. Remember that the roof of this building should not stand out for its beautiful aesthetic appearance, but for its reliability and resistance to rainwater. This is why we advise you to do this work on your own. This way, you will save your money and gain important experience.

")


