Modeling a nightgown. Development of a lesson on the topic “modeling a nightgown”
Lesson objectives:
Learn to perform various models nightgowns with one-piece sleeves.
Get acquainted with the profession of fashion designer and design engineer.
Lesson objectives:
Educational:
continue familiarization with the modeling process;
contribute to the formation and development of skills and abilities
simulation based nightgown with one-piece sleeves, make various models of shirts, select the finish of the product;
promote memorization of basic terminology technological processes.
Developmental:
contribute to the formation and development of student independence, spatial, logical thinking, creative imagination, cognitive interest.
Educational: developing students’ aesthetic taste, accuracy in work, respect for folk traditions, ability to work in a team.
Equipment: samples of nightgowns of various styles, cardboard templates, albums, scissors, glue, colored paper, tracing paper, textbook, cardboard dummies, technological maps, interactive whiteboard, multimedia, presentation.
Teaching methods: conversation, exercises, games, elements of research, discussion.
Forms of work: group, individual.
Lesson type: combined.
At the beginning of the lesson, the topic, purpose and objectives of the lesson are displayed on the projector. See these and all subsequent slides in the presentation.
During the classes:
I. Organizing time:
greetings;
checking student attendance;
teacher filling out a class log;
checking students' readiness for the lesson;
students' mood for work;
communicating the lesson plan to students. Slide 1
Hello girls! Today we have an open lesson, technology teachers from other schools in the area came to us. I present the topic of today's lesson "Modeling a Nightgown". Open your notebook and write down the topic of the lesson. This topic is a continuation of previous lessons in the “Textile Processing Technology” module.
Slide 2. Objective of the lesson: To get acquainted with modeling techniques, learn how to make various models of nightgowns with one-piece sleeves. Get acquainted with the profession of fashion designer and design engineer.
II. Checking students' homework completion.
Slides 3,4,5 But before we start studying a new topic, we will do a screening test on the previous topic: “Designing a Nightgown.” The test consists of 7 questions. Operating time 5 min.
Slide 6-7. Self-control.
Preparation for the main stage. Motivation and actualization.
Teacher.
What is a tunic? Slide 8.
Remember who wore a tunic in ancient times? Write the definition in your notebook.
That's right, the ancient Romans, and not only them, wore a tunic, but also in other countries, for example in Byzantium. And in Rus'? Slide 9. This is a shirt, which in the old days was also called “underwear.”
Additional material:
Do you know that the shirt played a terrible role in Russian history?
In the 16th century, Tsar Ivan the Terrible was on the throne. He was a cruel and ruthless man. In a fit of anger, he began to beat his daughter-in-law, his son’s wife, because she (at that time she was expecting a child) was in her chambers wearing only a shirt. She lost her child, and the king accidentally killed her son, who stood up for his wife. So Ivan the Terrible lost his heirs to the throne.
Slide 10. And the famous artist Ilya Repin depicted this plot in the picture.
Questions:
Do you think anyone wears a tunic now?
Who should wear it if it's like this? ancient look clothes?
So you are mistaken, it did not disappear, and you and I carried and carry it. How so? Yes, it’s very simple: after all, a tunic is any clothing that looks like the letter T - straight, the sleeves to the sides are also straight.
Slide 11. This is the simplest shirt, a shirt that was and is worn by both men and women of all nations. Her sleeves can be short or long, wide or narrow, and ruffled at the bottom.
Slide 12. So, the most ordinary shirt is a direct relative of the antique tunic; and her younger descendants are cheerful, mischievous, fashionable youth dresses and blouses that suit the youngest.
Slide 13. And a nightgown is also a tunic. A nightgown refers to underwear for sleeping. Since this product must be worn directly on the body, it turns out that we must present a number of requirements to our nightgown. Let's remember what these requirements are? Slide 14.
Therefore, we can conclude:
Nightgowns are made from cotton fabrics: chintz, satin, madapolama, calico, cambric, chiffon. These fabrics are soft, light, durable, absorb moisture well and allow air to pass through. For winter nightgowns, flannel and cotton wool are used. The fabrics chosen for coloring are white, plain-dyed, light tones and with small pattern. Slide 15.
Having found out what fabric is needed to make a nightgown and having completed its design, we can proceed directly to sewing and sew a very simple shoulder product. But I think you will agree with me that every girl wants to have a beautiful, original, fashionable item in her wardrobe, even if it concerns something as simple as a nightgown.
Slide 16. Do you agree with me? And I’m sure that you embodied all your creative ideas in a sketch of a nightgown model, which you had to make at home.
You had to not only sketch a nightgown at home, but also justify your choice. But before we look at the models, we'll do some physical education. Slide 17.
Let's start discussing models.
Students show their sketches and provide reasons for their choice.
III. Presentation of new material.
Teacher.
And so, the choice is made, and we can begin modeling the nightgown.
Nightgowns come in different styles. They can be short or long, sleeveless or with sleeves of different lengths, with or without a collar, with or without a shoulder seam. The shape of the neck of a nightgown can be different - oval, square, curly, angled. To decorate nightgowns, lace, braid, embroidery, hemstitching, and appliqué are used. Slide 20.
Slide 18. Let's remember what modeling is.
Slide 19: The process you did at home is called art modeling. Students write in their notebooks.
And the profession of a person who is engaged in artistic modeling is called a fashion designer. Which famous artists and fashion designers do you know?
Slide 21. And so, the second stage of modeling is called technical modeling, and this is done by a design engineer who changes the pattern drawings in accordance with the selected model. Write down the definition.
Students write in their notebooks.
1. Modeling by changing the length of the product
Slide 22. Changing the length of a product is one of the most simple techniques modeling.
Slide 23. If you want to increase the length of the product, glue an additional sheet of paper to the bottom of the pattern, extend the side line and fold line on it and set aside the increase in the length of the product on these straight lines. The new bottom line should be parallel to the previous cut.
Slide 24. If you want to reduce the length of the product, draw a new bottom line on the front and back patterns parallel to the bottom cut at the same distance as you want to make the product shorter, and cut off the excess parts of the patterns.
2. Modeling by changing the shape of the neckline
Slide 25. If you are not satisfied with the oval neckline that you received when making the pattern and want to change it to a rectangular, V-shaped or curly one. There's nothing complicated.
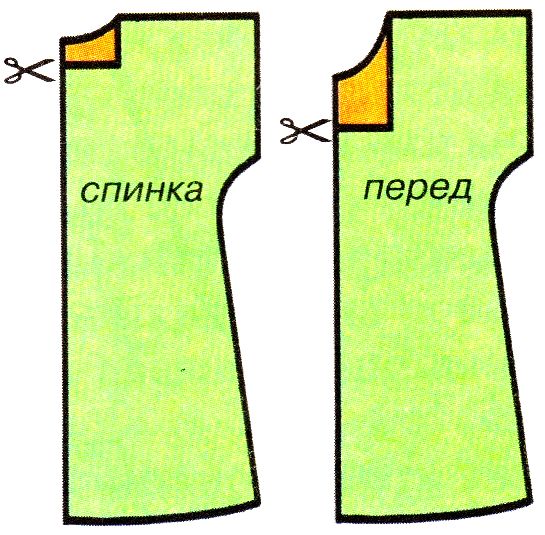
Slide 26-27. It is necessary to apply a new neckline on the front and back patterns and cut off the excess part of the pattern. When modeling the shape of the neckline, it should be taken into account that the shoulder width of the back and front should be the same.
Slide 28. The neckline can be trimmed with ruffles, a bow, a placket, etc. .
Slide 29. Let's see what models of nightgowns will be obtained after the process of modeling the shape of the neckline.
3. Modeling a yoke
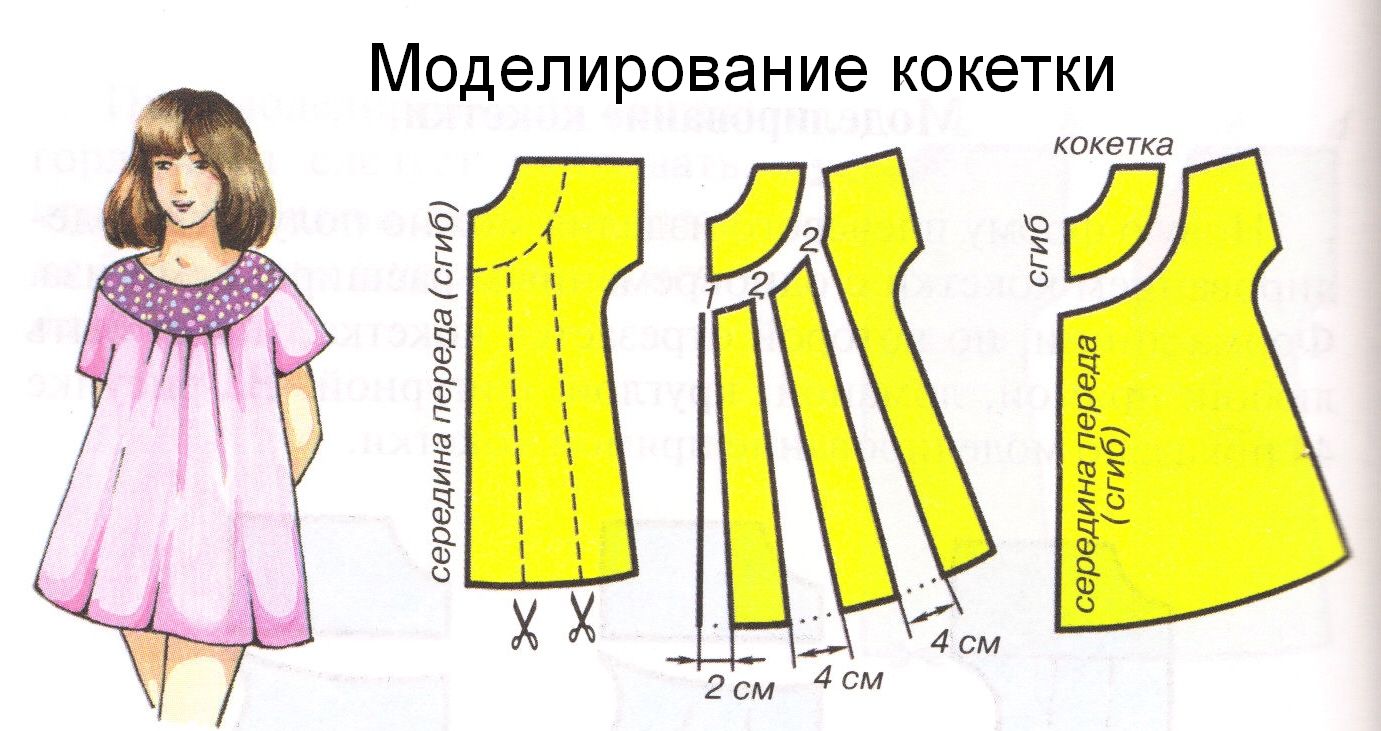
Slide 30. New form products can be obtained by modeling the yoke with simultaneous expansion of the bottom. The shape of the line along which the yoke is cut can be any: straight, broken, round, curly, etc.
Slide 31. Consider modeling a straight yoke. On the pattern, a line is drawn for the yoke, as well as two vertical lines along which the bottom is widened. Then the pattern is cut along the marked lines and moved apart. And in this form they put it on new paper, outline it and smoothly draw out the bottom line and the yoke line. Slide 25.
Slide 32. Modeling an oval yoke is similar to the previous stage. But the expansion of the lower part can be made larger, while parts of the pattern are moved apart not only along the bottom, but also along the yoke line. Yoke modeling can be done both on the front of the product and on the back.
After you have completed all the modeling steps necessary for your model, you need to calculate the amount of fabric. Since the fabric has different widths, then the quantity required material will be different. For example, if the width of the material is 150 cm, the amount of fabric is two lengths of the product; if the width of the material is less than 150 cm, the amount of fabric is two lengths of the product + 30 cm for processing and small parts. Students write in their notebooks.
IV. Physical education minute.
V. Practical part of the lesson. Game "Atelier "Coquette". Slide 33.
The goal of the game is to complete an order for modeling a nightgown with a one-piece sleeve.
Contents of the game.
The class is divided into five groups, which include specialist fashion designers. Each group is given the task of performing certain elements of modeling a nightgown. Also, an instruction card for completing this task is issued, with a clear example.
Teacher induction.
Checking the organization of the start of work, organizing workplaces.
Reviewing safety rules when working with sharp objects.
Independent work of students - “fashion designers”.
Students model a nightgown with a one-piece sleeve using cards.
While the children are working, the teacher makes a round and conducts ongoing instruction, if necessary.
Ongoing teacher briefing
Instructing students to perform individual operations.
Focusing on the most effective techniques performing operations.
Providing assistance to students who are poorly prepared to complete the task.
3Final briefing from the teacher.
At the end of the work, the “specialists” demonstrate their models of nightgowns.
For clarity, cardboard mock-ups of dolls are provided, on which models of finished shirts will subsequently be put on.
Analysis of students' independent work performance. Grade.
Analysis typical mistakes.
Teacher's word.
Based on the constructed drawing, dozens of new and varied products can be modeled. These can be different styles of nightgowns. To create a new model you need to have a little imagination and be able to perform some modeling techniques.
VI. Reinforcing the material covered.
Test “Test yourself” Slide 34-35.
Slide 36-37. Reflection.
Slide 38. Homework. § 22
1) Model your future shirt using a sketch in a notebook.
2) Bring: fabric, tailor's chalk, scissors, safety pins, ready-made pattern.
3) *Run research work on the topic: “The history of the nightgown”
Slide 39. 7. Cleaning workplaces.
Grading. End of lesson.
Open lesson on modeling a nightgown with one-piece sleeves
Lesson objectives:
- Educational: continue familiarization with the modeling process; teach, on the basis of a nightgown with a one-piece sleeve, how to make various models of nightgowns and select the details of the product.
- Developmental: formation of spatial, logical thinking, creative imagination, and cognitive interest in students.
- Educating: developing students’ aesthetic taste, accuracy in work, respect for folk traditions, and the ability to work in a team,
Lesson objectives:
- Get acquainted with the profession of fashion designer.
- Learn how to make various models of nightgowns with one-piece sleeves
Equipment: samples of nightgowns of various styles, cardboard templates, albums, scissors, glue, colored paper, tracing paper, textbook, design analysis sheets, tables, cardboard mannequins, multimedia, presentation.
On the desk: topic of the lesson, principles of modeling, criteria for evaluating ideas, ways to change a pattern, determining fabric consumption, homework.
Teaching methods : conversation, exercises, discussion.
Forms of work : group, individual.
Lesson type : combined.
At the beginning of the lesson, the topic, purpose and objectives of the lesson are displayed on the projector. See these and all subsequent slides inAppendix 1.
During the classes
1. Organizational point:
- greetings;
- checking student attendance;
- teacher filling out a class log;
- checking students' readiness for the lesson;
- students' mood for work;
- communicating the lesson plan to students.
2. Checking students' homework completion. Preparation for the main stage. Motivation and actualization.
Teacher.
Remember who wore a tunic in ancient times? That's right, the ancient Romans, and not only them - they wore a tunic in Byzantium, Rus' and other countries. Do you think anyone wears a tunic now? Who should wear it if it is such an ancient type of clothing? So you are mistaken, it did not disappear, and you and I carried and carry it. How so? Yes, it’s very simple: after all, a tunic is any clothing that looks like a letter T – straight, sleeves to the sides, also straight. This is the simplest shirt, a shirt that was and is worn by both men and women of all nations. Her sleeves can be short or long, wide or narrow, and ruffled at the bottom. So, the most ordinary shirt is a direct relative of the antique tunic, and a very respectable one; and her younger descendants are cheerful, mischievous, fashionable youth dresses and blouses that suit the youngest. Slide 4, slide 5
A nightgown refers to underwear for sleeping. Since this product must be worn directly on the body, it turns out that we must present a number of requirements to our nightgown. Let's see what these requirements are?Slide 6, slide 7, slide 8, slide 9
Therefore, we can conclude:
Nightgowns are made from cotton fabrics: chintz, satin, madapolama, calico, cambric, chiffon. These fabrics are soft, light, durable, absorb moisture well and allow air to pass through. For winter nightgowns, flannel and cotton wool are used. The fabrics chosen for coloring are white, plain-dyed, light colors and with small patterns.
Having found out what fabric is needed to make a nightgown and having completed its design, we can proceed directly to sewing and sew a very simple shoulder product. But I think you will agree with me that every girl wants to have a beautiful, original, fashionable item in her wardrobe, even if it concerns something as simple as a nightgown. Do you agree with me? And I’m sure that you embodied all your creative ideas in a sketch of a nightgown model, which you had to make at home. And the process that you did at home is called artistic modeling.
You had to not only sketch a nightgown at home, but also justify your choice. Let's start discussing models.
Students show their sketches and provide reasons for their choices.
3. Presentation of new material.
Teacher .
And so, the choice is made, and we can begin modeling the nightgown.
Nightgowns come in different styles. They can be short or long, sleeveless or with sleeves of different lengths, with or without a collar, with or without a shoulder seam. The shape of the neck of a nightgown can be different - oval, square, curly, angled. To decorate nightgowns, lace, braid, embroidery, hemstitching, and appliqué are used.
Every girl needs to learn how to model. This will allow you to find individual style in clothes, which is very important in life. You don't need to buy anything to be in fashion new clothes. You can change and reconstruct your favorite but out-of-fashion items.
The composition of the model should be determined taking into account the purpose of the future product, its design, manufacturing technology, properties and cost of fabric and finishing, features of the figure and the direction of modern fashion. The word composition itself is of Latin origin and means composition, combination, composition.Students write in their notebooks.
And before you and I start composing, composing, we will more than once encounter such a concept as a silhouette. We have encountered this concept more than once. Let's remember what this French word means?Students' answer (external outlines of any object).And no matter how original and unique the costumes of past centuries and modern costumes were, we can “fit” all of them into simple geometric shapes. Slide 10.
I will once again remind you of one secret that I have been revealing to you for many years now: based on the constructed drawing, you can model dozens of new and varied nightgowns. Let's look at several models of nightgowns that were made based on our pattern. Slide 11-18.
And so, the second stage of modeling is called technical modeling - this is the process of changing the shape of clothing parts.Students write in their notebooks.
And so, to create a new model, you need to imagine new model in space and be able to perform some techniques for modeling sewing products, which we will now get acquainted with.
1. Modeling by changing the length of the product
Changing the length of a product is one of the simplest modeling techniques.
If you want to reduce the length of the product, draw a new bottom line on the front and back patterns parallel to the bottom cut at the same distance as you want to make the product shorter, and cut off the excess parts of the patterns. Slide 19.
If you want to increase the length of the product, glue an additional sheet of paper to the bottom of the pattern, extend the side line and fold line on it and set aside an increase in the length of the product on these straight lines. The new bottom line should be parallel to the previous cut. Slide 20.
2. Modeling by changing the shape of the neckline
If you are not satisfied with the oval neckline that you received when making the pattern and want to change it to a rectangular, V-shaped or curly one. There's nothing complicated. It is necessary to apply a new neckline on the front and back patterns and cut off the excess part of the pattern. When modeling the shape of the neckline, it should be taken into account that the shoulder width of the back and front should be the same. Slide 21, slide 22.
The neckline can be trimmed with ruffles, bows, placket, etc. Slide 23.
Let's see what models of nightgowns will be obtained after the process of modeling the shape of the neckline. Slide 24.
3. Modeling a yoke
A new shape of the product can be obtained by modeling the yoke while simultaneously widening the bottom. The shape of the line along which the yoke is cut can be any: straight, broken, round, curly, etc.
Let's consider modeling a straight yoke. On the pattern, a line is drawn for the yoke, as well as two vertical lines along which the bottom is widened. Then the pattern is cut along the marked lines and moved apart. And in this form they put it on new paper, outline it and smoothly draw out the bottom line and the yoke line. Slide 25.
Modeling an oval yoke is similar to the previous stage. But the expansion of the lower part can be made larger, while parts of the pattern are moved apart not only along the bottom, but also along the yoke line. Yoke modeling can be done both on the front of the product and on the back. Slide 26.
As I already told you, based on the pattern of a nightgown with a one-piece sleeve, you can model not only a new model of a nightgown, but also another product, for example, a robe or dress, a windbreaker or a blouse. Slide 27, slide 28.
Let's see a small collection of shoulder products after the modeling process. Slide 29 – 38.
Teacher. All stages of modeling took place taking into account the design lines that we will also need during practical work. Let's remember them. Slide 39
After you have completed all the modeling steps necessary for your model, you need to calculate the amount of fabric. Since the fabric has different widths, the amount of material needed will be different. For example, if the width of the material is 150 cm, the amount of fabric is two lengths of the product; if the width of the material is less than 150 cm, the amount of fabric is two lengths of the product + 30 cm for processing and small details.Students write in their notebooks.
4. Physical education minute.
5. Practical part of the lesson. Game “Gathering of Specialists”.
Teacher induction.
- Checking the organization of the start of work, organizing workplaces.
- Repetition of safety rules when working with sharp objects and chemicals.
- Contents of the game.
The class is divided into three groups, which include specialist fashion designers. Each group is given the task of performing certain elements of modeling a nightgown. Also, an instruction card for completing this task is issued, with a clear example.Appendix 2
The purpose of the meeting is to complete an order for modeling a nightgown with one-piece sleeves.
At the end of the work, the “specialists” demonstrate their models of nightgowns.
For clarity, cardboard mock-ups of dolls are provided, on which models of finished shirts will subsequently be put on.
Independent work of students – “specialists”.
Students model a nightgown with a one-piece sleeve using cards.
While the children are working, the teacher makes a round and conducts ongoing instruction, if necessary.
Ongoing teacher briefing
- Instructing students to perform individual operations.
- Concentration on the most effective methods of performing operations.
- Providing assistance to students who are poorly prepared to complete the task.
3Final briefing from the teacher.
- Analysis of students' independent work performance. Grade.
- Analysis of typical mistakes.
Teacher's word.
Based on the constructed drawing, dozens of new and varied products can be modeled. These can be different styles of nightgowns. To create a new model you need to have a little imagination and be able to perform some modeling techniques.
6. Homework.
1) Model your future shirt using a sketch in a notebook.
2) Bring: fabric, tailor's chalk, scissors, safety pins, finished pattern.
7. Cleaning workplaces.
Subject: Modeling a nightgown.
The purpose of the lesson: teach how to model a nightgown.
Tasks:
1. Educational: to familiarize students with modeling techniques, with the sequence of making clothes from sketch to finished product.
2. Developmental: to develop students’ spatial imagination and creative thinking.
3. Educational: to cultivate hard work and accuracy.
Type: combined.
Methods: verbal, visual, practical.
Visibility: 1. nightgown modeling;
2. types of nightgown;
3. methods of making patterns;
4. sketches.
Literature: 1. “Technology”, textbook for 7th grade students educational institutions, edited by V.D. Simonenko, M. - 2004. P115-123.
2. “Service labor”, tutorial for students in grades 7-8. M-1985. P56-59.
Equipment: ruler, pencils, squares, templates.
Intersubject communication: Fine arts, Russian, literature, speech culture.
Stages:
I Organization of the lesson – 3 min.
1. Checking students' readiness for the lesson. Hello! Sit down. Duty officer, please tell me who is not in class today? Thank you.
The topic of our lesson is: “Modeling a nightgown,” and today in the lesson you and I must learn how to model a nightgown.
II Checking homework – 7 min.
Today to class you had to bring a ruler, a square, a pencil, an eraser, a workbook, colored paper, and glue.
Now let’s remember the previous topic - Building the basis of a drawing of a shoulder product with a one-piece sleeve. To consolidate the material covered, please answer the following questions:
1. What parts does the drawing of a shoulder product with a one-piece sleeve consist of?
Pattern of this product consists of 2 parts: front and back.
2. How does the drawing of the back differ from the drawing of the front?
The front and back are the same size. The difference is that the neckline is deeper at the front than at the back.
3. On what measurements does the size of the basic grid of a drawing depend?
The base grid determines the overall size of the product in terms of length and width. SG, D.
III Studying new material – 10 min.
In the last lesson, you completed the construction of the basic drawing of a shoulder product with a one-piece sleeve. If you use this cry without changes, you can sew simple products, for example, a nightgown. But each of you, having mastered the elements of technical modeling, can create based on this design more original model clothes.
The process of creating any product begins with a sketch, i.e., with a drawing of the future model. This stage is called artistic modeling. Dali's sketch is studied, determining the features of the model. The study is carried out according to the following plan:
Purpose, name (house robe, dress for special occasions);
Fabrics;
Silhouette, style;
Features of details (yoke, raised seams, collar);
Finishing.
After studying the sketch, they begin to develop the style - the product of the base pattern, i.e. technical modeling.
At the same time, the composition of the new model should be determined taking into account the purpose of the future product, its design, simplicity of manufacturing technology, properties and cost of fabric and finishing, features of the figure and the direction of modern fashion.
The main elements of costume composition are proportions, silhouette, color, different kinds finishing
Proportion is the ratio of the parts of the costume in size to each other and in comparison with the human figure.
Color is one of the most expressive means in costume.
So, to create a new model, you need to have a little imagination in order to imagine the product in space, know the basics of artistic modeling and be able to perform some technical modeling techniques.
change in product length;
changing the shape of the neckline;
coquette modeling;
Parallel extension method;
conical expansion method.
IV Practical work – 63 min.
Before we begin practical work, let's repeat the PTB with sharp objects:
Place the scissors with the blades locked away from the person working;
pass the scissors rings forward;
store scissors, pins, needles in a certain place.
Well done! You know everything about PTB! On my own behalf, I would like to add to you that since we will be working with glue, do not taste it.
Look carefully at the sketches of the nightgown that I am showing you, and now let’s start modeling, let’s try to model it ourselves the new kind nightgown.
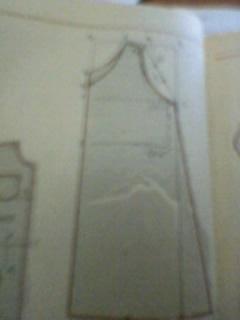
Model 1.
The nightgown is elongated at the bottom.
If you want to increase the length of the product, glue an additional piece to the back pattern from the bottom. A sheet of paper, extend the side cut line and fold line on it and set aside an increase in the length of the product on these straight lines. Then draw a new bottom line through the resulting points, parallel to the previous cut.

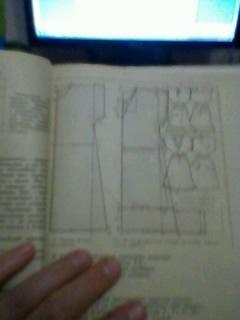
Model 2.
Nightgown with rectangular shape neckline.
You need to draw a new neckline on the front and back pattern and cut off the excess part of the pattern.

![]()
Model 3.
Yoke modeling.
Nightgown, widened at the bottom on a yoke with a conical flounce. On the front pattern, yoke lines and 2 vertical lines are drawn along which the bottom is widened. Then the pattern is cut along the marked lines and moved apart. To make a new pattern for the lower front, you need to lay the cut pieces of the pattern on new leaf paper and circle them, drawing out the bottom line and the yoke line with smooth lines.

Model 4.
The nightgown is widened towards the bottom and along the yoke line.
This additional expansion will then need to be removed into the gathers or pleats along the yoke line.
Modeling the yoke and widening the bottom can be done both on the front of the shoulder piece and on the back.
V Fastening – 5 min.
To reinforce the material you have covered, I will give you a card task.
Questions
Yes
No
1.Color is an artistic modeling.
2. Proportion is the ratio of the parts of the costume in size to each other and in comparison with the figure of the person
3. The main elements of the costume composition are the drawing, the artist, the fashion designer.
4.Based on the drawing, you can model: blouses, dressing gowns, vests, windbreakers, etc.
VI Summing up – 2 min.
Today in the lesson you learned that the creation of any product begins with artistic modeling, calculation of the basic design drawing and technical modeling.
At home, you are your own artist, designer, and technologist, so the knowledge and skills acquired today will help you create unique things that take into account your personality, image and craftsmanship.
Everyone received an “A” for the lesson; everyone was engaged, active, and attentive.
Open the diaries, write down your homework, repeat the entries in your notebook, prepare for independent work, bring a cry.
Thanks everyone for the lesson.
Municipal educational institution secondary school in the village of Kushmsky, Ershovsky district Saratov region.
Open lesson on technology “Modeling a shoulder product”
7th grade. Teacher Pechenova Nadezhda Vladimirovna.
Lesson topic : Modeling a shoulder piece based on a nightgown.
The purpose of the lesson : teach how to sketch a model, draw shaped lines on the base of a pattern.
Equipment : task cards, pattern drawing for the base of a nightgown, drawing tools, fabric, colored paper, pins.
During the classes.
Oh, fashion, fashion!! At all times it was, is and will be! She fascinates, captivates, draws you into her world. As a woman she is capricious, she is unusual, she is beautiful. A beautiful outfit can make any woman a queen and vice versa. An unsuccessfully chosen suit turns a woman into a slender, beautiful or unattractive, not bright, ordinary woman. Life without fashion would be gray and damp, like a cold rainy day. And today in the lesson we will open the curtain of the fashion world a little more. Each of you will feel a little like an artist, a little like a wizard, trying to create your first model.
Now we will take a journey into the world of fashion.
I. Survey - warm-up . (Two students work at the board)
1. Write down the main lines of the nightgown drawing.
V2V3, V2V4; GG1, TT1, NN3, V2V1, V5G2, G3N3, V3N.
2. Write down the names of the measurements according to the symbols:
Ssh, Dst, SgII, Sat, Di, Op.
The teacher works with the whole class at the same time. (Students answer questions using cards with symbols)
Poll repetition: Measurements required to calculate the design of the nightgown.
1. neck width;
2. product length;
3.product width;
4. Measurement for calculating sleeve width.
The teacher calls out the measurements, and the students answer with cards.
Product length, half waist circumference, half neck circumference, back length to waist, half chest circumference II, half hip circumference.
II. Learning new material.
Fashion, modeling, clothing creation.
Let's try to understand what fashion, modeling, and clothing creation are.
Dresses are distinguished by shape, cut and artistic style
Classic sports fantasy
Characterized by rigor
a small number of details.
Decorative finishing almost
absent. These clothes take a long time
does not get boring and does not go out of fashion.
Characterized by lightness, moderately spacious shape,
varied cut. This shows up well in
straight or widened clothing lines, in
sleeve cut. Patch pockets, yokes, flaps,
shoulder straps, straps (all this is emphasized by finishing stitching, edging, and complemented by various accessories). Strict necklines, turn-down collars, stand-up collars.
Differs in a variety of shapes and cuts. Application in various ways and types of finishing, use of materials different types, patterns and shades of color.
Demonstration of samples of each style.
Working on a magnetic board. Demonstration on a paper doll.
How, with the help of various dress styles, you can increase or decrease the height and volume of your figure, hide its flaws and emphasize its advantages. Important role The choice of pattern and color of the fabric plays a role.
Demonstration of varieties of sleeves, bottom of the dress, waistline design.


All this diversifies the products and makes them completely different, although the basic pattern is the same for everyone.
To change the model, you need to learn how to make the necessary changes and additions to the basis of the pattern.
Drawing shaped lines onto the pattern base.

Sundress dress with flounce robe
III. Consolidation of the studied material.
Questions - answers.
1. What is the modeling process?
2. How can you change appearance dresses without making changes to the pattern?
3. What neck shape is best for a dress intended
for a short girl with a round face?
IV. The work of fashion designers.
You have mastered the basics of modeling. Now let's try to work as fashion designers.
1. Design a model of your future dress (M 1:4).
2. Model the pattern of your product (M1:4, apply
shaped lines).
V. Couturier's work
While everyone is working on the task, I ask two people who want to work at the board as a couturier.
Create from fabric using pins:
1. Model from fashion history ( Ancient Greece)
2. Kimono robe. The style of the Japanese kimono is very relevant and
Nowadays.
VI. Checking the task.
Looking through ready-made models, we choose the best.
they applied how to change the basis of the pattern.
VII. Demonstration of couturier models.
VIII. Reflection. (reflection cards on everyone’s table)
1.What did you like about the lesson today?
2. What didn't you cope with?
3. What did you want to repeat at home?
4. What interested you?
IX. Summing up the lesson.
(everyone has cards for evaluating their work on the table)
X. D/Z: Prepare a pattern in your size for modeling.
"Models and Simulation" - Models. Schemes are most convenient for describing a hierarchical structure. Computer. Computer experiment. Analog. 5. Solving the problem, numerical analysis, mathematical forecast. Simulation modeling. Simulation plan. Reflection. Generalized information model of a graphical object. Uncertain tasks.
“Modeling a nightgown” - Fashion designer. Sketches of nightgowns. Modeling a nightgown. Fashion designer. Model No. 6. Crossword. Model No. 3. Modeling Neckline Facing Flounce. Model No. 1. Presentation. Model No. 5. Model No. 2. When modeling a product, the artist must take into account: Changing the details of the product drawing in accordance with the chosen style is called modeling.
“Mathematical modeling” - 6. Modeling of the farming system. Educational materials on the Internet. 4. Modeling of mineral nutrition. Predecessor requirement matrix (example). Mathematical models V agriculture. 2. Teaching methodology. France J., Thornley J. Operations on vectors and matrices. Mathematical modeling and design – © N.M. Svetlov, 2010.
“Modeling an apron” - Why are measurements taken? Explanation of new material. Sequence of practical work. Do not bite the threads with your teeth, but cut them with scissors. Professions: Modeling is done by a fashion designer. 3. Cut out the apron. Store needles and pins in a specific place. Safety rules when working with fabric.
“Computer modeling” - An example of a program developed as part of a master’s thesis “Research and development of methods for assessing the influence of parameters on the characteristics of an optical system.” Additional contacts. An example of a program developed as part of a master's and candidate's thesis “Research and development of methods for computer modeling and processing of interferograms.”
“Modeling in biology” - Verhulst Model. Which method is more suitable for solving this problem and why. Types of models. Laboratory research mice. What determines the number of individuals in a population (compare models). Forms of information models: verbal; mathematical; tabular; graphic. Modeling as a method for studying biology.
")


