How to make a garden bench. How to make beautiful benches, photos and instructions. Preparing for work
According to the classic, everything in a person should be beautiful. This also applies to everything that surrounds us. Creating comfort in your country house, don’t forget about the garden plot. Smooth lawn or flower beds serve as decoration for your garden, it doesn’t matter at all, the main thing is that there is a place to sit and relax from the bustle of the city and household chores. A DIY garden bench is a great opportunity to add individuality to your summer cottage. Let's look at a few interesting options handmade benches and figure out how to make some of them.
The simplicity of the design and the availability of materials allows even a novice craftsman to decide to create such an interior element. The best material Wood or stone will be used to create a garden bench. They fit perfectly into the design personal plot and create a feeling of unity with nature. It is possible to create a bench from scrap materials. Surely a zealous owner will have a couple of obsolete wooden chairs, which can be put into action.

Whatever you decide to make a bench from, the first thing you will need in any case is a design project, and the necessary drawings and assembly diagram for it. Drawings of garden benches for every taste can be found on the Internet, but if you wish, you can develop them yourself; after all, we all received the initial skills of creating them in school, and the design of a bench is not so complicated.
- height - about 40-50 cm;
- seat width - on average 55 cm;
- back height - 30-50 cm;
- the height of the armrests from the seat is 15-20 cm.
These are the dimensions that will allow you to sit comfortably on the bench.
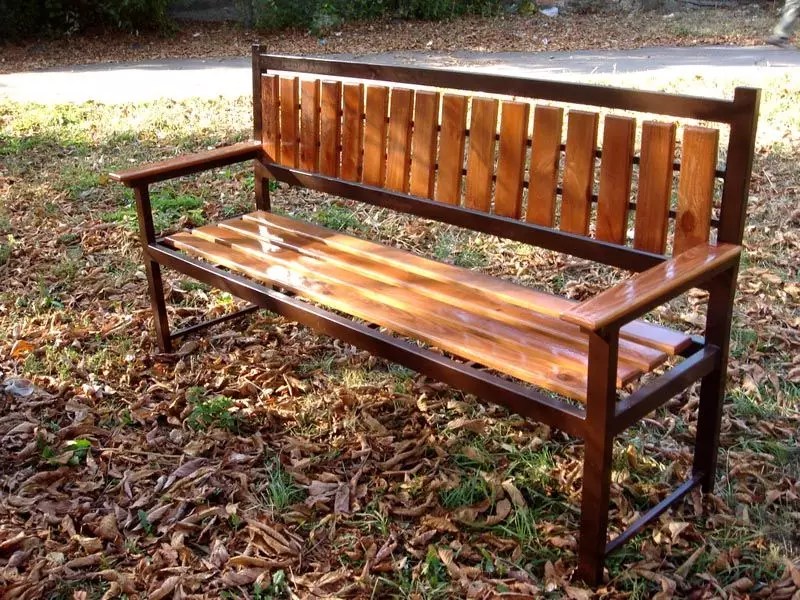
DIY wooden bench
Let's first consider the option of a simple wooden bench.
Among the small architectural forms The most common are benches and benches. Can be made from any materials or combinations thereof: wood, metal, stone, concrete, plastic, glass.
They are everywhere: streets and city squares, parks and squares, sports and educational establishments, public institutions and living quarters. Practically required element landscape design, plot of a private house or cottage.
The easiest material to process and affordable is wood. Do-it-yourself wooden benches provide an opportunity to save money, demonstrate your craftsmanship at home and be a creator.
Wooden benches: economy option
Make wooden benches using existing “blanks”. It is enough to process it a little and assemble a strong and functional structure - with a seat, back and legs.
Moreover, such “modules” are inexpensive, sometimes purchased for “pennies.” We are talking about pallets, or pallets.
But not everyone is suitable for the device garden furniture. You should not use products made from off-grade or unedged boards. In the first case, large knots may fall out, in the second, the “aesthetic” qualities suffer.
There are cases where the board fastening step is clearly not suitable for a bench.
The pallet is a wonderful donor for a bench
A pallet, as in the photo, would be better. With an angular chamfer removed along the contour.

The width of the pallet is large for bench seating. It needs to be trimmed, the remainder can be used to construct the backrest.

If the width of the backrest is not enough, then the bench will have to be made from two pallets.
The seats and backrest are part of the structure. Need legs. Let's make pallets from the board itself.

- the bench may not be stable
Rigidity is ensured by the seat, and the mounting area of the legs is quite small. Usually a lower ligament is added to prevent them from “spreading apart”. A simpler option is to use another pallet (or rather part of it) as a base.

or two. Do-it-yourself benches and benches made of wood in detail and clearly.

Fixing the backrest, as can be seen from the examples, can be done using a pair of slats, a board, a rope or rope. The assembled bench, its surface is cleaned, sanded, varnished or painted.
You can not cut the pallets to width and make a garden sofa.

There are examples of using pallet boards for the manufacture of other products from the class of small architectural forms. Flowerpots are also taken in the photo.

It is not necessary to waste time disassembling pallets, but it is better to buy standard lumber.
Simple bench shapes: board and timber
There are designs and execution options - from the simplest to specimens with wood carvings, worthy of being called real works of applied art.
The easiest option for making is a wooden bench without a back.
The drawing shows a do-it-yourself wooden bench, made entirely of boards with a thickness of 75 mm.

Bench made of boards and timber
Each element consists of two parts.
The seat with beveled ends is assembled from two boards. If the bench will be in an open area or outside a heated room, then it is better to provide a gap. It will allow water to drain and compensate for wood swelling.
The leg consists of two glued elements. To ensure reliability of the end connection, a pin (dowel) is inserted. Two short support beams and seat fastenings are attached to the leg. The legs and beams are connected with grooves, fixed with glue and self-tapping screws. Once assembled, the leg and beam are attached to the seat board with two pairs of screws and dowels, and holes are pre-drilled for them.
Assembly order
1. Cut out the workpiece;
2. Process the ends and clean the surfaces for gluing;
3. Glue the legs together;
4. Beams are attached to them;
5. Assembling the shop;
6. Sanded and coated with varnish (or paint).
Images and drawings of a bench made of 30 mm boards with a support beam.

Bench made of 30 mm boards with a support beam
There are already shaped elements in the form of legs with radius cutouts. You can make the work easier and make them rectangular. The drawing is not a dogma - it can be taken as a basis and changed in the direction of simplification or in the direction of complication. They do the same with sizes - make the bench wider, shorter, etc.
What is the difference between this option and the previous one?
One long support beam is used instead of four short ones; it also serves as a stiffening rib for the base - the legs and the entire structure are more stable. The connection between the legs and the beam goes through a tongue and groove, and the tenon is much easier to cut out. That is, this form is a little easier to manufacture, more stable and provides more opportunities for experimentation.
Below are several options for a similar design, but in a different design.
For example, in the minimalist style - there are not even protruding edges. Splicing according to the tongue-and-groove principle is used to connect the legs and the seat.

In this model, they simplified the task as much as possible - they even abandoned cutting out grooves and tenons. In this case, it is better to make the connection between the legs and the beam using confirmations rather than self-tapping screws (they have larger area contact). For strength, they usually add a pair of dowels on each side, set with glue. The hidden fastening of the seat is done with a dowel, the open fastening with a self-tapping screw.

If the bench is not very long, then the beam can be placed at the bottom. In this design, it serves solely as a stiffener.
In the photo below you can see an unusual case of using a dowel - it attaches the beam to the legs not with a hidden installation, but with an open one.

In this bench, a block was used to “help” the board.
Legs with crossbars and two oblique supports for sitting are made from it. All fastenings are made on confirmations, and the bars of the legs are connected to each other using grooves.

Here also a block is used for the base. Due to the large thickness of the seat board, it does not require additional support. The lower beam serves as a stiffener.

Making a small bench with a back is not much more difficult. The principle of installation and fastening is similar to simple benches: grooves, tenons, dowels, glue, screws and confirmations.
You can take a design with “solid” board legs as a basis. Move them a little from the center to the edge so that the ends of the seat and legs are in the same plane. Attach vertical beams to the legs and screw the backrest to them.

Bench with carved back
For a model whose base is made of a block, making the back is even easier. Two pairs of legs: front - for seat support, rear (high) - for fastening load-bearing beam, seats and backrests.

These were lightweight and “mobile” designs of benches and benches made of wood, which could be used with equal success in an open area, under a canopy or indoors. There are more massive forms aimed at “stationary” placement.
Benches: large format
Making a wooden bench with your own hands for a summer residence involves using any form of material. Including those that are used in the construction of wooden houses.
For example, timber. For reference: timber is classified as such if the aspect ratio is no more than 1:2, and the smaller side has a size of 100 mm or more. Reducing the size transfers such lumber to the “block” category.
It’s not easy to assemble a bench like the one in this photo with your own hands, but it’s possible.

Assembling the legs is not difficult at all. The only difference from a board and a block is that more powerful fasteners will be required. For example, such self-tapping bolts for wood.

You will have to widen the hole under their head (but confirmations also require this) and place a washer.
Installation and installation of the seat is much more difficult.
To “bundle” the beams together, three metal pins are needed, with a length almost the width of the seat, and two - the width of the bench, taking into account the legs. It’s difficult to find these on sale - you’ll have to make them from round reinforcement (stainless steel). The gap between the beams can be maintained using wooden plates from boards strung on studs. The thickness of the plates should be the same as the three supporting vertical beams that support the seat in the center of the bench.
And this specimen is made of even more powerful timber (150×100). Its assembly is much simpler. Two seat beams are attached from below through short cross beams, which are then mounted to the T-shaped legs.

Another easy-to-follow example using a large-format board. Load-bearing capacity The materials are such that the use of reinforcing beams is not required - the seat is attached to the ends of the short legs. The author of the project knows well that the most rigid geometric figure is a triangle. Therefore, both the configuration of the lower part of the supports and their connection with each other with bolts has the shape of an equilateral triangle.

If possible, order two non-standard wooden beams, then making such a bench with your own hands will not be difficult: you will need to “add” four short timbers (100×100) for the legs and two timbers (100×50) for the back.

Timber bench
But if this is not possible, then instead of a non-standard beam you can use a couple of standard ones.
This DIY wooden garden bench uses logs.

The most difficult thing in this option is to use an ax (or adze) to make a longitudinal groove and tenon for connecting the logs. For reliable fixation, you will need a couple more dowels on each side (this is the same dowel, but only thicker and longer). The seat and back can be made of boards (as in the photo) or timber. Do-it-yourself benches and benches made of wood - ideas and solutions.
And this version of the bench is already more complicated.
But not really. The main difficulty is making the back, or rather the notch on it. All fastenings of parts of the structure to each other are carried out using dowels.

Basically, like this wooden fastener quite durable - log houses with a couple of floors (including wooden churches) used to be built without a single nail.
And a very simple option: two logs with a groove and half a log sawn lengthwise.

Bench simplicity perfection
Wooden bench
In conclusion, here are a couple of examples of how you can make a bench from wood, not purchased wood, but found in a nearby planting or forest. Benches and benches made of wood with your own hands from auxiliary materials.
In this example, only the seat is made of boards, everything else is made of natural material, which had to be selected according to thickness and adjusted to size.

To make the seat of such a bench, you need professional tool, so you will have to either order longitudinal sawing of the log, or (which is easier) take an unedged board as a blank.

Information to note : , .
An important item for a country house and just garden plot is a DIY garden bench with a backrest, drawings of which can be found online. Although it can be made according to any suitable schemes, including those made independently. Benches can be made from various elements and parts, including scrap materials, and are much cheaper compared to ready-made and purchased options. And at the same time they look much more original and attractive.
There are quite a few various schemes and do-it-yourself drawings of benches with backrests, each of which fits its own. Based on the installation method, they are divided into three groups:
- Stationary models, installed on permanent place and having a foundation;
- Folding options, which can be folded and moved. Most often these are ready-made purchased options, although they can be made manually;
- , best suited for children.

Considering various materials For such benches, wood and metal are most often preferred. Sometimes a stone is chosen for this - although it can only be used if there is appropriate design of the territory of the dacha. And, if desired, the material can even be wooden stumps, logs, pallets or. You should choose a specific option depending on your tastes, availability of suitable parts for manufacturing and creative abilities.
Benches for summer cottages made of metal and wood
Having decided to make a bench for your dacha with your own hands, first of all they pay attention to options with metal frame. Their feature is increased strength, durability and the ability to use in any conditions. Although for ease of use the bench should be used:
- anti-corrosion coatings to protect metal from;
- additional parts for the seat and backrest made of other materials (most often wood or plastic).
When making a bench entirely from metal - for example, from forged elements or metal mesh it will weigh a lot more. In addition, it will be inconvenient to use in both hot and cold weather. Therefore, a combined design using wooden elements can be the best option. Firstly, because wood looks better than other materials (especially if you use larch or oak). And, after treatment with paint or a special varnish, it can last much longer without being exposed to fungus, mold and sunlight.

Another reason to choose wood for decorating a garden bench is the ability to harmoniously fit this material into the structure, in contrast to the use of stones and plastic.
metal benches
Photos of do-it-yourself stone benches Do-it-yourself stone garden bench with a back, the drawings of which may turn out to be even simpler compared to wooden and. metal structures In addition, stone is the most cost-effective material.
- Most often, you don’t need to buy it at all - suitable elements can be found on the territory of your own dacha. Among other advantages of stones it is worth noting: long service life – stone benches
- can last for decades;
- the reliability of the resulting structure, which is almost impossible to damage. But neither precipitation nor temperature changes can affect the stone;
the ability to fit perfectly into some types of landscape, becoming an excellent addition to other stone elements.

If there are no fountains in the area being decorated with such benches, it is not advisable to install them. Although they can be supplemented by other buildings, the construction of which used similar materials. Benches look advantageous in an ensemble with and, the foundation of which is made with stones, or together with. And one of their few drawbacks is the problem with the manufacture of the back, which is most often missing.
Photos of DIY garden benches from scrap materials It is possible not only from ready-made boards, but also from more affordable and already available materials, saving both time and money. It is after choosing this option on summer cottage a product may appear from residues building structures
and even felled trees. Thus, one of the drawings calls for making a bench from stumps that are easy to process and look more natural than processed wood.
- The design of such a product may be as follows:
- a pair of cut tree bases serve as supports for the bench;
- poles are used for the back and bottom crossbar;
the seat is made from part of the trunk. To make such a bench, it is enough to have and certain woodworking skills. If they are not available, the same poles or can be used for the seat. After manufacturing, the bench is varnished and looks even better than the finished version.

Ideas for DIY garden benches and benches
Any wooden bench with a backrest is made with your own hands according to certain drawings. But, if the simplest options provide for a product design consisting only of supports, a seat and a backrest, more complex options may also include the following elements:
- drawers for placing toys and equipment;
- forged parts that serve as decoration;
- wooden ones acting as supports.
If desired, the bench can be made with or without armrests. It can also have several backs, taking on the appearance of a double or triple chair.
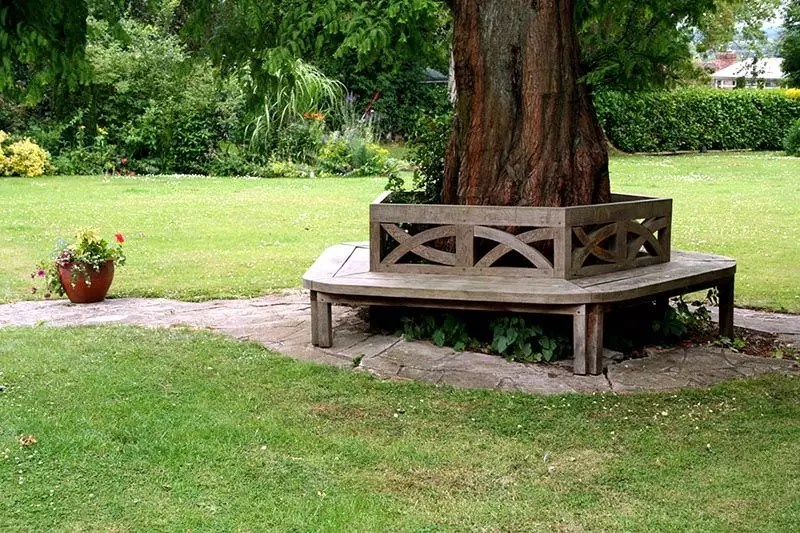
And even get not a standard rectangular, but a curved or polygonal shape - this option is often used for benches and benches in or around a tree.
Bench with storage box It won’t take much time to assemble a garden bench with a backrest with your own hands. While among its advantages can be called the creation extra space
for storing things. Children's toys are often stored inside such a bench, eliminating the need to use special cabinets or drawers for this. And sometimes a bench with a drawer installed in the garden is used to store garden tools.
- Finding a product that fits the size and color of the landscape is not easy. Moreover, such functionality will also increase the cost of the product, which is faster and more profitable to make with your own hands. To do this you should:
- Find the materials that are most often used as wooden boards;
- Make the side parts, the walls of the box and the seat, using self-tapping screws and metal corners as fasteners;
- Coat the outside of the bench with varnish;

For ease of use, place it on the seat of a wooden bench - or cover the surface with fabric. The product is suitable not only for the garden or summer cottage, but also for. And among its advantages are simple manufacturing that does not require special skills and tools. In addition, the drawers in such a bench can be located both under the seat and inside the side supports. A inner part

can be divided in half - with separate seat covers.
garden benches with storage
Making a simple garden bench from wood with your own hands Assemble a simple bench with your own hands from wood with Even a not very experienced carpenter or a person who has never made furniture can take the time and money. The main stages of such work are as follows:
- Preparation of materials - boards, the total width of which should correspond to the size of the bench, and two wooden boxes or concrete pedestals;
- Installation of supports and, if necessary, their fastening;
- Installation of the seat using corners;
- Sanding the surface of the bench using sandpaper.

If you place drawers on the sides of the bench, they can be used as flowerpots. To do this, soil is poured inside and ornamental plants are planted.
The asymmetrical option also looks good - when on one side there is an improvised mini-flower bed built into the bench, and on the other side there is a regular support.
How to make a country bench with your own hands from a log?
- A good solution from the point of view of practicality and production time would be a garden bench made of logs, for the manufacture of which you will need the following materials:
- a tree trunk that will be used for both the seat and legs;
- a second smaller trunk from which the back is made;
- pins and screws with which elements are secured;
circular saw and drill. To make a bench, holes are drilled in each of the parts. They are equipped with pins that fasten the parts of the structure. The product is additionally strengthened with self-tapping screws. And for ease of use and improvement service life polished and varnished. The disadvantage of this option is the need to use special tools , plus – almost complete absence of waste. The remaining wood can be used to heat the cottage or cook food.

wood stove
(the best option for a summer house), and even make other garden furniture out of them.
An ethno-style bench looks good in an ensemble with a wicker fence. Especially if you make the back of this garden furniture using weaving. This will require some skill in arranging the branches (there should be gaps between them, unlike making baskets), but the result will exceed all expectations.

Details of garden furniture with carvings are suitable for a landscape made in the Moroccan style, which is characterized by natural materials and rounded shapes. Bamboo elements go well with Chinese style plot. And low double benches - with the Japanese style of the garden and home.
DIY drawings of benches for a summer residence: photos and features
In order to make a garden bench with a backrest with your own hands, drawings are required. Even the most simple designs, consisting of a back, legs and a seat, require measurements and marking the location of the holes - such preparation will allow you to get a smooth and attractive-looking product.
If the design of the bench is more complex, you will need to spend some time making the drawing, taking into account all the details and dimensions - from the height of the supports to the width of the armrests.
Do-it-yourself double garden bench with backrest drawings
- The classic drawing of a wooden bench with a back to accommodate 1–2 people consists of the following elements:
- design drawing;
- brief assembly diagram;
- sizes of beams for support and boards for back and seat;

schemes for fastening legs, which can be installed on a permanent foundation or may not involve fastening to the base at all. The drawing is easy to draw, thanks to the presence of only straight lines on it. In addition, there is no need to take into account foundation loads, unlike heavier structures. And, if desired, dozens already ready-made options
Double products are easily found online. For making the most simple benches

with a do-it-yourself wooden back, you will need boards 120–140 cm long and at least 30 mm thick. This size is enough to accommodate two people. You will also need 2 posts for the backrest, at least 40 cm long, and two more for the supports on which the boards will be laid. The diameter of the supporting elements can be any, but the optimal option would be approximately 65–75 cm. In addition, you will need boards for the back, the length of which corresponds to the parameters of the log for the seat (electric or chainsaw), a drill and 12 screws 10–15 cm long. When handling the saw, you must follow safety rules. And, if you don’t have the skills to work with such a tool, you should either seek help from more to an experienced master, or choose another design option.
Do-it-yourself bench for a summer cottage made of wood
If we consider the process of making garden benches in more detail (which may be necessary for a person who has never performed such work), the main stages can be summarized in a table. With the help of a tabular form, even the owner of a summer cottage, who has nothing to do with woodworking and furniture assembly, will be able to assemble a decent-looking and durable structure.
Table 1. Instructions for assembling a simple wooden bench
| Stage number | Description of the technological process | Tools |
| 1. | Adjusting the boards to the size of the bench or purchasing ready-made elements with the same parameters. | Saw or jigsaw |
| 2. | Processing of wood and ends, which are given a rounded shape | Sandpaper, file |
| 3. | Selecting the angle of inclination of the rear supports. To do this, take boards 0.7–0.9 m long and place a mark approximately in the middle. A part of the board is cut off on one side at an angle of 20 degrees. | Saw |
| 4. | Connection of front and rear supports, the distance between which should be 270–300 mm. | Self-tapping screws, screwdriver |
| 5. | Connecting boards for backrests and seats with supports. The gap should be 15–20 mm. And the distance between the edges of the back and seat is about 20 cm. | |
| 6. | Coating the surface of the bench with varnish. | Brush, varnish |

DIY garden bench from scrap materials
A budget option for garden furniture can be a DIY bench, a photo of which can be easily found on the Internet. So-called Euro pallets, which differ from ordinary ones by the EUR marking, are suitable for its production. The width of these elements is larger than the standard one for a bench, so it is advisable to make the pallets a little smaller in size, shortening them, for example, to 60 cm.
With the onset of the summer season, hardworking summer residents rush to the garden. Over the cold months, so much work has accumulated that, perhaps, it is impossible to find such a corner in the country house or in the garden where the maximum investment of the gardener’s strength and energy is not required. Weed here, dig there, water here... Of course, with such an intense load, sometimes you want to sit down for a while and rest. And a garden bench is the simplest solution.
Garden bench - design object of the garden
In addition to their direct purpose, garden benches today can safely be called a real design object and the main attribute of a good rest in the country or in the garden.
IN last years The focus of spending time at the dacha has noticeably changed. If previously the vast majority of gardeners worked hard on their 6 acres to feed themselves and their families, now everyone more people They prefer to go to the dacha precisely in order to relax. That is why the role of the design component has increased country holiday. The influence of comfort and aesthetic pleasure from admiring the landscape has expanded. And garden benches, as one of the types of small architectural forms, do an excellent job as a decorative artist.
It must be said that attention began to be paid to the importance of designing benches back in the Renaissance. Already in those days, the best palace architects gave the most simple and familiar shops exquisite forms. And garden benches gradually ceased to be just an object for respite, but turned into a full-fledged design object, which is part of a large, beautiful garden.
In order for the recreation area or dining area to emphasize the unique image of your garden, it is important to arrange garden benches correctly, taking into account the surrounding landscape, topography and general style plot.
Garden Bench Styles
The style of garden benches directly depends on the style of the house. As a rule, benches appear in a garden where there is already a main building. This means that the style direction is already present.
- For a classic garden, benches made of wood with carvings, forged metal and stone benches with stucco elements are suitable.
- For a country-style garden, benches made of brutal wood with deliberately rough shapes are suitable.
- A Japanese or Chinese garden will be decorated with bamboo garden benches.
- English garden style is emphasized combined benches– metal base and wooden seat.
- Metal benches with beautiful, complex curves will look good in a French garden.
- In a natural style garden, benches made of stumps and rough boards would be appropriate.
- Unusual benches in the shape of a cat or horse (made of wood or forging) will decorate the garden in a vintage style.
Garden benches are an excellent tool for zoning an area in landscape design. With their help, you can mark the boundaries of a recreation area or garden room, the beginning or end of a green corridor, etc. The garden may include a terrace, dining area, reception area, swimming pool, playground, etc. functional areas. In order for each of them not only to be comfortable, but also to stand out visually, parts of the garden are usually zoned. And garden benches, as one of the types of small architectural forms, cope with this task perfectly.

According to their functional purpose, benches can be divided into:
They are usually placed at the entrance to the house. Therefore, the design and material of the front bench should match the exterior of the main house. For example, if there are forged elements near the entrance group (for example, a canopy over the entrance, window bars or a flower stand), then a forged bench will look more harmonious. It is wiser to choose the style of all forged products in advance. Strictly following the canons garden design, in all forged garden products (from the fence to the trellises) a single pattern should be traced. Therefore, everything is thought out at the design stage.

Dining garden benches. As a rule, such benches are included in a single lunch group, which means they must match the design and material of the table. Such benches are placed in the barbecue area, in gazebos, on terraces or in those places where the family likes to dine. This area can look formal and serve as a kind of platform for receiving guests. Or maybe it’s simple and cozy at home. It is in such corners that quiet family gatherings and tea parties take place.


Garden benches for relaxation. These benches are located in places where it is pleasant to retire and relax. This could be a secluded corner in the garden or an area in front of a pond. But the specific location of the bench in a given area has its own nuances. At correct placement viewing angle reveals the most attractive and beautiful view plot. In addition, the bench or bench itself becomes a decoration of the garden and an integral part of the landscape.
I must say that benches for rest include another subgroup that is worth highlighting separately. These are the so-called relaxation benches. They are intended for the most secluded corners, away from any irritants and observers. You can even lie down on such a bench-bench if you wish. Soft pillows with your favorite tune, auto-training or croaking frogs will help you relax as much as possible during the summer heat.


Such small benches are located next to a vegetable garden, flower bed or flower beds. The name speaks for itself. You can use them to relax a little while working in the country. To the design of “garden” benches special requirements not presented. They can be of the simplest form, without decorative frills.

In addition, garden benches come stationary And mobile. The type, material and design of stationary benches are selected more carefully, since they are located in the garden for a long period, and form (including) the final image of the garden.
Main advantage folding benches is their mobility. Folding benches are indispensable for small gardens. They unfold quickly and easily and weigh little. The design of these benches is very durable. And although folding benches may not be compatible with the design of a garden plot, one cannot help but admit the fact of their convenience.

As for the external design, benches can be with or without a back, with or without armrests, as well as with drawers in which it is convenient to store some necessary things.
A bench is considered comfortable if:
- Seat width – 50-55 cm
- Seat height from the ground – 40-50 cm
- Back height - 40-50 cm
- Back tilt - 15-45 degrees
- The height of the armrests from the seat is 15-20 cm
Material for garden benches
Garden benches are traditionally made of wood, stone, metal, wicker and plastic. The choice of material depends on both personal preferences and the exterior of the garden. IN Lately in the manufacture of garden furniture, materials are combined (for example, wood in combination with artistic forging), which makes it possible to most accurately capture the stylistic direction.
Correctly selected furniture always becomes a real decoration of the garden. Otherwise (for example, a super modern plastic garden bench) will look out of place next to a farmhouse style home.
Wood– the most popular material for making benches. At all times, the tree looked both beautiful and modern. Harmlessness and durability are the main criteria for choosing this material.
The most durable type of wood is teak. It was this material that was used in the construction of ships. Therefore, for open spaces with constant exposure external factors It is better to buy teak garden benches. With proper care, they will serve you for many years. Alternative options– oak, pine, larch, hazel.


Even deliberate roughness looks original and stylish.

Metal. The popularity of metal garden benches is understandable. Metal products are practical, durable and, with proper care, resistant to precipitation. This group includes elegant forged benches, light aluminum and heavy cast iron. Each of these types has a number of advantages and is suitable for its own tasks.
Aluminum, contrary to popular opinion, very durable material. He doesn't require special care and is not subject to corrosion. Aluminum garden benches retain their original appearance for a very long time appearance, and thanks varied design suitable for different zones recreation.


Cast iron garden benches. To this day, some parks still have ancient cast iron benches made more than a hundred years ago. This is a very durable, heavy and quite expensive material. Modern cast iron benches are available with various tinting and anti-corrosion impregnations, which can significantly increase their service life. Such benches - perfect option for parks, squares and large gardens.


This refers to products made from steel using the artistic forging. In fact, only a specialist can tell the difference between cast iron and forging. Without going into details chemical composition, we can say that wrought-iron garden benches are always delicate, elegant lines that give any summer cottage a sophisticated look. In combination with other elements of the exterior, a wrought-iron bench can literally transform a garden. It must be said that forged products can be made in any style.


Stone benches. Stone benches look impressive and monumental. Stone benches look most advantageous in a spacious garden. Despite the fact that they are not very comfortable and are not intended for long-term rest, stone garden benches are still quite popular. They give the garden a special flavor and hint at the respectability of the owners. The problem of discomfort can be easily solved by placing soft cushions on the bench. In some cases, stone benches are even cheaper than wooden ones.


Plastic. The advent of plastic furniture created a real revolution just a few decades ago. The owners especially loved it country houses. The advantages are obvious - plastic furniture cheap and practical. It can be left outside, it comes in a variety of colors and shapes. In addition, plastic furniture is lightweight, which allows you to move it in different areas garden If the exterior of your home is made in modern style, plastic garden benches and chairs will look quite harmonious.

Wicker benches graceful, sweet, airy, light, but short-lived. They will not last long even if they stand under a canopy. This primarily applies to products made from willow vine. Benches coated with a special varnish will last longer. And yet, such garden furniture has many fans. A corner with a wicker bench immediately resembles a French garden or a view of the sea coast.

In recent years, garden rattan benches. This material is much stronger than willow. This means that such furniture lasts much longer. Unfortunately, rattan does not grow in our latitudes, and export from hot countries is expensive. Furniture manufacturers offer products made from artificial rattan. It is stronger and lasts longer, since it is not afraid of either the scorching sun or rain.


Also, recently it has been gaining popularity Hularo furniture– synthetic rattan. This material, based on rubber and other artificial additives, is in no way inferior in external characteristics natural. And in some respects it even surpasses natural rattan. Wicker benches made from hularo do not fade and are not afraid of large temperature changes. Such furniture is pleasant to the touch and very easy to care for - it can be washed directly with a hose. In addition, manufacturers offer different colors, textures and weaving patterns. It is not surprising that wicker benches made from hularo are becoming more and more popular every year.


An arch with a bench is an excellent solution for a summer house
This is an almost ready-made place to relax. Now on sale there are models of arches or trellises made of metal, wood or plastic. A forged arch with a bench has always been an attribute of grace and aristocracy. On such a bench you can not only retire surrounded by climbing plants, but also to arrange a romantic date. Climbing grapes, clematis, campsis and climbing roses are well suited for decorating such an arch.

DIY bench: drawings with dimensions, photos. How to make a bench with a wooden backrest with your own hands.
A light garden bench will come in handy for relaxing in your country house; on the bench you can sit in the garden and relax in the shade of the trees. Wooden benches They will harmoniously decorate your relaxation corner in your summer cottage, and if the bench is also made by yourself, it will become a source of pride for the owner.
Materials for making a bench:
- Boards with a section of 20 x 100 mm or similar size.
- Screws.
- Varnish or paint.
Tools:
- Hacksaw.
- Plane.
- Tape measure, square, pencil.
- A screwdriver or a shaped screwdriver.
- Drill with a drill with a diameter of 2 mm (the diameter of the drill should be less than the diameter of the screws).
Bench assembly diagram.

- - legs.
- - frame.
- - back supports.
- - seat slats.
- - backrest strips.
How to make a bench with a back.
The pictures provide detailed drawings with dimensions for making a garden bench.
Let's start making a garden bench, and start with making the legs for the bench.

Mark the cut lines on the board and use a hacksaw to cut off the leg blanks. Smooth the ends of the legs sandpaper.
Assembling the sides of the bench.

We attach the upper support to the front and rear legs. Align the legs with the support, drill holes and secure them with screws. Let's make two sidewalls.
Assembling the bench seat frame.

We saw off the blanks for the seat frame. We combine the frame blanks, drill holes and screw in screws.
Assembling the frame and sides.
Now you need to connect the sides of the bench and the seat frame.

The back of the bench.
We saw off 3 supports for the back.

We install and secure the seat back supports as shown in the figure.

Install the slats to the seat frame, making sure you place them at equal distances, drill holes and secure the slats with screws.

Now secure the slats to the backrest supports.

Attaching armrests.

Place the armrests on the sides of the bench, drill holes in the armrests and secure them with screws.
The screw heads can be hidden by covering them with wood putty and then allowing the putty to dry for several hours. Sand the hardened putty and then apply several coats of paint or varnish to the bench to improve the appearance of the bench.

How to make a bench photo.


")


