A simple DIY piggy bank. How to make a large piggy bank for money with your own hands from a box?! How to make a piggy bank from cardboard
Things self made, of course, beautiful and unique. But I want such a product to also be useful. Good example- money box. It will not only decorate your interior, but also serve its intended purpose. This item is also a wonderful gift for a wedding or birthday. From this article you will learn how to make a gift with your own hands.
What can you make a piggy bank from?
To make an original item, the simplest things are suitable:
Excellent materials for creating a gift would be cardboard, leftover wallpaper, colored and wrapping paper. For decoration, let's take: newspapers and magazine clippings, pieces of lace and ribbons, coins and key rings.
How to make a piggy bank correctly?
To ensure that your work brings only pleasure, and its results do not disappoint, we strictly adhere to the following steps:
DIY piggy bank: several options
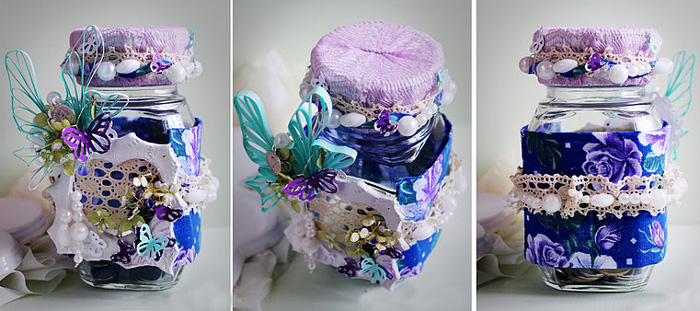
DIY piggy bank from a glass jar.
A homemade piggy bank made of paper and cardboard.
- Select the appropriate cardboard box, perfect for wearing under shoes. If there is no suitable box, you can make it yourself. Drawings are easy to find on the Internet.
- If you paint or paste over an object with paper, prime the surface with a solution of PVA glue and wait until it dries completely.
- We cut out the hole using a stationery knife and trim the edges. We decorate the box with old newspapers, printed banknotes, scraps beautiful wallpaper or fabrics. A piggy bank covered with velvet or leather looks very stylish and rich. When making this option, it is better to use special glue.
A piggy bank made from an old soft toy.
- This one is simple and original model will be a wonderful gift for a teenager. It will remind you of childhood and help you save money for something your child needs.
- Remove the stuffing from the soft toy. We leave it in the head and paws of the animal.
- We select the basis. This can be a tin or plastic jar with a lid.
- We make a hole in the lid. Place the base inside the toy.
- We fill the voids with filler.
- We sew it up carefully.
- Leave a hole in the toy, matching it with the hole in the lid of the jar. We glue the edges of the material or fur from which the toy is made.
Wedding present
There are many options for DIY piggy banks. Those given as wedding gifts deserve special attention. A DIY wedding piggy bank can be made using any technique.
Her main qualities are that she should be elegant and look expensive. For decoration, use natural lace, decorative fabric flowers, and pearl-shaped beads.
Often, in order to fulfill your desire, you need to save up a certain amount of money. To successfully complete this task, you should use a piggy bank! Piggy banks can be one of the most various materials, suitable for both metal coins and paper bills. Making a piggy bank at home is very simple and quick.
Piggy bank from a jar
A piggy bank made from a jar will be a fairly durable product and is perfect for storage. large quantity coins This assistant for storing money will do a good job with the considerable weight of your fortune.
To implement your idea, you will need glass, plastic or tin jar with lid. And also everything you can decorate the product.
These could be stickers, markers, colored paper, multi-colored laces and many other interesting unusual things. The tools you will need are a knife or scissors, as well as a glue gun.
The easiest way to make a piggy bank is to take tin can. It could be coffee jar with plastic cover.
- The first step is to wash the jar of coffee residues and use scissors or a knife to make a hole in the center of the plastic lid. The hole should be of such a size that coins and bills fit freely inside the jar.
- The next step is to decorate the body of the piggy bank. Multi-colored shoe laces may be suitable for this purpose. Before you start decorating, you need to put the lid on the jar to avoid problems with closing and opening the piggy bank.
- To make the piggy bank striped, you should alternate the laces different color. Using a hot glue gun, glue each lace to the can, wrapping it around it.
Glass jar
- If you use glass jar, then you also need to make a hole in the lid.
- Then you can take a sheet corrugated paper and wrap it around the prepared jar. You can cut sheets of different colors and glue them together. Thus, the piggy bank will be multi-colored. Having placed the sheet on the table, the jar must be placed in the middle of the sheet and carefully wrapped in it.
- Wrap the string over the leaf near the neck of the jar, tying a bow, or glue the string using a hot glue gun. Cut off the excess paper so that the lid is visible. The jar - the piggy bank is ready!
Piggy bank - pig
To make a funny piggy bank you will need:
- plastic bottle;
- scissors;
- scotch;
- pink paint (aerosol) or self-adhesive film;
- cardboard for making pig ears.
- Taking a plastic bottle, you need to cut off the front and back parts from it.
- Now these parts should be connected to each other by inserting one into the other. You can secure them together with tape or immediately wrap them with self-adhesive film.
- If there is no film available, then you need to paint the resulting part with pink paint and wait until the product dries.
- Using scissors or a knife, cut a hole on top for bills and coins.
- To turn a bottle into a pig, you need to glue four bottle caps to the base instead of legs. If there are no lids, then they will do matchboxes, or paper crumpled into a ball. Glue the ears cut out of cardboard on top, draw a tail and two eyes.
Your piggy bank is ready!
Shoe box
One of the most common items in the house is the shoebox.
She can too get a second life and help save up for your next pair of shoes.
By taking an old shoe box and a piece of interesting fabric, you can make an original piggy bank. Fabric can be used jeans.
- After measuring the box, you need to cut the fabric according the right sizes and use it again glue gun. If you have a stapler, it will do a great job of covering the box with fabric. On top of the lid you can glue a pocket from used jeans, which will serve as a good addition for storing banknotes.
- Decorate the lined piggy bank with buttons different sizes and colors, large pins or badges can be attached.
- Glue plastic bottle caps to the bottom of the box, so the piggy bank has legs. The product is ready!
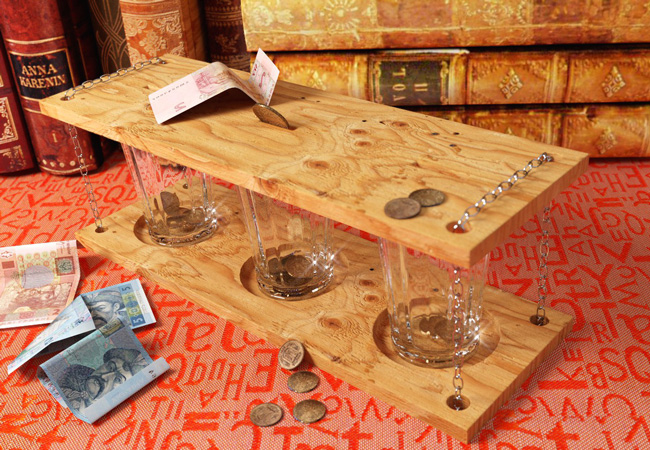
Piggy bank chest of drawers
If you want to store your accumulated banknotes and coins separately, sorting them by denomination, then good decision will be used to create a piggy bank matchboxes.
You will need a glue gun, self-adhesive film different colors and plastic decorative beads. You can use buttons to create such a chest of drawers.
- Let's take 10 boxes. Having separated them, you need to glue 5 pieces together, stacking them on top of each other. We get 2 parts. Then glue the sides to each other.
- If everything is done correctly, then you will see a product resembling a doll chest of drawers, consisting of ten drawers, five rows of two drawers.
- Now you need to cut a strip measuring 28x5 cm from self-adhesive film and wrap the boxes with it.
- All that remains is to stick it on drawers decorative beads that will act as handles. The boxes themselves can be decorated as desired. A chest of drawers can be decorated with buttons, and you can also make dresser legs out of buttons by gluing them to the bottom of the product.
The piggy bank is ready, you can sort the coins and bills into the boxes!
At home, you can make a piggy bank with your own hands. It can be perceived not only as a children's toy, but also as a temporary means of storage.
If you make a decoration, it will turn out interesting decorative element, which will complement the interior.
Needlewomen can use various materials at hand, use their imagination, invite a child and spend time together.
To put your house or apartment in order, to collect scattered small things, you can make a piggy bank from cardboard or paper.
It is easy to make, you don't need to spend a lot of time.
- Cardboard.
- Laces for decoration.
- Scissors (large and small).
- Pencil.
- Ruler.
- Nails.
- Stationery knife.
- Rubber.
The piggy bank is created in several stages. The main condition is to follow simple instructions:
| Stages | How to do |
| Stage 1 | First you need to make a blank from paper or cardboard. You need to draw the material into 4 squares horizontally and 3 squares vertically. Optimal size for a small piggy bank – 7x7 cm |
| Stage 2 | The workpiece must be folded into a square. Take a large nail and make holes where the lace will be inserted. If the piggy bank is made of paper, at the stage of creating the blank, you need to leave 1 cm along the side edges. In the process of forming the piggy bank, they are folded and glued with office glue. |
| Stage 3 | Using a stationery knife, make a rectangular hole where you can put small coins. For large items you can cut a large hole |
| Stage 4 | The workpiece is fastened with laces |
Important! To prevent the lid from opening, it is necessary to secure an elastic band.
To do this, it is tied inside the piggy bank to a cord. Next, it is threaded through the hole in the lid and a strong knot is tied.
Piggy bank from a jar or box
To create a piggy bank, take an ordinary glass jar. It can be of different sizes. Be sure to screw the lid on top.
There will be a slot for coins on it. The main condition is beautiful and original decoration. The square piggy bank looks beautiful.
Step-by-step instruction:
- Two strips are made from cardboard. One piece should match the width of the can. The second blank is equal to - 1 height, the diagonal of the can and one more height.
- The strips are attached to each other in the place where the bottom will be. For secure fastening, use a stapler. This creates a part for the frame.
- Next, another blank is formed. Place the first piece on the bottom of the cardboard and trace it.
Additionally, leave 1 cm for allowances on each side. The second blank is cut out with a stationery knife.
- In the central part there is a circle that corresponds to the diameter of the lid. The workpiece is cut out.
- Next, put the resulting blanks on the jar. The container is placed in central part first piece, the edges are raised, another piece is put on the second part. They are attached to each other with a stapler.
- To provide additional strength, the entire structure is wrapped with tape.
- Take paper towels and cut thin strips. PVA glue is diluted with water in a 1:1 ratio.
The strips are thoroughly impregnated with glue and laid on the base in waves. The jar is decorated on each side using this principle. It is recommended to make several layers.
Before applying the first layer, the glue must dry thoroughly. Each layer is carefully painted acrylic paint. You can choose the color or shade at your discretion.
Note! The first layer can be made darker so that there are no gaps.
The rest can be done in light shades. Next, take strong glue, which dries quickly, coat the neck and the places where the surface of the workpiece ends with it.
Packing rope, burlap or woolen thread are laid in a circle. The same glue can be used to decorate the lid using rope.
On the sides you can decorate the piggy bank with buttons, rhinestones, bows and other materials.
You can make a piggy bank from a shoe box. To do this, you can make a hole of any size on top. You can come up with decor and design at your own discretion and decorate it as you wish.
Ideas on what else you can use to make a piggy bank for coins and banknotes
Piggy bank for coins and paper money can be made from plastic bottle. You can take containers of different sizes.
Before starting work you need to prepare following materials and tools:
- Plastic bottle.
- Water.
- Knife or scissors.
- Glue and brush for application.
- Medium size black buttons.
- Marker, tape.
- Paper towels.
- Pink cardboard paper.
- Bottle caps or wine stoppers.
To make a piggy bank with your own hands, you need to cut off the top of the bottle. These materials make beautiful and useful craft in the form of a pig.
Children will definitely like it. The top of the bottle serves as the head. Bottom part- this is the torso.
After forming the blanks, you need to mix paint and water, PVA glue. The edges of the head and body are carefully processed and leveled. They are connected to each other using tape.
Using a stationery knife, make a hole in the upper part, next to the head, for coins or paper bills.
The piggy bank is carefully covered with the resulting solution of glue and paint. Place napkins on top in several layers, be sure to coat the layers with glue.
Note! Each layer must dry thoroughly before applying a new one.
When the surface of the pig is even and smooth, you can screw the lid onto the neck of the head. It serves as a patch.
Cut out a tail and ears from pink cardboard, and attach the parts with quick-drying glue. Eyes are made from buttons.
The remaining covers are used to form legs. Thanks to these simple instructions, you get a beautiful home piggy bank.
Using this technology you can make a dog or other animal. There are other ideas on what you can use to make such a useful craft.
It can be plaster, wood, salt dough. Any available means will do.
Useful video
If we take a small DIY piggy bank not only as a children's toy, not only as some kind of temporary means of saving, but as a reason to make an interesting decorative element for the interior, then the task changes a little. Now it is not enough to cut a hole in the box for coins and bills, you also need to decorate this box with dignity, no worse than. It's about interesting ideas We will discuss the organization of a home bank below.
How to make a piggy bank with your own hands
Ceramic pigs once became a real symbol of accumulating coins for many generations of children. Breaking a heavy pig, in which the money accumulated during saving no longer fits inside, and then having fun spending the acquired capital is real entertainment. But if you don’t want to buy expensive ceramic crafts, and it’s interesting to try to find out, how to make a piggy bank with your own hands using available materials, you can use non-standard approaches. Our first exhibit is a beautiful cookie box that, with a few manipulations, turns into a reliable safe.
To work, you will need several tools that you can temporarily borrow from your dad (or involve him in the work as well, because this is no less exciting than making) under conditions of careful handling. A tin box with a bright pattern that was left empty after eating sweets or cookies is ideal. The first step is to make a hole in the lid, into which it will be convenient to insert bills and coins, but through which you will not be able to pull anything back out. Special scissors will help you cut metal, just be sure to process the edges of the cuts so that they do not remain sharp and do not hurt your fingers if the child wants to insert the rolled up bill deeply. A small padlock might just be decorative decoration, it’s better to put your own wax seal on it (this is also a very fun activity that children will enjoy) and then you won’t be able to open the lock unnoticed, you’ll have to wait until it’s full.

The next box is made according to the same principle, but it can now not only be the property of the child, but also serve as an accumulation of small items for the whole family. It can even be placed in a prominent place in the room, thanks to the elegant decor that makes it similar to. The basis is DIY piggy banks at home There will be a small cardboard box that is completely covered with burlap. If you want to decorate wooden box, then you can use a furniture staple gun from the wrong side, and for cardboard, the technique of stretching and gluing with hot glue is perfect, as if you were wrapping a gift. Additional decorations in the form of figured legs, forged corners, and a copper flower on the lid look antique because they are processed special compounds, which are designed to add years to such crafts. You can simply put bills in such a box, opening the lid on it, or make a hole (preferably in the bottom or side) to make a piggy bank in the traditional sense of the word.
DIY money box
Quite a lot of master classes can be found for crafts such as DIY money box made from an empty plastic bottle. This material is extremely accessible, it is easy to work with, cut, glue, paint, so the examples that we will show you below are only a small fraction of all the ideas that you can come up with.

If bottles can become the main material for a full-fledged one, then it’s not possible to make them big piggy bank- it's as easy as shelling pears. The chosen shape for the product is a traditional one - a pig, inside of which coins ring and ring back. Since it is difficult to find a bottle that perfectly follows the shape of a pig’s body, it is worth connecting two containers and securing the junction with tape, electrical tape or other similar fasteners. After painting, the cap from a large bottle turns into a snout, which is glued on top of the bottle’s own neck, and small caps become four legs for the pig, you just need to place them symmetrically relative to each other so that the craft is stable. All that remains is to insert ears made of cardboard or cardboard, decorated with fabric on top, into the slots and draw black circles for the eyes.

To finally reveal the topic of pigs, we can also look at the next master class on the formation DIY piggy banks. Video In principle, you don’t need to with the work, because step-by-step photographs quite fully reveal the work process. This craft is good because we can take plastic bottles of any shade for it, because anyway it will be completely covered with an even layer of paint using aerosol can. You can even make it using the same technique, but our task is an elegant and simple piggy bank. Another advantage is that you will never know how much money has already accumulated inside, which means that the process of opening it will be full of pleasant surprises.

And one more option that will be useful as an idea for a piggy bank is to give it content rather than a form. In this case, the photo shows an example of a sorter for small items on a child’s desktop, but a piggy bank can be created using exactly the same principle. To do this, the plastic bottle is cut in half or to the height that you need, and a drawstring cover is sewn on top for it, which can be released and tightened back so that you can either take out the money or put it away. In addition, you can place items inside that will remind you of the goal for which you are saving funds. For example, images of a phone, the sea, or brand new skis.
DIY piggy bank from a jar
The easiest way to quickly make a container for collecting money is generally accepted: DIY piggy bank from a jar. Such piggy banks are widely used in cafes for collecting tips, and in the interior modern apartment they will also look very organic. If you want the simplest option, then simply make a hole in the tin lid, and on the sticker that is used to mark home preserves, write “for vacation,” “for a dress,” “for a tablet.” But for those who have done this, this method, of course, will seem boring and not creative enough. Therefore, we propose to decorate banks with capital.

Here is a simple method that is one step higher in complexity than the previous one. In addition to the sticker, you need to stick something around the can. The most beautiful and smooth sticker can be printed for you at a printing house, but you want to completely make the jar yourself. Therefore, we find a suitable picture, the length of which is the circumference of the bottom of the jar, place it inside and fix it with transparent glue. You can stick a picture on the outside using the decoupage technique, but then you will need to buy either special paper with the desired pattern, or look for a suitable napkin. In the end, if you want the craft to not be afraid of moisture, you can completely cover it with the transparent furniture varnish that you used for.

The next method is to completely cover the glass surface of the jar with an eye-proof layer of paint. You can see an example of such DIY piggy banks made from jars above. A huge advantage of this type of decoration is that you are practically unlimited in choosing a design; you can make not only superhero decor, but also draw your favorite cartoon characters or the logo of your favorite TV series.

The most grandmotherly way to decorate a jar would be to make a knitted cover for it with hieroglyphs applied to the canvas, which, according to Feng Shui, are sure to bring prosperity to your home. It turns out not only a useful thing in the household, but also a small amulet for attracting money.
DIY paper piggy bank
Another simple one affordable way – DIY paper piggy bank. Despite its apparent simplicity, paper can provide various ways form a craft. Let's start with something simple - by designing a box in the shape of... a pig, of course.

You can choose the most ordinary cardboard, packaging, without trying to decorate or decorate it particularly. On the contrary, just like that appearance crafts will best suit everyone fashion trends. On the surface, draw a sketch on each side with a pencil, and then trace along the contour with a thin black marker, gluing a circle of cork to the front part, which will serve as the pig’s snout.

Such a cute kitty too DIY paper piggy bank, only it was made using the ancient papier-mâché technique. This is the gluing of many layers of thin paper soaked in glue, which are applied to a frame or hollow form. As a result, after gluing and painting, you will get a decorative and durable figurine, in which it will be easy to make an incoming hole and even a hole covered with a stopper to remove money, because you probably won’t want to break such a masterpiece made with your own hands.
DIY piggy bank photo
Wood can become not only a material or kitchen utensils. Next DIY piggy bank, photo which is located below, proves that wooden crafts can become ideal decorations for the home, especially when Provence or country style dominates the decor.

You can choose any configuration for the box, but we suggest using the traditional shape of a birdhouse as a basis, so that the finished piggy bank looks like an elegant gingerbread house. You can paint on the surface of wood or plywood with either special paints or colored acrylic paints, which every lover of homemade decor has.

Often piggy banks are an indispensable attribute of a wedding celebration, where guests put money for the newlyweds. You need to decorate such a craft very elegantly, for example, make it in the form of a real multi-tiered wedding cake. To do this, cardboard blanks are wrapped in thin silk fabric, and the ends are decorated with lace braid.

")


