What glue to use to finish polyurethane foam figures. Interesting ideas for crafts made from foam. Ideas for crafts made from polyurethane foam
DIY garden figures from polyurethane foam Quite easy to make, you will need a minimum of available materials. Armed with a can of polyurethane foam, you can make almost any figure that will become a real decoration for your garden.
Using a plastic bottle and polyurethane foam, you can make your own original garden figure.
How to make a stork from polyurethane foam?
You will need:
- plastic eggplant from under water;
- thick wire;
- Styrofoam;
- stationery tape;
- polyurethane foam;
- wood chip;
- electrodes (for bird legs);
- sharp knife;
- poultry feathers;
- paint and varnish for facade work.

A do-it-yourself stork made from polyurethane foam will become the highlight of your garden. The first step is to build a frame, which will subsequently be covered with polyurethane foam. The basis of the frame is a 5 liter plastic water bottle. The head of the bird is placed on the bottom side, the neck serves as the tail.
The stork's neck is made of thick wire: a small piece of foam is applied to the bottle, pierced with the wire at an angle so that the wire rests against the wall of the bottle. To make a bird's head, take a small piece of round-shaped foam plastic and place it on the end of a wire. The nose is made from a piece of wood or a small piece of wire.
Bird legs are made from electrodes that have failed; you can also use metal fittings. Pieces of foam plastic are placed at the junction of the legs and the body, since the legs of the stork are thick at the top. The stork will be inserted into the ground with electrodes, so the figure does not require additional weighting, but if desired, you can fill the eggplant with sand.
For the wings, flat pieces of polystyrene foam in the shape of a semicircle are suitable - they are attached with wire to the sides of the eggplant. In order to give the frame the necessary strength, it is wrapped with tape. Work begins from the head, gradually moving to the base of the bird’s legs. There is no need to wrap electrodes with tape.

PVA glue is used to prime the figure.
After all the parts are fastened together, they begin to shape it using polyurethane foam. The foam is squeezed out in small zigzags or stripes, but there is no need to try to exactly follow the contours of the bird, since all the excess will then be cut off. Important: the foam is laid in thin layers with mandatory intermediate drying. This building material dries quickly enough, so the next layer can be applied in 15-30 minutes.
After the foam has hardened, they begin to form the sculpture: using sharp knife cut off all excess. All that remains is to paint the stork. In order to reduce paint consumption, it is necessary to apply a primer that forms protective film and will not allow the porous foam to absorb paint. As a primer, you can use PVA glue, diluted with water in a ratio of 1: 2. The neck and body of the bird are painted in White color, the tips of the wings and the tail are black, the nose and legs are covered with red paint. The result is fixed with any facade varnish. At the end of the work, a bunch of real feathers of a goose, duck or rooster is inserted into the hole for the tail (neck of the bottle). The stork figurine is placed in a flowerbed with electrodes (legs) buried in the ground.
How to make a donkey from polyurethane foam?
You will need:

- 10 liter water bottle;
- can;
- wire;
- sharp knife;
- polyurethane foam;
- glue gun or double-sided tape;
- wooden boards (for legs);
- façade putty;
- primer;
- facade paint and varnish.
Polyurethane foam figures can be small or large, it all depends on your imagination and available materials. To make a donkey you will need a 10 liter plastic water bottle. A tin can is perfect for the head, and if you don’t have one on the farm, you can use a cut-off 5-liter jar. The donkey's legs are made of wooden planks, the tail is made of wire or glazing bead. The head and legs are glued using glue gun or double-sided tape, the tail is inserted at a slight angle into the hole made in advance.
In order to make the figure heavier, you need to fill the eggplant with dry sand - it is better to do this after the glue has dried.

When making garden figures, a special gun for polyurethane foam is used.
Layers of polyurethane foam are applied to the prepared frame. It is necessary to let the previous layer dry for 15-20 minutes, only after that the next layer of foam is applied.
Donkey ears are made from wire, which is bent in the shape of a semicircle. Then the wire frame is wrapped with tape or paper, inserted into the donkey’s head, and then foam is applied to the ears. Next, the foam is cut with a knife in such a way as to give the figure the required form.
In order for the sculpture to look believable, it is necessary to apply façade putty on top of the mounting foam, having previously primed the product. The primer improves the adhesion of materials, so you should not ignore this process. Using wet putty, small details are worked out: nostrils are cut out, the eyes of an animal are made. After the putty has dried, pass over the surface sandpaper with fine grain. The donkey figurine is painted with acrylic façade paint and then coated with waterproof varnish.
Foam mushrooms
You will need:

- plastic bottle;
- Styrofoam;
- wire;
- stationery knife;
- primer;
- façade putty;
- acrylic facade paint and varnish.
Even a child can make mushrooms from polyurethane foam; for this you do not need to have the talent of a sculptor or artist. To make a mushroom stem you will need a plastic bottle. To give the figurine stability, the bottle is filled with pebbles or dry sand. Foam is applied to the bottle so that at the bottom there is a thickening characteristic of a mushroom. The foam is distributed in thin layers with intermediate drying.
To make a mushroom cap, take foam plastic and cut a circle out of it, but you don’t need to try to repeat the exact shape, since in nature there are no mushrooms with perfectly round caps. Foam is applied to the foam in such a way that a cone is gradually formed. A strong wire is inserted into the stem of the mushroom, a cap is placed on it, and the junction of the parts can be coated with glue. Next, apply the last layer of foam, allow it to harden, and then cut off all excess.
Polyurethane foam is a porous material that easily absorbs moisture, so the product must be primed. If this is not done, then the moisture from the putty will turn into foam, which will make finishing material drier, and this can subsequently lead to cracking of the surface. If the farm does not have a primer, it can be replaced with gelatin. Gelatin is soaked in cold water(15 g per 100 ml), allow it to swell, and then melt it in a water bath. Melted gelatin is diluted warm water. The figure is treated with this solution 2-3 times with intermediate drying.
Next, facade putty is applied to the mushroom (can be replaced with plaster) and left until completely dry. The surface is first sanded with medium-grain sandpaper, then fine-grained paper is used. The product is primed again - if this is not done, the paint consumption will double. The mushroom cap is painted in Brown color, for the legs use white with the addition of ocher. The work is coated with façade or yacht varnish in 2-3 layers.
Garden figures made from polyurethane foam will add an atmosphere of comfort and make the estate individual and unique. Anyone can make a mushroom, a stork or a donkey, if you show a little imagination and acquire the necessary materials.
Without attaching special effort and material costs, foam crafts will become excellent decor and decoration for any summer cottage. It is no secret that for many, a dacha is a place where people come to relax from the city noise, rhythm and bustle. Therefore, it is very important that the dacha be exactly the place where a person can truly enjoy life and rest his soul. Often, caring for a summer cottage and decorating it requires considerable Money
, patience and time, but with foam everything is different.
In order to make any crafts from polyurethane foam with your own hands, you do not need to have any special education - absolutely everyone can cope with this task, it is enough to have good fantasy and imagination.
In construction, polyurethane foam is used very often and in large quantities. It is used to seal small cracks and has the ability to expand, filling all the voids. Important!

The hardening of the foam depends on what brand of foam it is, but on average it takes from 15 to 25 minutes.
You can cut off excess parts of finished products only after the foam has completely hardened.
You can cut off excess parts of finished products only after the foam has completely hardened. From construction foam
you can make any crafts, since foam is an unpretentious material, and when frozen it can withstand any temperature; in addition, crafts made from foam do not undergo any serious changes when they are exposed to precipitation. The material is lightweight and does not have sharp corners, so foam crafts for installation are often made for kindergarten or sites. Such crafts can have both large and small size

When working with polyurethane foam, you must use a foam gun, which is placed on the can, and after finishing work, use a gun cleaner
How to work with polyurethane foam?
To work with polyurethane foam, you may need minimum set tools and accessories - several pairs of gloves, preferably rubber - the fact is that the foam has such unpleasant properties, it quickly sticks to the hands, so it is simply impossible to do without gloves. In addition, you will need 2 or 3 knives of different sizes - they are needed after the foam has dried in order to give the products the required shape and for cutting out small details such as eyes, nose, mouth. When working with polyurethane foam, you must use a foam gun, which is placed on the can, and after finishing the work, use a gun cleaner. To paint finished products you will need paints and brushes. In order for foam crafts to last as long as possible, it is recommended to coat them with varnish.
In construction, polyurethane foam is used very often and in large quantities. It is used to seal small cracks and has the ability to expand, filling all the voids. Polyurethane foam is a very light material, so every time before performing any new craft, it is important to take care of its weight, otherwise the structure will not hold.
Therefore, it is necessary to place something heavy inside each structure - it could be a container with sand, a piece of iron, a plastic bottle with water. You can use anything, the main thing is that the thing at least slightly fits the shape of the future craft (if ready product has small dimensions or volume) and was weighty.
It is important to remember that all work performed with polyurethane foam should be carried out only in a well-ventilated area. The temperature should be room temperature. If work is carried out on fresh air, then this should be done in good weather, but you cannot work in direct sunlight, you need to move into the shade.
While working, it is important not to forget to shake the can of foam before each use.
Finished products made from polyurethane foam must be coated with paint, but it is important to remember that the content of nitrocellulose is unacceptable, since this substance adversely affects the foam; as a result, the craft softens and the entire structure may lose its shape.

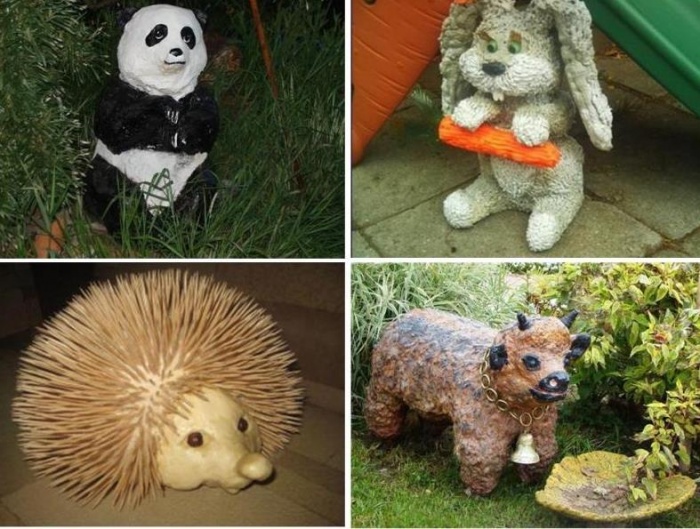
Hedgehog figurine made of polyurethane foam
Crafts made from polyurethane foam
Animal figures are especially popular among crafts made from polyurethane foam. You can place them in any part of the garden, placing a lonely figurine by the pond or on the lawn, or create an entire composition. When making crafts from polyurethane foam for kindergarten, figurines of fairy-tale characters are mainly created:
- Hedgehog. This figurine is very easy to make and is ideal for beginners. Any material can be used as a frame, it all depends on the preferences of the master. When the foam has hardened, use a knife to carefully cut off all excess and give the product the desired shape. Hedgehog needles are made from toothpicks, which must first be prepared for work - they need to be painted black, leaving a small distance untouched. The part that needs to be stuck into the figure remains unpainted. If desired, the other end of the toothpick can be painted golden color. Before sticking toothpicks into the hedgehog, the figurine must first be painted and allowed to dry. In these photos you can see step by step production crafts made from polyurethane foam like a hedgehog.

Foam goat
- Sheep and lamb. A master class on making crafts from polyurethane foam, such as a ram and a sheep, should begin with making a frame. The frame can be made from several plastic bottles connected with tape. In order for the structure to be stable, the bottles that will be used as lower limbs must be filled with sand or water. After the frame is completely ready, you can begin the main work - treating it with polyurethane foam. Foam treatment should be done gradually, in layers. Each applied layer must dry thoroughly (15-20 minutes), and only then can the next one be applied. What the craft will look like after final processing becomes visible after the first layer. After the final layer has been applied and dried, you need to use a knife to give the figure its final shape, and then paint it.
- Goat. These photos show step-by-step instruction on making such a craft with your own hands from polyurethane foam, like a goat. For the body frame you need to use plastic bottles, pre-wrapped with tape or wire. Leftovers are used for the leg frame metal pipes, which must be the same length and thickness. The resulting structure must be securely fastened to the ground, and care must be taken to ensure that the base of the body is securely fastened to the legs. The product is covered with one or two layers of polyurethane foam. In order to make the horns and tail, you can use cuttings of thick branches, securely fasten them and apply another layer of foam to the goat. Before painting the goat you need to apply one thin coat of primer. Large buttons can be used to make eyes.

Polyurethane foam bun
- Kolobok. This photo shows a craft in the form of a kolobok, made with your own hands using polyurethane foam. A medium-sized plastic ball can be used as a frame. The ball needs to be covered with foam in several layers, not forgetting to dry each layer. The hands of the kolobok are made of a plastic tube with a wire stretched inside. Hands need to be secured to the kolobok and treated with foam. Small ones are used for the legs wooden blocks, which must also be secured and foam applied to them. The scarf is also made of foam. And you can use cardboard as a frame for the ears on the headscarf. The finished bun needs to be painted, varnished and planted on some stump.
- Figure for growing flowers. In order to manufacture original pot for flowers, you can make any craft from foam. But it is important to remember that in the middle part of the figure you need to secure a container for growing flowers - this can be: a deep basin, a tin bucket, a large plastic bottle with a cut neck.
- New Year's crafts. Such foam crafts can be made both at a summer cottage and on the territory of a kindergarten. A Christmas ball can be made from a tennis ball; to do this, cover it with a layer of foam and paint it with bright colors.
In order to make a Christmas tree, you must first make a frame. The frame is made from a cone made of cardboard. The foam is applied in several layers to the cone-shaped frame. As it dries, the figurine is shaped into a Christmas tree using a knife and painted in the appropriate color.
It is not at all necessary to spend money on purchasing ready-made garden figures to decorate your site. Original crafts made of polyurethane foam will become a worthy element landscape design. The main thing is to show imagination and a little perseverance.
Properties of polyurethane foam
The scope of application of polyurethane foam is quite extensive. Now it has spread to the landscape design of the site. Garden figures created with your own hands from polyurethane foam are no worse than specimens made on a production scale, and are often superior in decorativeness to crafts made from tires or plastic containers.
The special properties of polyurethane foam allow you to create crafts complex shape. Ease of processing makes creative activity accessible to weak women's or children's hands. In the process of forming a garden figure with your own hands, removing an extra fragment or adding a missing part will not be difficult. With proper decoration, the craft looks very presentable and does not show traces of recycled materials, as is the case with plastic containers.
Attention! Garden figurines made from polyurethane foam are resistant to precipitation, but require protection from ultraviolet radiation.

An obstacle to creating crafts with complex configurations may be a lack of experience working with three-dimensional figures. Create something new from scratch, focusing only on flat image, poses a problem for some. Therefore, it is initially recommended to practice on simple garden figures. Mushroom, turtle or ladybug will be an excellent start for demonstrating the abilities of a sculptor.
Depending on the volume of foam used in the manufacture of the craft, it may take considerable time for it to dry completely. Usually the process lasts for a week. You should be prepared that polyurethane foam in the process of forming a garden figure can pollute the surrounding area, so it is recommended to organize work in an open area.
Colorful examples of do-it-yourself polyurethane foam figures are presented in the photo:

Available materials
The list of available materials varies depending on the garden figure chosen for making, but the constant set consists of the following items:
- Polyurethane foam. It is better to replace a regular can with a tube with a pistol, which is much more convenient to work with.
- A stationery knife for trimming unnecessary elements.
- Latex gloves to protect your hands. Fabric products will quickly become unusable.
- Sandpaper for sanding the surface.
- Brush with paints intended for external use.
To create the frame of a craft, they usually use plastic containers and tin cans, rigid wire, planks, hoses and double-sided tape. If foam gets on your skin during work, a special cleaner or kerosene will help get rid of the dirt.
Advice! A garden figure made using polyurethane foam is lightweight, so at the formation stage measures are taken to make it heavier. Plastic containers can be partially filled with sand or small pebbles. The wire protruding from the paws of the animals will help to fix the craft on the ground.

General algorithm
Preliminary familiarization with the instructions for using polyurethane foam will reduce the likelihood of undesirable situations developing. Making crafts should be done on outdoors at positive temperatures. If work is carried out indoors, it is worth taking care of quality ventilation. Polyethylene film will prevent contamination of the surface, the mounting foam will not stick to it.
Shake the can before use and keep the cap down when working. Otherwise, the gas will escape and the material will not be completely consumed. The polyurethane foam gains initial strength within an hour and completely dries in 10 hours. It all depends on the applied layer.
Apply in one go a large number of material is not recommended, the liquid substance may fall off. The optimal way to organize the work of forming a garden figure is as follows:
- position the frame of the craft horizontally;
- apply a small layer of foam;
- give the material time to dry;
- turn the craft over and repeat the steps.
When the foam dries again, the voids and missing fragments are filled in accordance with the selected outlines of the garden figure. Excess fragments are removed with a sharp stationery knife. To achieve flat surface crafts, it is sanded with sandpaper attached to a block.

Advice! Putty can protect a garden figure from rapid destruction under the influence of sunlight. This technique will provide additional leveling of the surface.
After the composition has completely hardened, the decorating stage begins. Usually it consists of painting a figure from polyurethane foam. Paints on acrylic base, which are applied in 2 layers. Additional means of decoration are buttons, cords, wire for mustaches, pieces of glass to create a mosaic.

Typical crafts made from polyurethane foam for the garden
Studying a wide range of garden objects made using polyurethane foam, we can roughly distinguish two groups of crafts. In one case, the surface of the figures is smooth, in the other it is lumpy and often imitates the skin of an animal.

Leveled areas are often additionally covered with putty. This creates protective layer from UV rays. This technique is not used with rough garden figures.
It is unlikely that it will be possible to achieve the identity of an animal skin immediately after applying the foam; this will require additional manipulations. But the result of painstaking work is always impressive. The only exception may be the lamb, whose curls are so similar to the lumpy surface obtained from a liquid construction substance. Vivid examples of DIY crafts made from polyurethane foam are shown in the photo:


Representatives of the animal world are the most popular solution when creating garden figures. Less often they create objects of inanimate origin - all kinds of flowerpots, shoes and other objects, mainly intended as decorative stands under the flowers.

Simple crafts
If there is no experience in creating crafts at all or it is not enough, it is better to start the experiment with light garden shapes, for example a mushroom, the base of which is a plastic bottle. You will need to add a primer to the previously listed available materials and you can begin to get creative.
Main stages:
- A plastic bottle, which acts as a stem, is filled with sand or pebbles to give the mushroom stability.
- Polyurethane foam is distributed thin layer, the process takes place in several stages. A thickening is formed in the lower part.
- The garden craft hat is cut out of polystyrene foam. There is no point in striving for a perfect circle; slight asymmetry is quite acceptable.
- You should try to form a cone-shaped figure or hemisphere from the polyurethane foam applied to the foam.
- Strong wire is used to connect two parts of a garden figure. Gluing the parts will help strengthen the fixation.
- Trimming of unnecessary protruding parts is carried out carefully so as not to damage the assembled craft.
Comment! The porosity of the polyurethane foam causes moisture to be absorbed, so it is recommended to treat the garden figure with a primer.

The absence of a primer layer will lead to the putty absorbing moisture from the polyurethane foam, this process will provoke cracking of the surface of the craft. After primer garden figure covered with a layer of putty and left to dry. To make the mushroom smooth, the surface of the garden figure is treated with sandpaper, first medium-grit, then fine. To reduce paint consumption, the putty surface also needs to be coated with a primer layer. The color of the craft is chosen at your discretion, whether it will be cute White mushroom or bright fly agaric, depends on the wishes of the master. Varnish can add additional shine to the figure.

Large figures
When simple do-it-yourself polyurethane foam figures turn out quite well, the task of creating garden crafts can be complicated and move on to larger objects.

Donkey
To form a popular element of landscape design you will need:
- A 10 liter water container will serve as the body of a garden figure.
- A 5 liter tin can or eggplant will act as a muzzle.
- Wooden planks for feet.
- The glazing bead or wire will become the basis of the tail of the garden figure.
- A familiar set of tools that are used when making crafts from polyurethane foam.

When everything is prepared, begin the creative process:
- First, connect two containers together; wire or tape will do the job.
- A glue gun will help you secure the legs to the body of the garden figure.
- The tail is inserted into a pre-prepared hole.
- The eggplant is filled with sand to give the craft heaviness and stability.
- When the frame of the garden figure is completely prepared, it is gradually covered with polyurethane foam. Take a break of 15-20 minutes between applying the next layer.
- The ears of a garden figure can be made perfectly from flexible wire, which, after fixing, is also covered with polyurethane foam.
- After drying, unnecessary protruding fragments are cut off with a sharp knife.
- Applying further layers is identical to the algorithm for creating a mushroom. First, the craft is primed, then the surface is treated with putty, then sanded, primed again and painted. The final layer will be waterproof varnish.
Naturally, between each action, the polyurethane foam craft is given time to dry out the next applied layer.


Symbol of family happiness - stork
A stork looks incredibly cute on the site, the manufacture of which will also require polyurethane foam. The algorithm of actions includes the following steps:
- A plastic 5-liter container serves as the body of a garden figure.
- The stork's head will be located on the bottom side, the tail will be in place of the neck.
- A thick wire will serve as the base of the neck, onto which the foam head is fixed.
- At the discretion of the master, the long nose of a garden figure can be made from a small piece of wire or wood chips.
- Long legs for crafts can be made from electrodes or plastic pipes. Both materials are subsequently buried in the ground, thanks to which the garden figure made of polyurethane foam becomes stable. Therefore, it is not necessary to fill the eggplant with sand to weigh it down.
- You can make wings from pieces of foam plastic. They are screwed to the sides of the craft with wire.
- Wrapping it with tape will help add additional strength to the connection between the head and the body.
- When the frame of the garden figure is completely assembled, they begin to cover it with polyurethane foam.
- After complete hardening, excess fragments are removed with a stationery knife with a sharp blade.

When the mounting foam is completely dry, proceed to decoration. As a primer for a garden figure, you can use an aqueous solution of PVA glue, diluted in a ratio of 1:2. The body and head of the craft are covered with white paint, the tail and edging of the wings are made black, and the legs of the stork are painted red. For the stork's tail, you can use real feathers from poultry, be it a goose or a rooster. When the garden figure is completely ready, the legs of the stork are buried from electrodes into the ground.

Review of original ideas
The choice of garden figures that you can create with your own hands using polyurethane foam is unlimited. Here is a modest list of original ideas:
- A small artificial pond or waterfall will be perfectly decorated with a funny frog or turtle. Someone might want to become the owner of a crocodile or a monitor lizard - it all depends on preferences.
- If children are relaxing on the site, they will like the presence of a craft in the form of a cheerful SpongeBob.
- Bright ladybugs always attract attention.
- Polyurethane foam will not require sanding if a lamb is chosen as a garden figure.
- Sometimes the wire used to braid a frame with a complex configuration helps to create a frame with a complex configuration. plastic containers, and then gradually filled with foam.
- The craft does not need to be coated with paint. Some masters of working with polyurethane foam offer to create a real mosaic on a garden figure from small pieces of mirrors or tiles.
In the process of creating any craft, it is important to let each applied layer dry thoroughly. This applies not only to polyurethane foam, but also to primer, putty and paint. If technology is violated, a garden figure can quickly become unusable.

How creators wake up
It is human nature, as a rational being, to create. Often creative qualities are discovered literally out of the blue and where you would not expect them at all. Just one inner push is enough. For example, a blog post with illustrations. And comments: “Oh, what a beauty! Where did you buy it? Did you make it yourself? How? From what?” Last question usually specified several times. After a while - joyfully: “Oh, girls, I did it!” And then, embarrassed: “Just don’t tell your husband, otherwise I’ve used up all his mounting foam...”. And others rejoice: “Hurray! Another homemade product has appeared at the dacha!”
Polyurethane foam
Polyurethane foam, also known as polyurethane foam sealant, was invented more than 60 years ago, but began to be actively used in construction only in the 1980s by the Swedes. It is used to install door and window blocks, “treat” seams and cracks, isolate communications. compressed into aerosol can it takes up very little space. The polyurethane foam released from there quickly increases in volume up to 40 times and hardens (polymerizes) to a rigid state, acquiring a light yellow color. Does not tolerate direct sunlight: first it darkens and then begins to crack. The ease of decorating with polyurethane foam and its availability have won over people with ingenuity and creativity. At the dachas and suburban areas Homemade garden sculptures began to appear en masse, relatively cheap compared to finished products.
Basic Tools

It is best to release polyurethane foam (and not a cheap one, since it holds its shape less well) from a professional reusable gun with a handle and a metal nozzle - only it can regulate the volume of portions. To prevent the gun from turning into a disposable one, after finishing work it must be washed with a polyurethane foam cleaner. The foam itself is very sticky, so work with thin household gloves. The exception is when you need to touch up a slightly dried out figure - here you need hands moistened with water. When the mass has completely dried, you can cut out any crafts from the polyurethane foam using a sharp stationery knife.
And we have such a frame
Even the simplest sculpture needs a base on which foam will be applied. That is, the frame. Fantasy itself will tell you what is best to use. For example, for Kolobok, an old children's ball suggests itself, for a hefty boletus mushroom - a plastic bottle (leg) and a round candy box (hat); the frame for the adorable donkey can be assembled from a ten-liter bottle, tin can And wood scraps. Part of the frame can be bent from wire (for example, a lizard's tail or a swan's neck). To make crafts made from polyurethane foam not only beautiful, but also stable, weigh them down (sand in a PET bottle will be quite enough).
Apply and strengthen

The room where you will create from polyurethane foam should be well ventilated. You can set up a workshop under open air, but only in dry weather. Apply the foam to the frame gradually: do not rush with the next layer until the previous one has dried (this should take no more than a quarter of an hour). Crafts made with your own hands from polyurethane foam must be protected from cracking by using putty. Acrylic putty or dry putty is best suited for this. mortar with pasty acrylic supermastic. Another method is gauze bandages soaked in cement mortar: they need to be used to pave the entire figure.
Brush of a famous master
For painting your garden sculptures use acrylic or oil paints of any color. Before painting, let the product “rest” for several days. Be sure to paint with my own hands, armed with thick brushes. Put one layer of paint - wait until it dries properly and paint again; there should be several layers. To make the sculpture not only bright, but also shiny, varnish it. Polyurethane varnish for concrete floors is excellent for this. At the same time, add strength. All! Your crafts made from polyurethane foam are waiting for their favorite place, where they will calmly stand under the sun and rain. But when winter comes, it is better to put them in a warm and covered room. Just in case.
What can a person come up with! It would seem that from an unnecessary thing that just needs to be thrown away, you can make something unusual and useful, breathe new life into it.
Usually, old ones are adapted for a summer cottage. car tires, tires, sheets of plywood, old stumps and snags and other items.
Have you ever thought about what you can do? interesting crafts from polyurethane foam for a summer residence? Some people have probably heard about this, but most were probably surprised. Therefore, today we will tell you what can be done from of this material and how to turn it into a craft.
What crafts can be made from polyurethane foam for the garden?
Polyurethane foam is a very common material in construction. With its help, seams and voids are sealed, in which it expands, filling the entire space. After hardening, it becomes hard, but has little weight. When creating crafts from it, it is worth considering the basic properties of this material. In addition, polyurethane foam can be easily trimmed.
Why can it be used to create crafts? The fact is that polyurethane foam takes on any shape, and its positive attribute– resistance to various adverse environmental factors – allows you to display crafts in the garden. They are not afraid of precipitation or frost.
Light weight and the absence of sharp edges and corners make such crafts safe for kids. Therefore, you can safely place your masterpiece on the playground. You can also make enough foam out of large structure, which, as mentioned above, will have little weight.

The most popular figures from polyurethane foam are various animals: frogs, sheep, hedgehogs, cows, etc. They will look great near a pond, flower bed, on a playground, near trees and shrubs, and even in the middle of a lawn.

The craft can be either stylized, cartoonish, or very “alive”, similar to a real animal. It all depends on your personal preferences.

In addition to animals, you can make stylized mushrooms beautiful flowers. They look no worse than those made from stone, stump or wood.
If you really want to, you can even build a mini-house, an airplane, a tower and other similar structures. In addition, making garden crafts from polyurethane foam is a very interesting activity that will help keep you busy. free time. And the ease of working with this building material will not require any special expenses from you.
We make garden crafts from polyurethane foam with our own hands
When working with this material, you should follow some rules. Thus, polyurethane foam has the property of quickly setting to the surface with which it comes into contact. It’s the same with our hands - they need to be protected from foam adhesion. To do this, you will need fabric gloves (cotton), and have several pairs of them.
You should also prepare a special cleaner in advance, with which you can clean the mounting gun. By the way, you will also need it, just like the polyurethane foam itself.
Having purchased everything you need and decided on what your craft will look like, you can get to work. The technology is not complicated, you need to make a figurine frame and cover it with layers of foam, each of which dries for about 15-20 minutes. Any available materials are suitable for the frame: boards, old unnecessary pots of different diameters, various jars and other containers.
It’s like an artist draws a picture - first the circles, squares and ovals that make up the figure, and then begins to draw out the details. It’s the same here – fill the mold on top and use a knife to give it the features you need.

The finished figurine can be painted and varnished on top. This simple technology will allow you to create almost any craft for the garden.
Now let's look at a few specific examples . It's very easy to make a cute hedgehog. This craft is perfect for a beginner. In addition to the materials discussed above, you will also need toothpicks. We make an ellipse out of foam, which will be the body of the hedgehog. When it hardens, cut off the excess, forming a figure. To make the hedgehog smooth, you can paste it over in several layers toilet paper with PVA glue.
After that, we start sticking toothpicks. Moreover, they can first be dipped 3/4 in black paint, and the ends in gold. It is better to paint the hedgehog itself before attaching the “needles”.
Ladybug is also easy to make. Fill the hemisphere and cut out the desired shape, then paint it. When selecting paint, be careful; it should not corrode the polyurethane foam.

If your vase breaks, do not rush to throw it away. It is enough to cover it with foam, which will hold the shards together, and when it hardens, cover it with paint. Gold or silver coloring looks beautiful, and the vase itself does not need to be cleaned. Leave it textured and lumpy.
More complex crafts require some skill and more time. For example, to create a deer, the most difficult thing is to make the frame. Large plastic bottles are suitable for the body, wire legs are suitable, and a glass is suitable for the face.

Then we slowly apply layers of polyurethane foam one by one. Then we clean it, give it its final shape, prime it with paint (acrylic), apply varnish and paint it. As a result, you will get a cute fawn, almost like a real one.

")


