How to properly place vegetable beds on the site. What should be the optimal width of a garden bed? Video - DIY raised beds
Gardening is a favorite hobby of many of our fellow citizens. In other years, only having your own personal plot made it possible to keep family budget afloat, and today the garden can be considered as a source of fresh and environmentally friendly products for the family table.
But in order to get a rich harvest, it is very important to master competent soil cultivation technology, since otherwise you will not be able to ensure a normal growing season for the crops you grow. In particular, it is very important to know how to properly make beds in the garden. This article is devoted to consideration of this issue.
Initial soil preparation
If you are going to use some area for garden beds, it must be processed and dug up as thoroughly as possible, simultaneously freeing it from debris, plant roots and trees. If you plan to make beds on a site where some kind of outbuildings previously stood, you will have to spend a lot of time clearing it of construction debris. As a rule, in this case a lot of glass, bunches and remains of boards remain in the ground. All this must be removed.
In addition, after this it is advisable to bring there a layer of normal soil, from which the beds will be formed. Of course, you can try to grow plants on the remaining soil, but its fertility will be in question.
What should you pay special attention to?

Before you properly make beds in your garden, it is very important to prepare bottom layer soil. The fact is that with strong compaction, moisture will constantly be retained in the beds. This is good in dry years, but the rest of the time there will be a constant risk for plants, since their roots may simply rot.
It is advisable to use a cultivator for loosening, since it will be very difficult to properly loosen the soil manually. Important! If this is your first time making beds in this place, it is advisable to give the soil for testing: perhaps it is too acidic or alkaline. It is better to immediately add appropriate additives to it, since otherwise it will not be possible to grow a rich harvest.
Among other things, we would recommend planting green manure on newly cultivated lands. It is best to use alfalfa or other legumes. There is no need to sow rye, as it makes the soil very acidic. An exception can be made only for highly alkaline soils. Of course, in this case, all agricultural activities take much more time, but all costs are paid off.
When the soil issue is completely resolved, you can begin marking the beds.

Of course, creating beds always begins with delineating boundaries and digging, but it is important to remember that high crop yields can largely depend on other factors. Before making the right garden beds, it is also important to choose their location in relation to the cardinal points. This issue should not be approached lightly, since plant productivity depends on the correct choice of location.
Let's give some generally accepted rules that should be followed when creating sites for growing various crops. So, beds for vegetables are located in the direction from north to south. It is best to make them rectangular. It is believed that it is more convenient to process ridges if they have a width of 1.2 m. The length can be any, it all depends on your preferences and the size of the area.
They are made at least 40 cm wide, but it is preferable to provide even wider passages, since in this case it is possible to strengthen the edges of the ridges with the help of boards or slate.

Approximately the same requirements apply to the layout of flower beds or ridges. Of course, it is much better to make their corners rounded, since they look much better. Before properly making beds in the garden, it is best to outline their future boundaries using twine and several pegs. Don't forget to make indentations, otherwise you won't have room for aisles.
What to do if you are making a garden bed in a former meadow?
Important. In this case, it is necessary to carefully remove the turf. Make compost out of it: this fertilizer contains a huge amount of nutrients that contribute to a significant increase. Here's how to make good garden bed with which you will receive excellent harvest!

You need to start digging the soil from the edge of the string stretched along the border. You need to work with a shovel so that you get a neat and clearly defined line. In this way we dig the entire border of the bed. Be sure to pay attention to how dense the soil is at the depth of the shovel bayonet. If there is a lot of clay there, you will have to dig two or three shovels deep. Or use a cultivator or even a tractor.
We use a hoe or a hoe!
After removing the layer of turf, you will find that underneath there is quite decent, but still somewhat dense, soil. If the soil is compacted too tightly, it would be preferable to cultivate it with a hoe, since in this case you break the roots of the plants, and the structure of the soil becomes much better. Since making a garden bed with your own hands can be difficult, you need to purchase everything in advance necessary tools for tillage.
In a word, creating beds is a rather troublesome and time-consuming task. Therefore, it is worth taking care of preserving the results of your work by strengthening the resulting ridges. The easiest way is to use boards and hammer in pegs to support them. But a blind area made of bricks or natural stone. Plus, she looks much more beautiful.
When making a vegetable garden with your own hands (including beds), do not forget about the accuracy of your work. Such a personal plot will give you a lot of positive emotions!
How to make beds in the garden if you want to get a harvest from them as early as possible, starting in April-May?
Making warm beds

So that in our conditions middle zone to get a rich harvest and cucumbers, the natural growing season is not enough, because the earth warms up too late and freezes quickly. Since making a warm bed is not difficult, you can correct this annoying misunderstanding without spending money on building a greenhouse or even a greenhouse.
By the way, what is this? In this case, before starting to develop the site, you need to dig a ditch 40-50 cm deep, which completely follows the contours of the future bed. Layers of manure are laid there, which must be alternated with the remains of tops, rotten wood and similar organic residues. Kitchen waste can also be used.
Before making a warm bed, you can also purchase it. It heats up best. Having laid a layer of waste flush with the edges of the ditch, we lay fertile soil on top of it, and the thickness of its layer should be at least 40 cm, since otherwise the roots of the plants may burn.
Further actions
After this, cover the finished bed with film and leave it for a couple of days. When the ground warms up noticeably, you can plant the seedlings. It is better to combine this method with installing a film cover. In this case, planting can begin almost immediately after the snow melts and the strong morning frosts disappear.
Here's how to make garden beds. There are some difficulties with this, but as a result you will get an excellent harvest of your own vegetables.
An ordinary vegetable garden is an amazing place, a special plot of land, which, through the efforts of its owners, turns into an almost inexhaustible source of not only vitamins and fresh vegetables, but also a whole range of “by-products” - health, well-being and vigor.
According to experienced summer residents, working in your own garden successfully replaces working out in the gym and brings a lot of pleasure and benefit. In addition, vegetables grown on your own plot differ in taste from those purchased in a store or market, and, of course, for the better.
Spring work on plot of land start with an important task - planning a vegetable garden. It would seem that my plot, I plant whatever I want, and the choice is not too great - on the standard six hundred square meters you won’t be able to do much. And yet, the harvest largely depends on the choice of place for a certain variety of vegetables, so planning a garden should be approached with all responsibility.
What factors should you pay attention to when planning your garden? What vegetables are best to plant and where?
 Working in the garden is not necessarily hard work and daily hassle. Gardening brings a lot of pleasure and benefits
Planning your garden correctly
So, you have already prepared the seeds and even grown seedlings at home. All that remains is to decide where exactly to plant all the plants by choosing optimal place on your site for certain types of vegetables. You can start planning your garden in early spring, when the snow has completely melted from the area and the soil has dried well.
In general, plot planning, which is carried out by a summer resident with many years of experience in gardening, looks like this - the owner simply walks along already equipped paths, leaving sticks and pegs in the ground and muttering to himself: “Here are two beds of peppers,” “And here there will be tomatoes.” . In fact, only many years of experience working on the site allows summer residents to approach garden planning in such a simple way. Less experienced gardeners should listen to the advice of professionals and approach the process of planning vegetable planting in a scientific way.
 An ideal vegetable garden looks exactly like this - even rows of green healthy plants promising high harvest
If you decide to plant a vegetable garden on a newly acquired plot of land for the first time, you will have to take into account several main factors:
- Sides of the world. Experts advise laying out beds for future plantings strictly in length from north to south or from northeast to southwest. This way the plantings will be warmed up and illuminated by the sun’s rays as evenly as possible throughout the day. It has been proven that with this arrangement of beds, plants are less susceptible to fungal diseases. The southern, slightly warmer and better lit side should be given to heat-loving crops such as beans, tomatoes and cucumbers, and the northern side to cold-resistant crops - radishes, turnips and rutabaga. To protect plants from cold winds, it is better to plant dense rows of corn, sunflowers or berry bushes, such as gooseberries or currants, on the north side.

- Soil composition. If vegetable crops are planted in this area for the first time, it is necessary to study the composition of the soil. If the soil is clayey, you will need to first add straw manure, sand, compost, turf soil and mineral fertilizers to the soil. If the soil is sandy, then ideal additives would be peat, manure and mineral fertilizers. When increased acidity soil, it is necessary to add lime additives - quicklime or slaked lime, as well as wood ash. Of course, you can add all of the above additives in the fall, but experts call the optimal period for adjusting the composition of the soil early spring - about a month before planting seedlings and seeds.

- Illumination. The illumination of the area can only be influenced by cutting down existing trees. It is strictly not recommended to plant seedlings under the lush crowns of apple or pear trees. Trees can only grow on the northern side of the garden - this way they will not cover the plants from the sun's rays and at the same time protect them from the cold wind. If on the north side of the house there is vacant plot land, it's better to plant there unpretentious plants, for example, sorrel or onions, for which excess sun is even harmful. Tomatoes or cucumbers will definitely wither in the shade. It’s even better to give up such a northern front garden for flowers, since growing vegetables here is quite risky.

- Relief of the site. If the site has an uneven topography, then in the spring the soil in the lowlands will thaw and dry out much longer than the soil at higher elevations. In addition, in heavy rain, water will stand in such areas. That is, it is necessary to take care of a system of drainage grooves that will help get rid of excess moisture. In such low-lying places, professionals advise planting cabbage and other moisture-loving plants. But, if in your region summers are usually dry and hot, then you can plant both tomatoes and peppers in low-lying areas - in this case, you will have to water the seedlings a little less often.
If in the area where you plan to plant a vegetable garden, previously only weeds grew and there was an ordinary lawn, the owners have two options: remove the top layer of soil with the roots of the weeds completely, remove them from the area and add peat, rotted manure and, if necessary, to the soil. sand; or simply dig up the area and plant potatoes here in the first year. The first option is too labor-intensive and expensive, so it is not popular among gardeners. In the second case, in the first year the potato harvest will be low, but most of the weeds will disappear and the next season you can plant any, even the most finicky vegetables.
 When starting to plan a vegetable garden for the first time, it is worth taking into account the characteristics of the soil and the location of the beds relative to the cardinal directions.
Irrigation system
When planning a garden, you need to pay special attention to the irrigation system. Tomatoes, cucumbers, peppers and eggplants in central regions With a fairly dry summer, you have to water regularly - literally every three to four days. Therefore, for vegetables, it is better to choose areas that can be watered without special costs and problems.
The minimum program is that hoses from an outdoor tap must reach the beds. If your plot of land is too large, and the tap is located next to the house, then in remote areas it is better to lay out a garden or plant especially resistant plants that do not need additional watering. In this case, it is better to move the garden closer to the water source.

Remember that experts do not recommend watering the beds with water directly from the tap. The best option is water that has already been settled and warmed up in the sun, or even better - collected rainwater, or water from a local pond or river. If you want to listen to the advice of professionals, you will need to install a large enough container next to the beds for water - rainwater or regular water from the tap. Even an old cast iron or steel bath, a spacious, specially ordered metal vat or large plastic barrel. In addition, you will also need a water pump, which will lower into the container and provide excellent pressure when watering. You can, of course, water the beds with a watering can, but this is too long a process.
Another great option irrigation systems - drip irrigation. If your site already has such a system, then the planting of vegetables will have to be “tied” precisely to the plots already provided with water.
 Don’t want to spend a lot of time watering vegetables manually with a watering can or stand for hours in the garden with a hose in your hands? Take care of the system drip irrigation, which will save both time and money on paying for water supply
Every vegetable has its place
Have you figured out the cardinal directions, lighting and watering? All that remains is to find out all the nuances regarding the compatibility of individual varieties of vegetables and their rotation in your garden. Every experienced summer resident knows that if last year, for example, potatoes grew in this area, then this year it is worth planting some other vegetables.
Thus, all vegetable crops are usually divided into:
- Demanding people who need a large number of nutrients. These include cabbage, zucchini, cucumber, pumpkin, tomatoes, peppers and celery.
- Moderately demanding. Such vegetables need fertilizing only once a year, unlike demanding ones, which have to be “fed” both in spring and autumn. These vegetables include: eggplant, onions, potatoes, carrots, beets, radishes, lettuce, kohlrabi and garlic.
- Undemanding. Crops that cost a minimum of nutrients. These are peas, beans, parsley, dill, sage, basil and other seasonings.

In order to correctly draw up a plan for planting seeds and seedlings, the garden should be divided into four sections:
- One to allocate for perennial plants, for example, strawberries and strawberries, which will have to be replanted no more often than once every three to four years.
- The second area is reserved for demanding plants.
- The third is for medium-demanding crops.
- And the fourth, of course, for undemanding plants.
After a year, particularly fastidious plants need to be planted in the area where undemanding plants grew, moderately demanding ones - in a plot where the harvest of demanding ones has already been harvested, and undemanding plants, accordingly, are sent to the area where averagely demanding ones grew last year. cultivated plants.
This rotation is carried out every year and allows the soil to rest a little and get a higher yield.
 Plants with different levels of nutrient requirements must be alternated with each other when planting a vegetable garden.
In addition, when planning the location of the beds, it is necessary to take into account the compatibility of plants. The compatibility of cultures lies in the ability to grow side by side, strengthening, complementing and protecting each other.
So, it is quite possible to sow onions, garlic or radishes between the rows of tomatoes. An ideal “seal” for carrots or beets would be dill or lettuce. And rows of potatoes can be combined with planting peas, which will be harvested earlier and “provide” their roots as an excellent fertilizer for potato tubers.
Experts say that the ideal precursors for cabbage are nightshades, that is, tomatoes, potatoes, peppers or eggplants, as well as cucumber, legumes or onions.

In turn, it is better to plant cucumber seedlings in the place where peppers or spinach grew last year. The optimal predecessors for carrots and beets are cucumbers, tomatoes and peas.
Another important point is that different periods of ripening and planting of plants allow you to get two harvests of different crops in one area. For example, in early spring you can sow onions or radishes, and after harvesting, plant them in this plot melons or tomatoes. After the garlic or onion has already been harvested, winter radish or lettuce will do well in this area.
 Plant compatibility - important factor when planning a vegetable garden
Bed sizes
When planning your garden, do not forget about comfortable paths at least 30-40 centimeters wide, which will allow you to harvest tomatoes and peppers without harming flowering and fruit-bearing plants.
The optimal width of the bed is 80-100 centimeters. If the bed is wider, it will make caring for plants and watering more difficult.
 If you lay not just dirt paths between the beds, but real paths made of stone or boards, then you can harvest even on the rainiest day or immediately after heavy watering, without fear of getting your shoes dirty
In addition, do not forget that cucumbers grow better, bear fruit and take up much more space. less space, if you provide them with support on which they can curl. In this case, picking cucumbers will be much more convenient. Some tomato varieties, such as the tiny, delicious cherry tomatoes, also need support. Therefore, when planning beds with such tall and fragile crops, you need to take care of a fence or trellis on which cucumbers and tall tomato seedlings can rest.
 Tall tomato shoots need support, and cucumbers creeping along the ground will take up too much space. Plant them near the hedge, and harvesting a bountiful harvest will be much more pleasant, and most importantly, easier!
And finally two more important points- firstly, you also need to leave space in the garden for a compost heap, where you will throw in the fall the remains of shoots and leaves, which in the future will become an excellent organic fertilizer. The compost heap can be located at the very end of the site, in the shade, that is, in a place that, due to its properties, is not suitable for planting useful plants.
Secondly, most likely you will be building a greenhouse or greenhouse for early vegetables and seedlings. For such a structure it is also necessary to allocate appropriate place in the sun.

Approach planning your garden thoughtfully and seriously, try to place crops with good compatibility nearby, alternate different families of vegetables in the same area, try to plant both early and late varieties of vegetables in the same bed to get two harvests a year - and even a small one the vegetable garden will provide your whole family with fresh herbs during the warm season, and the pantry in the fall will be filled with jars of home-made preserves.
To obtain a rich harvest, properly cultivated soil and care of the crops play an important role. Therefore, you should know how to rationally and carefully arrange the beds in your summer cottage.
Before you start arranging the garden bed, you should decide and take into account such parameters as:
- form;
- size;
- location;
- layout.
In most cases, many gardeners build rectangular-shaped beds.
This is not a fundamental condition for growing a rich harvest. The beds can be anything: rectangular, square, round, trapezoidal, etc. The shape can be selected taking into account the features of the relief.
Unconventional forms of flower beds will allow rational use of the site area.
The size of the bed can vary depending on the individual desires of the owner and the landscape. It is important to observe certain conditions: they should not be too narrow, wide or deep.
The optimal width of the bed is 60-100 cm.
Considering these parameters, caring for vegetable crops will be easier. The length of the bed can be any. If the bed is located along the fence, then its height should not exceed 80 cm.
The distance between the beds should be 40-50 cm.
This size is quite enough to care for and collect vegetables.
It is better to place the beds on a summer cottage from south to north.
In this case, the soil warms up better, and the crops grown receive required amount Sveta. There are cases where it is located on a gentle slope. The optimal placement of the beds in this case is transverse to the slope.
If the site is uneven, then it is best to place the beds on the south side, and place garden plantings on the north side.

When planning beds, some features should be taken into account.
Box beds and terraces are the best option when designing beds on a site with a strong slope. It is better to place it in the northern part of the garden tall plants so that they do not shade low vegetable crops.
All these features should be taken into account when constructing beds on a summer cottage.
Basic rules for creating beds
Once the shape, size and layout of the beds have been determined, you can begin to create them.
It is best to create beds on damp and clay soils, in lowlands where water can linger after rain. Having decided on the length and width of the bed, you can begin arrangement.

When arranging a garden bed, loosen the soil with a hoe or chopper.
First you need to mark out the future beds. Then they should be dug up, processed and cleared of foreign debris. The soil can be treated with a solution of copper sulfate. It will protect vegetable crops from various diseases. Soil using a hoe or chopper. If there are lumps, they should be broken up.
There are several types of beds:
- High bed. It is the most common among gardeners. Such a bed significantly improves the heating of the soil, which ensures high intensity of growing vegetables. To create such a bed, you need to make a frame. The width of such a bed is 150 cm, and the length can be different.
- Hilly bed. Its height is 80-90 cm, and its width is about 200 cm. To avoid the bed from spreading, it is necessary to make a small border along the edges.
- Beds according to the Mitlider method. A distinctive feature of these beds is a wide path of about 90 cm and narrow beds no more than 45-50 cm wide. This method of arranging a bed ensures simplicity and ease of maintenance, as well as the absence of the need to dig up everything.
The first layer of the bed is branches and twigs, which must first be processed. Next, a layer of small wood debris is laid, then plant debris. After this, a layer of peat is laid out. The final top layer may consist of mature compost and fertile soil. All components should be taken in equal quantities.
It is necessary to dig up the soil along the entire length of the bed. Next, use a shovel to pour the soil into the center of the bed, and then make a 10-15 cm deepening. After this, you can begin installing the sides. They can be constructed from different materials: boards, slate, bricks, etc.

The sides on the bed prevent it from spreading. In addition, such beds are easier to maintain.
A simple and affordable way to make the sides of a garden bed is with wooden boards. Optimal thickness 4-5 cm. Before installation, it should be treated with an antiseptic to prevent rotting.
The wooden frame should be sheathed after installation plastic film. This avoids water leakage and soil washing out of the constructed frame. The height of the side should be selected individually. Here it is important to consider the depth of the side in the soil.


At first glance, garden beds in the country do not require decorative elements, but in fact they play a big role not only in the yield, but also in the appearance of the entire garden plot. While working in the garden, almost each of us would like to see our plot as well-groomed and pleasing to the eye as possible.
Form
The shape of the beds on the site primarily depends on your fantasies and what you want them to look like in the end. There are a great variety of decor options: square, round, animal-shaped beds, various objects, and more. If you wish, you can even not adhere to the standard rules when building a garden bed, but come up with something new and unusual. Place the beds on garden plot recommended taking into account the terrain features.
As a rule, there are no strict recommendations for sizes, but there is one nuance that should be taken into account when making calculations. The size of the bed should be such that from any side you can reach its middle without any inconvenience. If you need to build a garden bed near a fence or the wall of a house, then first think about whether you can easily reach the opposite side.

Attention ! The width of the wall bed should be within 70 - 80 centimeters. The width of the bed, located directly on the site and adjacent to the wall or fence, varies from 1 meter in width, from 2.5 meters in length, and the depth ranges from 20 to 50 centimeters. It is recommended to make the distance between the beds themselves from 50 to 70 centimeters. Paths and paths between them should be approximately 20-50 centimeters below the surface layer of the bed.
Organization
If the dacha plot is located in lowlands and places where dampness prevails, then the beds are best built in the autumn. It is recommended to choose a small size (1 by 1 meter), and the height should be no more than 30 centimeters. Thus, the soil will warm up much better, and the snow cover will melt away much faster in the spring.
- to start, take four wooden boards;
- then assemble them into a 1 by 1 meter square;
- after the base is ready, install the structure on a horizontal surface and fill it with soil mixed with fertilizer. If you need an early and abundant harvest, then in this case it is best to arrange raised beds.


The construction process is as follows:
- on suitable site it is necessary to dig a hole 40-50 centimeters deep. Choose the length of the pit according to your preferences. As for its width, the recommended width is from 1 to 1.2 meters;
- Then, along the perimeter of the dug hole, it is necessary to install a kind of frame. The material for the frame can be chosen based on your own preferences, for example, stones, bricks, small logs and others. Frame, the height of which should be from 40 to 50 centimeters, with inside must be covered with plastic film;
- then an iron mesh must be installed at the bottom of the pit, which will protect the crop from rodents;
- then you should carefully fill the hole. To begin with, a layer of sawdust, shavings, cardboard and other similar long-decomposing material (1/3 of the pit height) is poured onto its bottom. Sprinkle the layer with a little earth and water;
- Finally, we fill in the soil, which should be mixed with manure and mineral fertilizers.

Location
If the plot small sizes, some problems may arise with the location of the beds. To place beds in a small area as rationally as possible, you should adhere to the following rules:
- it is necessary first of all to use any horizontal surfaces and suspended structures;
- the second option could be to combine a beautifully designed garden bed with a relaxation area;
- It is also worth paying attention to various objects on your site (unnecessary barrels, old carts, etc.), which can be used for planting vegetables.
Attention ! Remember that the beds must be placed on a flat, horizontal surface, thereby avoiding possible accumulation of excess moisture.

Tillage
As a rule, the beds are dug up twice a year, in the spring and autumn, adding all the necessary minerals and organic fertilizers. If digging occurs in autumn time, then it is best to leave the soil blocky, which will help retain moisture. In addition, if the soil remains blocky, the pest larvae in it will freeze and die. Also instead of autumn digging mulching can be done. To do this, you will need to fill the soil with a sufficiently large layer consisting of peat, sawdust and rotted compost. In the spring, the unrotted layer must be removed using a rake, and then the soil must be dug up.

Sides
Many people often do not pay enough attention to the design of the edges of their garden beds. As a rule, they do between them simple tracks or cover them around the perimeter with boards. But some want to create beautiful view throughout the entire area, including the garden. You can decorate the sides different ways, from scrap or purchased materials, for example, ready-made sides bought in a store, sides made of bricks or slate. It all depends on your imagination.

Kinds
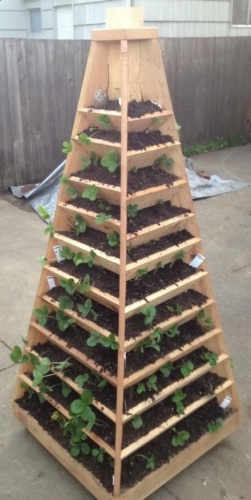
Vertical
The vertical bed will become good decision For small area. You can build it from scrap materials, for example, from boxes. But it is worth remembering that not all types garden crops suitable for growing in such a bed. Will fit the following types: strawberries, onions, lettuce, tomatoes, cucumbers.
From car tires
To do this you will need several rubber tires from car wheels. First you need to prepare them: clean them from dirt and paint them. Then soil with organic and mineral fertilizers is poured into the tire. The following types of crops are suitable for cultivation: parsley, dill, radish.

Green wall
If there is a fence or other building on your site, then to give it an attractive appearance you can try to build a so-called green wall. There is nothing complicated about this, you just need to attach the boxes to the fence or to the wall of the building, cover them with soil and plant the plants.
You can also go a more original route and use simple ones instead of boxes. plastic bottles. To do this, screw plastic bottles to the required surface, then cut a hole in the top of the bottle and fill it with soil. After this, you can plant the necessary crops.

Weaving arch
At your summer cottage, you can build an arch from weaving types of crops, for example, cucumbers. To do this, we need several boxes where we fill the soil and plant the cucumber seedlings. Then you need to build an arch from small pipes (if you are making an arch yourself, then you cannot do without the ability to work with welding). After the arch is ready, the boxes with seedlings must be placed at the bottom of the structure. As the cucumbers grow, they need to be tied up.

Spicy
A spice bed in a country house plays a special role, because the crops growing on it can be used as medicinal, seasonings for dishes, or simply playing the role of ornamental plants.
Attention ! It is best to place a spice bed in those areas of the site where sunlight predominates.
Spicy herbs will be ideal solution to create an original landscape design. Spicy crops do not require close care from the summer resident; they will also help protect the garden from various types of pests:
- lavender will help prevent the spread of aphids on rose flowers;
- a thyme border around the perimeter of the bed will prevent the spread of pests on vegetable crops;
- Yarrow will give carrots a sweeter, richer flavor.

Suitable plants
- Melissa;
- thyme;
- yarrow;
- sage;
- fennel.
Ornamental plants
- common basil;
- lemon balm;
- mint;
- parsley;
- medicinal rosemary;
- thyme;
- caraway;
- Salvia officinalis;
- coriander;
- fragrant onion.
Worth paying attention
When setting up a spice bed, it is worth taking into account that some types of crops (such as lemon balm or thyme) can grow to impressive sizes, thereby displacing other crops. For this reason, plant growth must be monitored and controlled very carefully.
Growth control is carried out as follows: plants must be trimmed in time, an area must be allocated for subsequent growth, or it must be limited by constructing sides of tiles or bricks. Thus, the area where it is planned to plant plants will be divided into squares, which are laid out in a checkerboard pattern using slabs or bricks. Crops are planted in free squares.
When planting greenery, you need to consider:
- when planting spicy and medicinal plants special attention must be paid to their environmental requirements;
- For a spicy and medicinal bed, you need to choose specific planting material.
If you follow these simple rules, and also use creative ideas, you can give your site a pleasant appearance.


")


