Chimney on the roof: installation and repair. Requirements for the outlet of the chimney through the roof and ceiling Do-it-yourself roof cutting of a thin-walled chimney
-
Private houses usually have independent system heating. Regardless of whether it is gas, wood, coal, pellet or complex, it requires a chimney that removes combustion products outside, most often through the roof. They present to the chimney special requirements both stove makers and roofers, since when installed correctly, it provides warmth to the home and, importantly, does it safely.
The smoke channel is built in accordance with the norms and regulations of construction and fire safety, standards determining the location of the smoke removal system. The passage of the chimney through the roof is regulated by SNiP 41-03-01-2003. It is usually performed:
- when building a new house;
- at major renovation or roof reconstruction;
- when replacing a heating source or changing it.
It must be fireproof and completely sealed.
How to choose the right location for the chimney on the roof
The best option, according to boilermakers and roofers, would be to install a smoke exhaust on the roof near the ridge.
- This makes it possible to ensure minimal accumulation of snow around the chimney pipe in winter and the absence of snow pockets near the ridge, that is, leakage in the junction area is eliminated.
- The height of the chimney above the roof at the same time, it is small, which leads to a decrease in the impact of external unfavorable external factors on its design.
- The low height of the chimney relative to the ridge creates favorable conditions for the formation of the smallest amount of condensation.
It should be taken into account that the lower the chimney pipe is located along the roof slope, the greater, according to building regulations, the height of the chimney above the roof should be.
If available common wall With multi-storey building, then the pipe is installed above the roof of the high-rise building.
It is better not to install passage units in the following places:
- next door to, since any gust of wind will blow into the attic carbon monoxide and smoke;
- valleys, the junction of two slopes that form internal corner, where it will be difficult to ensure a high-quality connection to the pipe, in addition, a huge snow pocket will form there.
The chimney cannot be rigidly fixed to the roof, since if the integrity of the roof is damaged, there is a danger of destruction chimney, accordingly, and fire.
How to remove a chimney: choosing a design

When constructing a passage through the roof, special elements are used ( chimney roof trim) with aprons made of copper, lead, stainless or galvanized steel, designed for different slope angles.
What determines the choice of passage unit design?
How to make a chimney in the roof depends on certain factors:
Flue pipe material. The main materials for their manufacture are fire brick, metal, ceramics or asbestos cement. For each of these materials, the passage design may have its own characteristics.
The determining condition for it is the combustion temperature of the fuel. For example, the use of firewood, coal or peat to fire stoves precludes the use of metal pipes.
External finishing of the chimney. Depending on whether the pipe is lined with brick or plastered, the design of the junction is completely different.
Type of roofing. It is recommended to build chimneys with a rectangular or square cross-section, since there are ready-made additional elements for them, which are used when connecting to the roof. They are usually bought as one set with roofing material.
Passage of a chimney pipe through a roofing pie
As is known, to protect against moisture from outside and water vapor coming from interior spaces, the thermal insulation layer is enclosed in two additional ones: vapor and waterproofing, and proper insulation requires the continuity of these layers. But on the other hand, according to building and fire safety standards, it is necessary to leave a certain distance (at least 13–25 cm) from the chimney to combustible materials, including vapor and waterproofing made of polymer films.

The solution to this problem is usually to create a separate box for the pipe to pass through the roof. The chimney junction area is separated from the rest of the roof:
- rafter legs - on the sides of the pipe,
- transverse beams fixed to the thickness of the rafters - below and above the pipe.
The distance from the chimney to the rafters is selected according to the requirements of the same SNiP.
The connection of vapor and waterproofing films to the installed box is usually carried out according to the standard method:
- the canvas is cut into an “envelope”;
- their edges bring them to cross beams or rafters and fixed with staples or nails;
- waterproofing film then the battens and counter-lattens are pressed with beams, and the vapor barrier is pressed against the base for laying the material for finishing the attic or attic space.
In order to maximally protect the insulation of the roofing pie from moisture, a hermetic seal is made at the place where they adjoin the walls of the box using a special tape or adhesive composition.
Waterproofing a chimney on the roof where the pipe meets the roofing

Despite the fact that the chimney passage assembly depends on various factors, say, pipe section or type of roofing material, however chimney waterproofing is carried out according to the general principle.
Sealing the chimney, ensuring the drainage of water from it, which flows down the walls of the pipe and the slope, is usually done using an apron. The upper part of the chimney apron is placed on the roof slope, leading into mandatory under roofing material. That is roofing sheet, located above, is laid on the apron with an overlap.

In the case of a modular steel chimney, a special chimney roof section is used to protect it from water. They may differ in the method of execution, material and angle of inclination.
Sealing chimney joints with various roofing materials.
The chimney can be protected from water when passing through ceramic and cement-sand tiles using elastic tape based on lead and aluminum. WITH reverse side an adhesive composition is applied to it.
- The lower longitudinal side of the tape is glued to the roof, the other to the pipe.
- Part of the tape glued to the chimney is pressed using a metal profile strip with curved profile and fix it either directly on the pipe, using heat-resistant dowels, or on a groove previously made in the pipe.
- The flange of the strip is sealed with roofing sealant, thereby completely eliminating the penetration of moisture under the tape.
Similar work can be done without self-adhesive tape, using traditional metal cutting.

The passage of the chimney through a soft roof is carried out in a similar way, only the elastic tape is replaced with a valley carpet or ordinary tiles are placed on the chimney.
They isolate using the same technology. In this case, the apron is mostly made of smooth sheets that match the color of the metal tile sheets.
The chimney through Ondulin is waterproofed using self-adhesive insulating tape Onduflesh.
If the chimney width is more than 80 cm, then from the side of the ridge a slope is created behind it - a small one gable roof, usually made from coating material. This element is designed to drain rainwater and snow from the upper section of the pipe. Although, if you consider that deviation can create problematic situations, it’s better to just make chimneys narrower. Among other things, a wide chimney is a definite obstacle to ventilation of a thermally insulated roof and requires installation on a slope before the chimney and after the ventilation elements (vent tiles, aerators, etc.).
Clamp
Multi-flanged clamp - designed for fastening chimney elements together, used to improve sealing at joints. Is mandatory element systems.
The man of different sexes tells us that he has different size shelves, so that the larger shelf is placed on the smaller section of the pipe - male, and the smaller shelf on the female. It is important not to confuse them, as otherwise the clamp will not perform its functions. You can check where the smaller and where the larger shelf is with a pen or pencil, hold the pencil horizontally, hang a clamp on it, in which direction the clamp tilts and where the smaller shelf leans. On a single-wall chimney collected by condensate, it is mounted with the smaller shelf up and the larger one down. For sandwiches, vice versa, the larger shelf is up, the smaller one is down.
The clamps are elastic and resistant to transverse bends, so you can easily install them on an already installed chimney.


Roof chimney trim – required condition its safe operation and guarantee of warmth and dryness in the house. Errors in venting a chimney through the roof usually lead to leaks, rot and destruction. wooden structures roof, and improper fastening of the pipe itself can cause a fire.
The sandwich chimney is brought out through the hole in the roof cut pipe, the gaps are treated with heat-resistant sealant with an operating temperature of up to 1000 degrees.
It is important to know that the upper edge of the roof trim apron must be placed under the overlying sheet of slate or metal.

When using a flexible cutting made of silicone or rubber, a hole is cut in the cap 1/5 smaller than its diameter. The cap of the roof cut is pulled over the pipe and the flexible apron is given the shape of a sheet. They are secured with self-tapping screws, having previously been coated with sealant. For a more durable fastening, it is sometimes necessary to strengthen the roof sheathing - this is done at the stage of cutting out a hole in it.

For soft roof, For example, bitumen shingles, two types of connection are used - closed and open. Basically, the first option is used quite rarely, since it is difficult to install and not entirely practical to use, therefore, we will talk about the second method. In this case, the chimneys are adjacent to the roof according to the same principle as metal tiles, i.e., using a roof apron and various sealants. Only the roof trim apron for the soft roof of a chimney is not made from metal material, but from a valley carpet, which is laid under bitumen shingles.

The essence of laying a soft roof apron is that the tiles completely merge with it, and there are no leaks at the joints of the roofing materials to the carpet. And, besides this, water should not go down into the attic through the fireplace/stove pipe, therefore, an inlet should be made into the roof trim from the carpet.
Various types of fixation are used bitumen mastics, although not all of them are good - after a while the material peels off, and then water will penetrate through the cracks. Based on practice, it can be noted that the same K-36 glue copes well with this task, which can last quite a long time without being afraid of temperature changes, moisture and ultraviolet radiation.
To pass a chimney through any structure, you can use a ready-made ceiling-passage device. The ceiling passage device is used both for passage through the ceiling and for passage through walls. It is selected based on the outer diameter of the pipe. Before installation, this device for passing through the ceiling must be prepared: all surfaces that will come into contact with the wood of the ceiling sheathing, and all internal surfaces of the passage box are laid out with thermal insulation, or already used ready-made solutions Polyurethane foam with mineralite, in which mineralite takes on the role of thermal insulation.

Usually basalt wool serves as thermal insulation, but it must be special: it can withstand high temperatures. When purchasing a material, make sure that it is designed for use at temperatures of 800-1000 o C. These materials have a higher cost, but it is unreasonable to skimp on safety. Cheaper options contain binders that, when high temperatures They sinter, which is why the thermal insulation loses all its properties, and this can lead to a fire. In addition, it is advisable to use foil heat insulator - this will make the structure even safer. It must be remembered that the distance from the chimney to a wall made of flammable material must be at least 500mm, to a wall made of non-combustible material 380mm.
Having insulated the passage device, prepare the place for its installation. Mark on the ceiling where the chimney will be located. Outline the hole suitable size: a little smaller sizes the front panel of the pass-through device in such a way that it is convenient to attach it to the ceiling trim with self-tapping screws. Having cut a hole, cover its edges with the same heat insulator as the pass-through unit, or any other with similar properties. To increase the level of fire safety, metal strips can be strengthened on top of the heat insulator. Insert the prepared passage device into the finished hole. It can be put on the pipe and installed with it. Having installed this structure in place, secure the panel pass-through node self-tapping screws (holes can be pre-drilled). For greater fire safety, fill the foam with thermal insulation, approximately halfway.


The height of the chimney relative to the roof ridge
If the pipe exits the roof at a distance of less than half a meter from the ridge, then the minimum height of the chimney above its level should be 50 cm. In such a place, less snow accumulates in winter, which reduces the risk of leaks when it melts in spring period and during thaws. Calculation of the height of the chimney relative to the ridge is based on the requirements of SNiP41-01-2003 and SP ( building regulations) 7.13130.2013, as well as on the recommendations of the heating device manufacturer.

If the roof has a flat structure, then the height of the chimney above the roof is at least 50 cm. On pitched roofs, if the chimney is located at a distance from the ridge to 1.5 m, its height must be at least 50 cm relative to the last or enclosing parapet. If the chimney is located within 1.5–3 meters from the ridge, then its height cannot be lower than it or the parapet. When the chimney is located more than 3 meters from the ridge line, its minimum height is determined by drawing a line at an angle of 10 degrees relative to the horizon.
Most stove makers will probably agree that the device chimney on the roof is one of the most difficult jobs. In addition to professionalism, performing this process requires: the ability to correctly calculate and determine the location for installing the pipe, understanding how it works roofing pie and knowledge of the basic requirements regulated by GOST and SNiP.
You will also need to ensure that the installation and fastening of the chimney pipe to the roof is done in such a way that it can withstand wind loads. This raises several important questions:
- How to bring a chimney through the roof?
- What should you consider when using a metal chimney?
- How is the roofing pie waterproofed and thermally insulated?
- Do SNiP and GOST regulate what height of the chimney above the roof is required?
- How to make a cut, and what materials can be used to line a chimney?
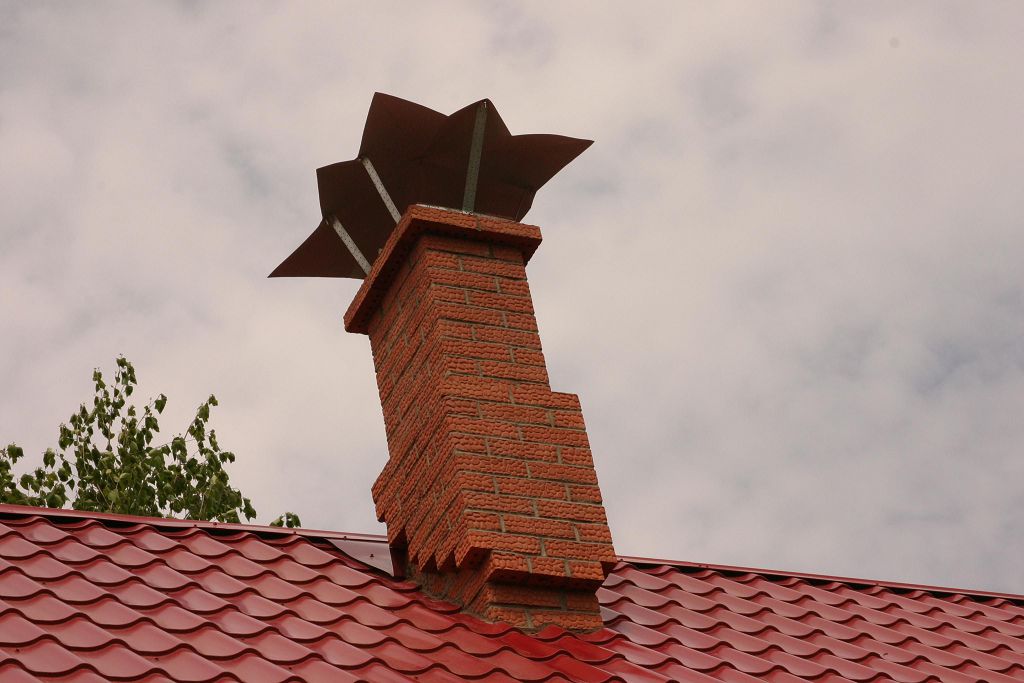
How to remove a brick chimney through the roof
In order for the work to be completed efficiently, and not have to redo your own mistakes, you need to follow a few simple recommendations:- Layout - even with a “spontaneous” repair, there should still be time when you should stop and think about: where exactly the stove will be located, how the smoke removal system will be installed. Where on the roof will the chimney go? The calculation will make it possible to calculate what height of the chimney above the roof will be sufficient to provide the necessary draft.
- Pipe location- exists general rule, how better pipe blown by the wind, the stronger the draft in the furnace. Following this, they try to place the chimney as close as possible to the center of the roof - to the ridge. The height above the ridge depends on how far the pipe is from it.
- Sealing and insulating a chimney on the roof– a single-layer metal chimney can become hot during intense combustion, the brick does not heat up so intensely, but still requires the use of thermal insulation in the area where the roofing pie passes. The outlet through the roof of the chimney must be carefully insulated so that moisture does not pass through the opening.


There are certain standards regulating what the gap between the chimney and the roof should be. According to SNiP, the distance to hot materials from the chimney should be at least 13-25 cm.
Passage of a metal stove pipe through the roof
Installation and installation of an iron chimney through the roof is a process that cannot be rushed. The master needs to understand the characteristics of each roof with which he will have to work. The essence of the work comes down to two important principles:- After installing the chimney, the integrity of the roof should not be lost; in other words, it is necessary to avoid a situation in which the roof will leak after the first rain. Often water runs straight down the installed chimney. At the same time, waterproofing a chimney on a slate roof is significantly different from how the same operation is performed on a metal tile or soft bitumen roof.
- A single-layer metal chimney gets very hot, so it is necessary to install a thermal insulation barrier or duct.


For chimneys made of different materials, there is a solution to this problem. Namely:
- Waterproofing a brick chimney - a special plate is used for it. For slate roof you will need to make a special pedestal around the chimney. A sealant plate is placed on top of it for sealing.
- Pipe box - used if the roof is made using a roofing pie. The fact is that violation of the integrity of the pie leads to the loss of waterproofing and thermal insulation properties. To avoid this, a special box is made. The structure surrounds the chimney around the perimeter and a special heat-insulating composition is poured into it.
- The roof pipe can be protected using a special insulating apron. The advantage of the apron is that it completely follows the curves of the roofing material and fits tightly, protecting against moisture. The apron is a rubber seal made of durable and resistant to temperature and atmospheric phenomena material.
- Installing a roof covering around a round chimney is the best solution. In this case, the material is laid according to a completely finished structure. This allows you to narrow the required opening. For a roof made of metal tiles or corrugated sheets, the hole for the chimney can be made larger than the diameter of the pipe by only 0.5-1 cm.
The cutting of the roof must be carried out taking into account the material from which it is made, as well as technical characteristics chimney.
What is the height of the chimney from the ridge
The presence of draft in the stove depends on the correctly calculated height of the chimney, fast warm-up pipes, and soot slowly settling on the back of the structure. These standards are strictly regulated by GOST and SNiP. In particular, the regulations specify the following requirements:- Installation of the chimney at a distance of up to 1.5 m from the ridge. The edge of the chimney should protrude at least 0.5 m above the top point of the roof.
- The distance of the pipe outlet is 1.5-3 m from the ridge - the optimal height would be above the roof so that the chimney is approximately level with the ridge.
- More than 3 meters from the ridge - the chimney should be 10 degrees below the ridge.

To increase traction, pipe heads are used. Head divides air flow, directing it in two directions (down and up the pipe), thus increasing the thrust by 15-20%. The distance from the stove pipe to the ridge is an important requirement related to the safe operation of stove equipment.


It is not possible to fix the chimney to the roof; its stability depends on fixing it below when passing through the attic. Typically, brackets are used for these purposes, with which a metal chimney is rigidly screwed to wooden beams and rafters.
How to seal a chimney on the roof
Bypassing the chimney and waterproofing it is carried out as follows:


In most cases, cutting the roof can be done using already ready-made structures, which can be purchased at any construction supermarket.
How to cut a chimney on the roof
 The connection between the pipe and the roof and its subsequent waterproofing can be done either independently or using ready-made structures. Each type of roofing material has its own way of performing this work.
 The roof to be maintained must be handled by a professional construction crew, the rest of the work can be done independently.
Practice has shown that penetration for a chimney through metal roofing from corrugated sheeting is best done using a lead apron placed on the roof cut. The advantage of this solution is that lead is soft and pliable, which allows it to completely follow the shape of the roofing material.
Framing the junction is done using a hammer. By lightly tapping, you can give the apron the desired shape. After this, the cutting is removed and generously coated with special silicone. Top part the apron is laid under a sheet of roofing material.
A soft roof around the chimney can also be installed using a similar structure or a special rubber insert.
You can solve the connection problem using other laying methods metal pipe, namely its side exit from the room.
 The device for connecting the chimney and the metal tile roof also consists of an apron, but in this case the apron is made not of lead, but of galvanized metal, painted in the color of the roof.
Most manufacturers of metal tiles also blow out structures for the chimney. The exit assembly through the roof made of ondulin is also sold ready-made. The apron of the product completely follows the curve of the wave of the material. After installation, the apron is covered with sheets and then insulated with self-adhesive tape.
Additionally, it is recommended to use following materials for cutting: 
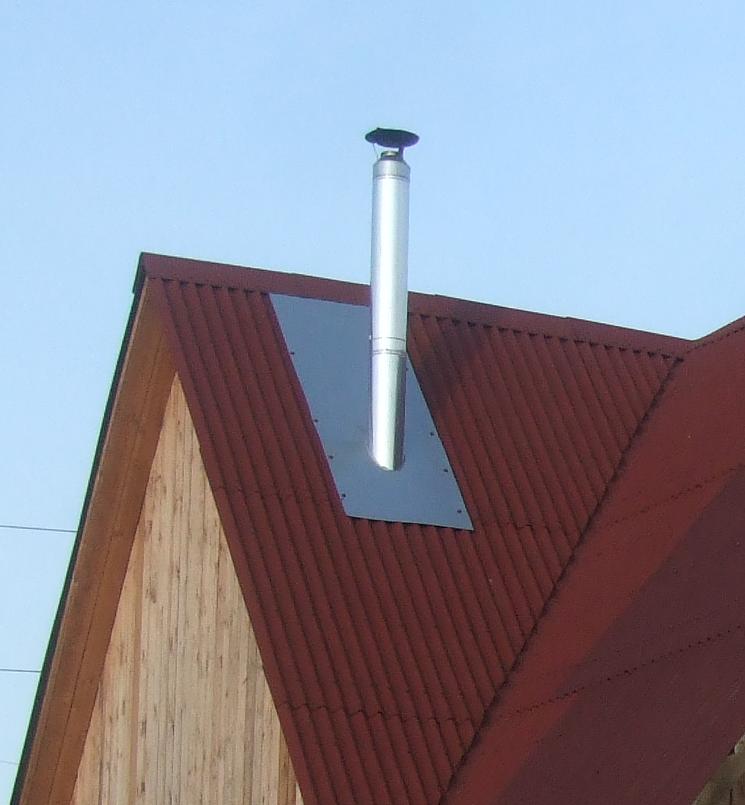
Easiest way to withdraw metal sandwich chimney of a circular cross-section chimney through the roof. The surface of the sandwich pipe practically does not heat up, and in the place where the floor and roof slabs pass, you will need to install a regular sleeve.
Roof chimney lining
Finishing the roof pipe can be done using facing bricks. The resulting design will resemble a classic chimney. The only requirement is to make a base for the chimney apron on a roof made of metal tiles or other material. It is best for such a structure to come from the very bottom, or in extreme cases, rest on the floor slab.The passage of the chimney through the ceiling plays a key role in how well, correctly and safely your solid fuel stove will operate. To create comfortable and safe conditions with your own hands, the ceiling cutting of the chimney must be done in accordance with all rules, regulations and requirements. An important role is played by how correctly the pipes and pipes of the furnace unit are selected. Also, in the process of working with your own hands or with the help of a master, a cutting unit will be installed. And the entire structure must be completely fireproof. Also during the installation process, we will pay special attention to the passage of the stove unit pipe through the ceiling.

Chimney passage through wooden floor must be carried out taking into account all safety requirements; ultimately, such a furnace unit will be completely fireproof.
In order to remove the chimney through the ceiling with your own hands, you will need to equip this area with a unit. Due to this element, you can make the distance between the pipe and the ceiling optimal and safe.
- If the chimney system is made of concrete or brick, the distance from it to the nearby sheathing or rafters must be at least 130 millimeters in total;
- If you prefer a ceramic chimney pipe for your stove unit, given distance will be about 250 millimeters, despite the fact that the inner surface of the pipe was not insulated. If the layer thermal insulation material present, the distance can also be reduced to 130 millimeters.

The chimney system is routed only through a pre-insulated ceiling

The easiest way to install and install steel and sandwich chimneys yourself

The space around the chimney pipe is insulated and properly sealed
Important: all information presented above is taken from official documentation. These values are standards and provide maximum level fire safety if you decide to install a pipe, a pipe assembly, or make a cut in the ceiling with your own hands.
When installing beams, it is also important to remember that one step will be about 600 millimeters (applies to insulated pipes).
The outlet type pipe has a diameter of about 115-120 millimeters, but if you plan to install a modern sandwich system, the diameter increases to 300-320 millimeters.
When installing a chimney for your furnace device with your own hands through the ceiling, you must maintain the same distances on each side of the pipe. Ideally, this parameter will be about 130-150 millimeters.
Before installing the beams, calculate the distance between them. To do this, you will need to multiply 130 by 2, and add 320 to the resulting numerical value. As a result, we get 580-600 millimeters between each of the beams. The value and similar calculations are carried out for pipes with a heat-insulating layer.
For pipes that do not have thermal insulation, calculations are made as follows: with a pipe diameter of 115 millimeters, it is recommended to maintain a gap of 250-300 millimeters. In this case, we multiply 250 by 2, and add 115 to the resulting numerical value and get a distance of 615 millimeters. This value will be a step, and will also allow you to better, more accurately navigate when installing pipes, creating nodes, dressings, and installing the pipe of your stove device when passing through the ceiling.
When performing installation yourself, it is important to take into account the distance between the ceiling and the surface of the chimney pipes:
- If there is a protected partition and if the thickness of the chimney system is about 120 millimeters, the distance will be approximately 250-270 mm. If the thickness of the pipe is 50 mm, then the distance will increase to 370-390 mm;
- If there is an unprotected partition, the distance, depending on the thickness of the pipe, will be 300-320 and 490-520 millimeters (for pipes with a thickness of 120 and 50 mm, respectively).
Important: the chimney passage through the ceiling must be at optimal distance from wall partitions. Since the temperature range in the chimney system can be more than 600 degrees, a pipe located near a wall in some cases can lead to a fire. In order to make the operation of your stove unit as safe as possible, the walls located near the chimney must be insulated and covered with metal sheets.
What types of nodes are there?
In order to protect the ceiling from overheating and fire as much as possible, a cutting or other angle, which can have a different appearance, is used to pass the chimney pipe through the ceiling.
The best option is a ready-made product that is most often used for industrial work. This option presented metal box, equipped with a galvanized plate fixed on one side. In the center, the product is equipped with a continuous opening into which pipes passing through the ceiling are inserted. The product also allows you to lay a thermal insulation layer, and on the room side the box has a decorative plate.

A steel plate is installed around the pipe to protect the material. ceiling from fire, melting

A diagram that allows you to do it yourself ceiling cutting for chimney
Interesting to know: professional stove makers insist on using a box made of of stainless steel, since the galvanized plate begins to melt a little when heated, as a result of which it begins to emit a large number of substances harmful to health.
In order to install this unit yourself, a hole of suitable shape and size is cut out in the ceiling. Next, the thermal insulation material is fixed (minerite, stone wool, asbestos). Don't forget to reinforce the structure with metal strips. Self-tapping screws are used to secure the unit. In order to carry out the installation, a special element is put on a straight section of the pipe, after which the structure is raised to the required height and secured on all sides with thermal insulation.
Interesting to know: appearance And design features knot or cutting may be different. It can be either a classic square design or rectangular, round, cylindrical or oval. The heat insulator itself is necessary to provide maximum protection to the ceiling.
If the cutting does not have a cylinder in its design, then it is additionally equipped with special sides, which are based on mineralite or metal.
Passing through floors
In order to correctly install a chimney system through the ceiling, it is necessary to take the following nuances as a basis:
- A simple metal uninsulated pipe, the length of which is about one meter, is attached to the outlet pipe of the furnace. Next, you can connect this section with an already insulated system;
- Where the chimney passes through the ceiling, the pipe is insulated on all sides with your own hands or initially purchased in this condition;
- It is prohibited for pipes to be joined to each other where they pass through the ceiling;
- The total length of one horizontal section is no more than 1 meter;
- You should not use more than 3 bends for one system;
- To connect pipes, use only flexible fastening elements, since when heated, the chimney is capable of sudden expansion, and after cooling, contraction.

Due to correctly carried out cutting, installation of a chimney pipe system is possible even in a wooden house
Choosing a heat insulator
The space between the beams and the chimney system must be filled with heat-insulating material. Basalt fiber can be used as a heat-insulating material. It tolerates temperatures well, not exceeding a range of 600 degrees. However, this fiber also has a number of disadvantages. First of all, when heated strongly, the material begins to release formaldehyde, which is harmful to health. Also, a large amount of condensate forms in the pipe, which is absorbed by the cotton wool and worsens the thermal insulation features.
Tip: as a better alternative basalt wool, you can use expanded clay, which has a small mass, consists of small elements, and when wet quickly returns to its original position.
More budget option insulation between the ceiling and the chimney is to use a clay solution diluted with water or a simple river sand. It is also not recommended to leave the space unfilled - this is not safe from a fire point of view.

A pipe with a protective metal screen is inserted into a hole of a suitable diameter

The hole for the chimney has dimensions allowing the installation of a pipe, protective screen and box
How to protect surfaces and materials from overheating:
- The chimney system is equipped with a water jacket. When warmed up, water can be discharged into the house and used for domestic needs;
- The chimney system can be supplemented with a simple hanging barrel, in which, after the water has become very hot, it is drained and replaced with cold water.
Cooling of the pipes is also carried out using an installed additional pipe, which must be covered and equipped with gratings in the upper and lower parts, ensuring good circulation and passage of air masses.
Carrying out cutting
If desired, the purchased structure can be replaced with a home-made one according to the following instructions:
- The hole is covered with a pre-cut element from a stainless steel sheet;
- We cut out a round passage in the center, the diameter of which is 12 millimeters larger than the pipe itself;
- we cut out an opening similar in shape and size in the ceiling;
- The passage is sealed at each edge with basalt fiber;
- For additional protection of the thermal insulation layer, it is covered with steel strips;
- During the assembly process, we attach the first elbow to the stove and complement the structure with a stainless steel sheet;
- This section of the system must be vertical. We secure the element to the attic;
- We fix a special plate and lay a layer of heat-insulating material in the space formed between it and the ceiling;
- We fix the plate with self-tapping screws;
- We insulate the passage.

High-quality insulation of the ceiling, with the installation and fastening of several steel sheets at once

It is important that the chimney is well insulated - this will not allow accumulation and formation of inner surface condensate

Insulation is carried out over the entire thickness of the ceiling
If you don’t know how to make a ceiling cut for a chimney with your own hands, we recommend watching the following video:
At correct installation corrugated sheeting on the roof of a house can be guaranteed to avoid leaks during rains and spring melting of snow. By this criterion one can judge the reliability of the roof. It should be remembered that any roof structure consists of many elements. The list includes valleys, front strips and ridge. However, based on practice, the most risky element in terms of leaks is the chimney.
Several decades ago, stove makers dealt with this problem by thickening brick chimney. However, such work requires certain knowledge and skills, and modern designs are increasingly being built from metal. Typically, chimneys are made with a round cross-section. It will help you figure out how to seal a pipe on a roof made of corrugated sheets simple instructions.
Causes of leaks
The roof, covered with a profiled sheet, must be equipped with several openings through which the chimney pipe and ventilation channels will be routed. As a result, the integrity of the waterproofing may be disrupted, which will increase the risk of leaks. It is quite difficult to solve this problem if the chimney had to be routed through an already constructed roof.
To ensure high-quality sealing of the areas where the pipe meets the corrugated sheet, you need to put in quite a lot of effort.

If the work is done poorly, many problems arise:
- Water begins to flow. This happens if the sealing of the joint between the chimney and the corrugated sheet is poorly equipped.
- The rafter system began to rot. After water gets inside the roofing pie, the wood from which most of the roof elements are made gets wet. As a result, the structure is deformed.
- The roofing material itself begins to rust. Corrugated sheeting is not very well protected from corrosion from below.
- Aging of thermal insulation. When insulation gets wet, its effectiveness is significantly reduced.
To increase the reliability of the roof, you need to choose the correct location for the chimney outlet and ventilation ducts. This will make sealing the pipes much easier.

Installation features
What needs to be done to ensure that there are no leaks at the points where the pipe joins the corrugated sheet? To do this, you need to properly seal the joints. Experienced installers note that when solving a problem, it is important to take into account the location of the chimney. The closer the chimney pipe is located to the ridge, the less water gets to its junction with the chimney. In this case, the risk of leaks is reduced.
In addition, the pipe installed as high as possible along the slope has the smallest section located in the cold air zone. This allows you to minimize the formation of condensation, which contributes to the growth of soot inside the chimney. In addition, if condensation constantly forms in the pipe, the walls of the pipe are exposed to acid, which corrodes the metal.

Should be considered separately different designs chimney pipes to figure out how to design their joint with the corrugated roofing.
Rectangular products
Today, more and more manufacturers are making sure that the joints of the roof and chimney pipes are reliably protected from water. For this purpose, special additional elements are being developed. They are installed near valleys, ridges, and pipes. Such elements are called aprons.

The main purpose of the apron is to collect water flowing down the chimney and roof slopes. With the help of such devices, moisture is diverted to the eaves into the drainage system. However, during the installation process it is important to consider one important point. You need to take care of proper waterproofing. As you know, it is mandatory to lay a waterproofing film under the corrugated sheeting. It doesn't matter whether the roof is insulated or not. Together with the junction of the pipe to roofing a cut is made for the installed chimney. The edges of the cut are left wide from 50 to 100 mm. In the future, they will be fixed directly to the chimney structure.
However, these are not all the points that need to be taken into account. At the joints it is necessary to create a reinforced layer of waterproofing. Therefore, quite often a special tape is installed under the apron. It must be placed under the apron strips located on top. The tape partially extends onto the corrugated sheet. The scheme of work when creating a waterproofing layer should be as follows:
- first the tape is applied to the lower edge of the chimney pipe;
- after this, the joints must be sealed on the sides of the pipe structure;
- At the final stage, the upper edge of the chimney is glued.

Situations often arise when it is necessary to run a stove pipe through an already created corrugated roof. This job can be done quite simply. However, one subtlety must be taken into account. It is necessary that the hole for the chimney in the roofing material be 1.5-2 cm smaller than the pipe itself. In this case, the chimney will not be able to fit through. But to do this, the edges of the corrugated sheeting are simply cut and bent.
After installing the chimney, they will fit tightly to it. This allows you to create additional protection for the joint from leaks. In this case, it is imperative to install the lower strip of the apron under the corrugated sheeting, and a waterproofing tape on top.

Pipe connection at the ridge
The easiest way to seal the joint between a pipe and a corrugated roof is if it is routed through a ridge. This increases the reliability of the connection. In such structures, the formation of snow pockets is impossible. The risk of leaks arises precisely when they are present. Such options also have one significant drawback - in order to pass the pipe through the top of the roof, it must be divided ridge element. This means that two additional posts need to be installed under the edges of the plots. You can seal the junction using an apron. However, it must have a certain configuration. This element is made from smooth metal sheets.
Attention! Often the space between the corrugated sheeting and the apron is filled with silicone-based sealant. Modern manufacturers offer consumers the use of self-adhesive tapes, which are made of butyl rubber.

The upper junction area between must be sealed standard method- using the upper elements of the apron, sealed on top with sealant. The silicone composition is not afraid of high temperatures.
Joint of pipe and corrugated sheet on the slope
Not in all cases, the layout of the building allows the chimney to be brought out through the roof ridge. Therefore, another path is chosen - to make a hole on the slope. In this case, the work on sealing the junction becomes significantly more complicated.
The main goal is to correctly install the top element of the apron. Therefore, the main rule is to install this element under corrugated sheeting.
Attention! If the upper side of the chimney structure is more than 80 cm wide, a shaped apron with a slope is installed on it. This design resembles a breakwater that diverts water in different directions from the chimney.

Installation of such an apron is associated with certain difficulties. In addition, at the junction of its elements and corrugated sheeting, two valleys are obtained. They need to be sealed in the same way as valley roofs. This requires the installation of additional strips and increased waterproofing.
Round pipe
Many chimney structures for stoves are equipped with round channels made of metal sheet. Such products are multi-layered and are additionally insulated. Such a pipe is sealed in many ways. It’s worth looking at the most popular ones:

When there is residential space under the roof of a house attic room, the passage for the pipe must not only be sealed, but also thoroughly insulated. The gap formed between the apron and the pipe must be closed using a special heat-resistant gasket. It is attached to the plane of the product.
As you can see, you can install the joint between a corrugated roof and a chimney yourself, knowing the installation features various designs. In the process of work, it is important to follow technology. This will ensure sealing of the junction.
How to make a passage in corrugated sheets without disturbing the rafter system
If the insulated roofing pie has already been completed, there will be many problems with passing the chimney through it. The main difficulty is compliance with fire safety requirements. At the same time, it is necessary to maintain the integrity of the vapor and waterproofing.
The chimney structure should be located at some distance from wooden rafters. Therefore, the passage of the pipe through the corrugated roof is created in a special box, which consists of rafters located next to the chimney duct. Two beams are fixed between them. They are placed above and below the chimney structure. From the cross beams and rafter legs to the chimney structure is selected in accordance with fire safety standards. This figure ranges from 130 to 250 mm. It depends on the material from which the chimney structure is made.

The inside of the box must be filled with insulation with non-flammable properties. usually used material high density made using basalt fiber. It has low hygroscopicity compared to conventional insulation.
To ensure the tightness of the roof, it is necessary to cut through the corrugated sheeting with an envelope for hydro- and vapor barrier in the place where the pipe passes. Its edges should be secured to the outside of the wooden box.
To cut corrugated sheeting for a pipe in the place where it will be laid, you should create continuous sheathing. Thanks to this, it will be possible to firmly secure the lower junction strip and the roofing material near the walls of the chimney structure.

conclusions
The choice of method of sealing the joint between the pipe and the corrugated sheet depends on the shape of the chimney and the features roofing structure. You can create a reliable connection using an apron (for rectangular designs) and additional elements (for round-section products).
Choosing the location of the chimney outlet also has great importance. The lower the pipe is located on the slope, the more water accumulates at the joints. This increases the risk of leaks. The best option location of the chimney opening - at the ridge of the roof or close to it.
By following the technology of sealing the junction of the pipe and corrugated sheeting for certain chimneys, you can reliably protect the roof from leaks. It is especially important to do this if you have an insulated veranda.

")


