How to disassemble the eyelid split system internal block. How to disassemble a split system. Eliminate unpleasant odor from the air conditioner. Do-it-yourself dismantling of the split system: sequence of actions
Dismantle household climate control equipment as responsible as installing it. Especially if you plan to use it further, for example, when moving to another place of residence. Let's consider the basic rules on how to dismantle an air conditioner yourself without losing its effective performance.
Set of tools
It is strongly recommended to trust professional installers to disassemble, as well as install the air conditioner. This largely guarantees a high-quality installation procedure, without unpleasant consequences in both cases. But if there is no money for an expensive service, with certain skills, it is possible to disassemble it yourself.
The main point when dismantling a split system is careful, consistent adherence to the basic rules that will preserve the functioning of the equipment. In many ways, special tools will be useful here to help you disassemble with the least effort and with better quality. These include:
- pipe cutter
- side cutter
- construction knife
- Phillips screwdriver
- integral screwdriver
- hex socket wrenches
- open-end wrenches
- adjustable wrenches
- drill, screwdriver
A set of these tools is a must because not many standard mounting tools are useful. Using the latter, it is likely to cause irreparable damage to the system, after which it will have to be replaced.
How to properly dismantle an air conditioner? Safety regulations
There are certain rules and conditions that must be observed in order to protect health and equipment from breakdowns and malfunctions. Let's list them:
- depressurization of the cooling circuit must not be allowed. It operates under a pressure of 15 A. If there is a sudden leak, there is a high probability of falling under a stream of very low temperature gas;
- you can get frostbite from a stream of cold freon if it leaks;
- When disassembling, it is necessary to avoid the entry of dust and moisture into the circuit, which have a destructive effect on the system;
- during transportation external unit containing freon, an explosion may occur;
- during transportation, it is necessary to carefully handle the remaining sections of pipes, since their damage will lead to the replacement of the entire unit;
- It is forbidden to unscrew from the fittings union nuts;
- Care must be taken to handle the latches of the indoor unit so as not to break them.
Transportation of freon
When dismantling the outdoor module, the primary task is to “pack” the freon. It is necessary to carry out this procedure efficiently so as not to subsequently waste time and money on refilling the air conditioner. You should pay attention to the accuracy and precision of pumping the refrigerant.

It is possible to reproduce using a pressure manifold or without it. This device will be able to indicate when a vacuum has been reached in the cooling circuit. It is in this case that the second valve should be closed to “pack” the freon inside the condenser.
- connect the pressure gauge manifold to the nipple on the fitting instead of the pipe with the liquid of the cooling circuit (it is thinner compared to the second one, through which gas freon passes);
- if the device is missing, you need to start from the next point;
- put the split system in cooling mode, determining the lowest temperature that the equipment is capable of technical specifications(must be found in the operating instructions). This way the block works for at least 10 minutes;
- close the valve of the liquid pipe (thinner. Closed with a hex key under a protective cap);
- On the manifold, follow the arrow until it reaches the vacuum level. If there is no pressure gauge, you need to mark 1 minute on the clock;
- after the time has elapsed/the desired indicator has been reached on the device, close the valve of the gas pipe with a hex key;
- turn off the air conditioner;
- Put the protective caps back.
The difficult task of transferring refrigerant can become more difficult during the cold season, when the air conditioner cannot be turned on. The compressor oil thickens and its smooth operation is impossible. If the equipment is equipped with a “winter kit” that allows the equipment to operate for cooling even at sub-zero temperatures, the problem is easily solved by starting heating devices located in the compressor crankcase and drainage. After 10 minutes of warming up, you can start the climate system for cooling and pump freon, following the recommendations described above.

If there is no winter heating system, you can use a pressure gauge station to collect the refrigerant. It is connected according to the same principle as the collector. Freon is transported there for transportation.
Dismantling the external unit. Can I do it myself?
After “packing” the coolant, you can begin to remove the outdoor module from its mountings. How to dismantle an air conditioner with your own hands:
- disable outdoor unit from the mains;
- if further use of the pipes is planned, they are unscrewed. Open fittings must be reliably protected from dust and moisture. In cases where reuse is not expected, copper pipes cut off, leaving 15-20 cm of each branch from the fastenings. The ends are sealed with a vice to remove moisture and debris;
- when it is known that the air conditioner will not be used for a long time, it is recommended to fill the remaining pipes with nitrogen, thereby displacing the air and plugging it. This will prevent the oxidative reaction of the metal with atmospheric oxygen;
- remove thermal insulation from the freon circuit;
- disconnect the outdoor unit from the electrical cable by removing the pre-marked terminals;
- remove the nuts holding the module to the brackets and remove the module. It is recommended to do it together with an assistant, because the block is heavy and there is a high probability of dropping it;
- place in a special box with polystyrene foam or other filler to avoid mechanical damage to the housing and pipe bends;
- transport and store only in an upright position.

How to dismantle the indoor unit of a split system?
The indoor unit of the air conditioner is removed from its mountings only after dismantling the outdoor unit. Here you also need to be careful, especially with the clamps of the evaporator and the equipment itself. If these elements are damaged, subsequently re- installed block will vibrate during operation, which will cause it to break.
How to dismantle the air conditioner yourself:
- remove the front panel so that you can get to the latches;
- disconnect the cooling circuit pipe;
- turn off the power supply;
- remove the evaporator (carefully unclip the latches closed with the lid)
- release the latches of the indoor unit and remove it from the guides;
- dismantle the plate on which it was mounted indoor unit;
- remove the cooling circuit pipeline from the wall grooves;
- remove the drainage pipe;
- dismantle decorative box.

Consequences of improper dismantling
Here are some unpleasant consequences careless dismantling of the split system:
- depressurization of the cooling circuit, resulting in freon leakage. When installing equipment again, you will have to pay to refill the system with coolant;
- mechanical damage to the external unit housing, outdoor module, any parts, freon pipes, especially if they lead to depressurization of the circuit;
- clogging of the cooling circuit with dust, debris, moisture ingress. Dust will invariably affect the operation of the compressor; it will soon have to be replaced due to a malfunction. Moisture is dangerous because it will oxidize inner surface copper freon route, the metal will begin to corrode, which will render the system completely inoperable;
- falling of the outdoor module from a height. It does not matter how high it was fixed - a fall in any case will lead to its complete replacement.
The video will tell you how to properly dismantle the split system
When changing residence, they often carry an air conditioner with them; after all, the equipment is expensive. To do this without loss, it is strongly recommended to contact professional installers who will do everything correctly and with high quality. If you plan to disassemble the air conditioner on your own, you must strictly follow the dismantling rules, and do everything as carefully, clearly, and harmoniously as possible.
Friends! More interesting materials:
 Air conditioning
Dismantling this household system is carried out for subsequent repairs or when moving, many users solve the problem simply - call the specialists from service center. A thrifty owner who has the skills and desire can save money and do everything himself, and we will tell you how to remove the air conditioner correctly, while avoiding mistakes and negative nuances.
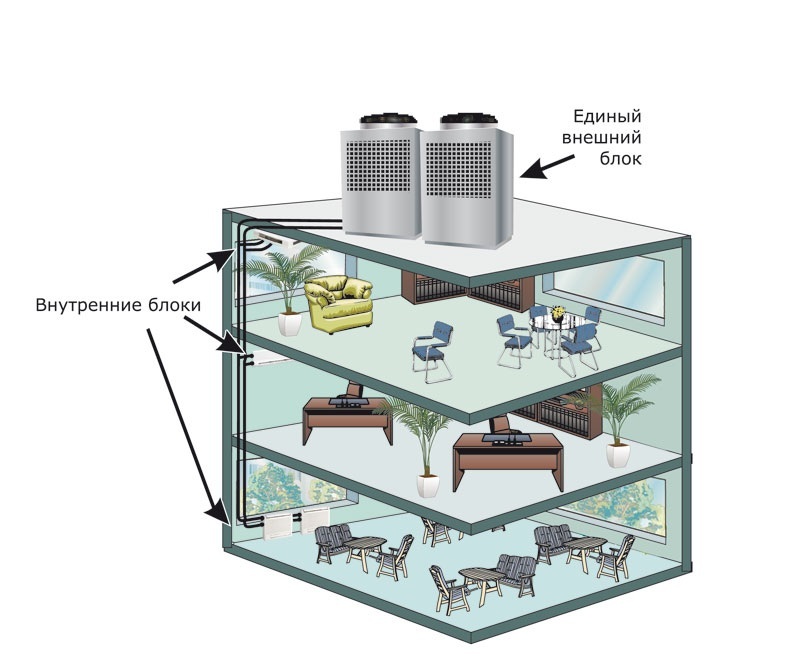
Any modern split system, which includes a household air conditioner, consists of blocks for indoor and outdoor locations. They are connected by two lines through which the refrigerant moves. Circulates through a tube of smaller diameter freon in liquid state from the indoor unit to the outdoor unit, the same thing runs through a thicker copper tube in the opposite direction, but in a gaseous state.
This is where problems lie that can ruin everything you do when trying to remove the air conditioner yourself.
- As a result of improper shutdown of main pipelines, partial or complete loss of freon.
- Air containing moisture can get into the tubes and heat exchanger, which can cause damage when the air conditioner operates in a new place - incompressible moisture enters the compressor and disables it.
- Hitting copper tubes small particles when pulled through the wall or during improper transportation leads to rapid breakdown of the system.
- Particular attention should be paid to the threaded bends soldered to the tubes; if they are damaged, very expensive repairs will be required.
- Incorrectly disconnected wires. If you do not put special marks on the terminals, it may lead to incorrect connection at the new location.
- Cutting it too short drainage tube , which discharges condensate outside the outdoor unit, you doom yourself to its premature complete replacement.
- When transporting a product to a new location, there is a risk of losing small fasteners and parts if they are not securely fastened after disassembly.
All of the above cases lead to very expensive repairs of the entire system, so before you start dismantling the air conditioner yourself, read the instructions.
Preparation
Before dismantling the split system with your own hands, you need to prepare a tool, not a simple one from your home arsenal, but a purely professional one, as shown in the photo:

Many users do not take seriously the advice of professional craftsmen on how to properly dismantle any split systems. As a result, the shutdown is carried out with numerous violations: they dismantle the product without pumping freon into the air conditioner, and it leaks, which will not be as easy to replenish as many people think.
Refilling the entire system with refrigerant will result in serious financial costs:
- first, the master will check the integrity of all pipelines - 600 rubles;
- refilling an air conditioner with a power of up to 4.5 kW - up to 3 thousand rubles;
- the same actions with equipment power up to 7 kW - up to 3.5 thousand rubles.
At the bare minimum for household air conditioners, this operation will cost you at least 4 thousand rubles, depending on the refrigerant used.
Freon release
There are three ways to dismantle the air conditioner yourself:
- disassembly with freon release;
- keep the gas inside the air conditioner approximately or “by eye”;
- completely save freon with the help of professional equipment using a special technique.
The third option gives best effect without any loss, but many users use all methods. Experts advise completely preserving the refrigerant so that there are no problems when installing dismantled equipment in a new location.
To properly dismantle the air conditioner, you need to know the design of the split system, which consists of a closed circuit filled with freon. The main components are a compressor, an evaporator with a condenser and a system of copper pipes that connects the entire structure and ensures the supply and removal of refrigerant.

This is what the schematic diagram of a modern air conditioner or any split system looks like:
To turn off the air conditioner yourself without losing freon, you need to pump it into the condenser; to do this, when the equipment is operating in cooling mode, you should close the valve between the product and the thin-diameter tube. When all the refrigerant is pumped into the condenser within a minute - that’s exactly how long it will take to completely pump gas into the condenser, you need to shut off thick tube valve, turning off the freon supply, and “close” it in an improvised trap.
Dismantling
Before dismantling the external unit, you must disconnect copper tubes, but in practice they are not reused, since their extension is strictly prohibited. It is necessary to cut them at a distance of about 200 mm from the fitting and caulk the sections for complete sealing.

Attention! When storing the product disassembled for a long time, the tubes are filled with nitrogen and ensure tightness to prevent oxidation of the inner surface.
Outdoor unit
The instructions say: after working with copper tubes, you must remove thermal insulation As a rule, all masters work together, one indoors and the other outside. Thus, dismantling is carried out faster: the partner has turned off the power and now you can disconnect the wires at the place of their connection, first marking the terminals.
The tubes are straightened manually so that they pass through the holes in the wall without interference, and the end of the cable is screwed to them to remove it into the room.

After this, we unscrew the nuts that hold the outdoor unit on special brackets, together with an assistant, carefully remove the unit and move it inside the apartment. Lastly, the brackets are removed from the wall of the building.
Important! During transportation and storage, the dismantled outdoor unit is positioned only vertically to avoid mechanical damage from shaking - it is inserted into a box with foam at the bottom.
Compressor
Sometimes only the outdoor unit is dismantled, for example, if only the compressor needs to be repaired, and the indoor unit of the air conditioner remains in place. During similar operations, the internal block of the split system is also not touched.
The main condition is to properly dismantle the compressor:
- remove the cover from the outdoor unit;
- then disconnect suction and discharge tubes;
- all electrical wiring is turned off;
- the fasteners of the condenser and fan are unscrewed;
- remove the capacitor from the block housing;
- access to the compressor is open - remove the fastenings and dismantle it.
With such actions, the risk of causing damage to pipelines is eliminated and there is a real opportunity to repair other elements located in the casing of the outdoor unit, if necessary.
Indoor unit
Dismantling the internal unit of an air conditioner has its own very specific nuances, without knowledge of which all your efforts will be useless, and in some cases careless actions can lead to breakage of rather delicate fasteners, for example, evaporator latches or clamps holding the unit on the guides.
To understand how to remove an air conditioner from a wall, you need to study the instruction manual, which contains the section you are interested in. Many users will not be able to do this operation and will have to turn to professionals.
Remove the indoor unit the air conditioning system will only work after removing the front panel, then you also need to disconnect all the electrical wiring, freon inlet and outlet pipes. You need to disassemble the tangle of wires carefully and without fuss. But this is not all the testing - manufacturers have reliably blocked access to evaporator latches

ensure that dismantling is carried out only by specially trained people.
Access is closed by a lid, the latches of which are pressed quite tightly to the wall - you can get to them using two screwdrivers with a very thin tip. Your partner must hold the entire block during this labor-intensive process. After removing the evaporator, you can unscrew mounting plate
The disconnected wires are carefully twisted and placed in a separate box for transportation. To help home craftsmen, there is a video on how to dismantle an air conditioner on your own, without turning to specialists:
Dismantling in winter
Many users are interested in the question: how to remove a split system in winter period when due to low temperature it is impossible to pump refrigerant into the condenser. The oil in the compressor will thicken, and all attempts to turn it on can end very badly.
If you have a special model equipped with a kit where there is heating of the compressor crankcase and the entire line drainage system, as well as a block that slows down the rotation of the fan, then your intentions will be crowned with success. If it is not available, you can use a special refrigerant collection station, which is connected in the same way as a pressure manifold.

Several Yet practical advice: You can start dismantling yourself only when you are completely confident in your own capabilities and have a qualified partner. Also availability special tool makes the work much easier.
The air system has a distributed circuit for transporting refrigerant between the outdoor and indoor units. Such a device has many advantages, except for one thing - dismantling the system is much more difficult than dismantling a monoblock. And often ignorance of how to remove the air conditioner leads to its failure.
How to properly remove an air conditioner
There are three mandatory conditions to remove the air conditioner yourself:
- The outdoor unit must be within reach. If he stands on the facade apartment building above the level of the second floor, then it can only be dismantled from a window or from a balcony. Otherwise, you need to involve industrial mountaineering specialists.
- To remove heavy blocks from the wall and properly turn off the compressor, you need at least one assistant.
- It is necessary to rent a pressure gauge station specifically for the type of freon that is pumped into this air conditioner model.
Note. The last point concerns stations with conventional (arrow) pressure gauges. Digital manifolds are customized to the refrigerant brand.
Precautions
If the air conditioner is out of order and cannot be repaired, then it is easy to remove it - there is no need to save freon, the tightness of the compressor, condenser and evaporator is not important.
You cannot do this with a working air conditioner. And in this case, the main thing is that dust and even air do not get inside the system. Otherwise, we can talk about guaranteed compressor output after installation and start-up of the air conditioner in a new location. Reason - device feature vacuum pump.
Freon is extremely fluid, and the temperature difference at the inlet and outlet reaches several tens of degrees. No seals or rings used in conventional pumps and compressors will not withstand such operating conditions. The required tightness is achieved through extremely precise adjustment of the surface of the moving elements of the pump to the internal geometry of the chambers. The slightest scratch from a solid particle leads to compressor failure. And such a particle could be a grain of ice formed when moisture in the air trapped inside freezes.
That is why new air conditioners are sold filled with inert gas, which is pumped out with a vacuum pump before pumping in freon.
When removing the air conditioner yourself, the freon must be pumped out and the units disconnected. This must be done so that dust and air do not get inside the system. That is, create a vacuum there. And it is advisable to save all the freon (or most of it) so that it would be easier to get the system into working condition in a new place.
Preparation
To properly remove the air conditioner, the only professional equipment you need is a pressure gauge station, which can be rented.
Every home craftsman has the remaining tools:
- a set of wrenches and hex keys;
- screwdrivers;
- pipe cutter or side cutters;
- hand bench vise;
- pliers.
Freon release
There are two ways to dismantle a working air conditioner:
- Using a pressure gauge station to collect freon in an external unit.
- Using a freon pumping and collection station connected to a special two-valve cylinder. The station has its own pressure gauge manifold and a compressor for pumping out refrigerant in liquid or gaseous state.
The first method is more “affordable”, but it can only be used when starting the air conditioner - freon is transported using a standard compressor.
The second method is universal. It can be used even in winter, when the air conditioner cannot be turned on due to low outside temperatures. The advantage of this method is that the external unit will be evacuated - without freon in the condenser. Which is much safer when transporting to a new place. But renting such a station and a cylinder will cost more than a regular pressure gauge manifold.
Freon collection in the external unit
On the side of the outdoor unit body there are two fittings from which tubes extend:
- thin - for transporting liquid freon from the condenser to the evaporator;
- thick - for pumping freon gas into the condenser.
Both fittings have shut-off valve heads under the caps. An outlet with a nipple extends from the gas head.
Freon is collected in the condenser in the following order:
- Remove the protective covers from the fittings and nipples.
- The manifold is connected to the nipple.
- Turn on the air conditioner to maximum cold.
- After a few minutes, close the valve of the liquid fitting, stopping the supply of freon to the evaporator.
- The pressure is monitored using a pressure gauge.
- When the arrow shows “-1 MPa”, tighten the gas fitting valve with a hexagon and immediately turn off the air conditioner (for which an assistant is needed) - during prolonged idle mode, the compressor pump may fail.
The pressure gauge reading “-1 MPa” means that all the freon is in the condenser, and there is a technical vacuum inside the evaporator, in the tubes and in the compressor.
After this, you can separate the blocks.
Dismantling the air conditioner step by step
Disassembly while maintaining the functionality of the dismantled air conditioner is as follows:
- sealing of pipeline fittings;
- disconnecting and dismantling the external unit from the facade;
- dismantling the indoor unit in the apartment.
Below are instructions for dismantling a wall-mounted air conditioner.
Outdoor unit
To remove the outdoor unit of the air conditioner, first disconnect the tubes.

There are two ways:
- Unscrew the union nuts that press the flared edges of the tubes to the flanges of the fittings of the outdoor unit. And in place of the nuts, pre-prepared caps are screwed on. The advantage is that the tubes remain intact. The disadvantage is that there is a high risk of air getting into the compressor.
- Side cutters are used to cut copper tubes (about 15 cm from the fitting). The edges are folded and clamped (caulked) using a vice. The disadvantage is that new tubes must be installed in a new location. The advantage is that the operation is quick and the likelihood of dust getting inside with air is much lower.
Note. The other cut edge of the tube must also be caulked to protect the evaporator of the indoor unit.
The next step is to disconnect the cables (signal and power), remove the fastenings of the unit to the frame on external wall and lift him into the room.
Compressor
One of the situations when it is necessary to remove the outdoor unit may be to replace the air conditioning compressor. And in this case, the dismantling algorithm is slightly different. The differences are as follows:
- Freon must be completely removed from the system. The right way- collect it in a cylinder using a freon pumping station. Incorrect, but simple - release it into the atmosphere (if the compressor is replaced in the warm season and the air temperature is higher than the boiling point of freon at normal pressure).
- There is no need to caulk the tubes - after installing a new compressor, the system is “pumped out” with an external vacuum pump.
It is impossible for a non-specialist to replace the air conditioning compressor on his own. In addition to the vacuum pump and pressure gauge station, it is necessary to have gas burner to disconnect the suction and exhaust pipes of the old compressor from the system, and then solder the new unit to the system. And even if you rent equipment, you need to have the skills to handle it.
You can remove the unit yourself, but it is better to invite a professional to replace the compressor.
Indoor unit
Most household split systems have a wall-mounted indoor unit (although there are other placement options). But except duct air conditioner, other types are dismantled according to the general principle.

To remove the inner wall block, proceed as follows:
- remove the housing cover;
- disconnect cables and wires;
- cut and caulk the copper tubes that go to the evaporator of the indoor unit;
- trimmed drainage pipe, drain the condensate;
- “snap off” the latches securing the housing to the mounting plate;
- remove the block and unscrew the plate from the wall.
Dismantling in winter
The air conditioner can also operate in winter time. And not only as a heater, but also in cooling mode (for example, in rooms where servers are located).
Note. It is possible to collect freon in the condenser of the outdoor unit only when operating in cooling mode - in heating mode it already works as an evaporator.
The peculiarity of working in winter in this mode is that there is a lower temperature limit, which is influenced by the type of refrigerant, type of air conditioner and additional equipment. This dependence is also related to the design features of the compressor - it is oil-based, and the oil thickens when low temperatures. For conventional air conditioners, the lower operating temperature ranges from +5°C to -5°C, for inverter air conditioners - up to minus 15-25°C.
Before dismantling the split system, these nuances must be taken into account. And if the temperature is below the specified limit, and the air conditioner is not equipped with a “winter kit” with heated compressor crankcase, then to remove the outdoor unit you must use a freon pumping and collection station (it has an oil-free compressor).
Sooner or later any user household air conditioner is faced with an unpleasant problem - after turning on the split system, a cool breeze bursts out of the blowout hole, filled with the sweetish smell of stagnant mold.
This only means one thing - it’s time to carry out maintenance on your split, or rather, wash it thoroughly.
Here you can do two things - call a specialist and part with a certain amount of money, or rely on own strength and disassemble the air conditioner yourself.
This guide is for disassembling the indoor unit of a split system (using the example Toshiba RAS-07EKH) will also help those who are faced with the problem of an air conditioner breakdown and want to fix it on their own.
And the last thing - the disassembly algorithm is standard, and is suitable for most modern split systems.
What you will need
Yes, in general, a little. Several positive and negative screwdrivers of different diameters and (for some models) a set of hexagonal stars.

If you have stocked up on such a simple arsenal, it’s time to get started!
And in order to completely dispel the last doubts, I would like to clarify that during all the operations described below, the internal unit of the split system is not removed from the wall, copper route does not disconnect, freon does not drain.
Let's start cleaning the air conditioner!
Disassembly process
First of all, turn off the power to the air conditioner and remove the protective filters of the indoor unit. This process is described in detail in the manual for any split.
Now you need to remove the front panel. Unscrew the two bolts under the protective plugs,

and pull the frame towards you (two latches hold it on top).
The inside of the lid is covered in dust and mold; it belongs in the sink.

Now remove the direction blade air flow. To do this, you need to apply a little force and remove it from the grooves.

We get this picture.


Now disconnect all electrical wiring, remembering to write down the location of the wires.

If you are too lazy to write, and your knowledge of radio engineering is worthy of respect, you can use electrical diagram, located on inside front cover.

Be sure to disconnect the ground wires before removing the card from the socket.

Now we press out the fastening brackets,

and remove the electronic unit housing along with the transformer.

Press out the three support latches and carefully remove the drain along with the outlet hose.

Look at those ugly brown spots.

The exhaust hole of the indoor unit, as well as the fan blades, are also covered with a disgusting coating that emits a stench.

But let's continue
Unscrew the motor support bolt,

very carefully lift the radiator and remove the motor mount,

after which we remove the blade along with the engine from the cell.

We carefully put the radiator back so that it does not fall.

Removing the thermal lock of the motor pulley mounting bolt is not easy.

To avoid burning the energy-transmitting rubber element, use a thin soldering iron to carefully heat the head of the bolt, periodically trying to unscrew it. I succeeded on the third try.
When the blade is separated from the motor, all dirty elements should go to the wash.

A bottle of Feri, a long-bristled brush, and a powerful stream from the shower hose will help you get rid of those pesky molds.
Reassemble in reverse order.
Conclusion
As you can see, the design of the indoor unit of a household split system is quite simple, if not primitive.
So if your hands grow out of the right place, and your wallet is not bursting with an abundance of unnecessary junk, it is quite possible to service your favorite air conditioner on your own...
how to open the air conditioner to get to the fan I found the bottom 2 screws, what needs to be done to open
Vadim Unscrew two or three screws under the horizontal blind.
Then carefully move the bottom of the body aside. Try to ensure that the blinds fit through the slot. There are three hooks on top that will unhook themselves. After removing the case, carefully remove the thermal resistor from the slot.
Then, on the left side, unscrew one screw holding the drainage tray, carefully slide it off the hooks and let it hang on the drainage hose.
The fan will be freely accessible.
Be careful when assembling. Don't break the hooks.
Nikita hits the floor with all his might
Victoria Download the instructions for it - there is a breakdown in pictures. At least that's how it works on my HITACHI.
Yuri It is removed from the case. very tight.
Tags: How to remove the cover of the indoor unit of a Samsung air conditioner
Disassembling and cleaning the indoor unit of the Panasonic P.S. split system. Don't forget to lubricate the impeller bearing...
24 Nov 2013 - 29 min. - Added by user Split-infoDisassembling the internal unit of a split system. ... Dismantling the indoor and outdoor air conditioner units. - Duration: 8:39. Cool Van 89,139...


Service maintenance of the indoor unit of the air conditioner...
Hi all! At the request of my friends and accomplices in general, I want to write a post about the service of air conditioners, because this is already relevant at the moment (I hope the moderators will be understanding)! The fact is that consumers are often misled by offering them service maintenance air conditioning every year!!! There is no need to do this, because everything depends on the degree of pollution of the room where the air conditioner is located!How to understand that cleaning is already inevitable? Let's take a look at the process of cleaning the indoor unit, perhaps you can perform this operation yourself:
So we have a regular internal block:

Below, so as not to stain the repair, we glue the film onto ordinary masking tape:

Open the lid, remove the mesh filters and rinse them under running water (this can be done at any frequency, but at least once every 2 months!)

Now let's remove it completely top part housing, together with the lid...

We unfasten the bathtub (through it the condensate gets out into the street)...

and then enjoy the terrible spectacle! Here we can already understand what we breathe including a clogged air conditioner...

So we got to the main point that I wanted to tell you about! WITHOUT DISASSEMBLYING THE AIR CONDITIONER, you can see the degree of contamination and draw your own conclusion... is it necessary to clean it?
Please note... The fan impeller we need to clean!!!

We remove the impeller (if possible), wash it with a stream of water and a brush, and clean the radiator using a steam generator... VOILA:

Then we proceed to assembling the indoor unit, in reverse order! But those same mesh filters...

Fasten the lid, put the meshes...

Close the lid of the indoor unit...

We turn on the remote control to 22-25 degrees (don’t turn it on minimum... never in the heat, not a single air conditioner will give you 16-17 degrees!!! You’ll stupidly ruin it!) and enjoy the coolness!

...I'll tell you about the outdoor unit later! I would like to inform you that I have been involved in air conditioning and ventilation since 2000 and am ready to help with advice and business in this area!!! So ask away! I’ll answer later, in the evening I’ll answer everyone, because there’s a lot of work right now... I’m running away) Have a good day everyone!
How to properly remove an air conditioner from a wall with your own hands
disassembled indoor unit. How to remove the air conditioning compressor and the outdoor unit itself with your own hands... Remove the protective cover from the housing; ...
")


